Europa Games and Military History

Month: December 2018 (Page 1 of 2)

Three Turns in May (On Christmas Day)

Our first “Fall of France” game report has arrived, belatedly in two ways, first because the game is now quite old, and second because the game was played in 2012. However, we think it will make for a nice addition to the War Archive, and its author, Mike Willner, has allowed us to publish it here. Mike is from the “Metropolitan Wargamers” from Park Slope. I could share some fond memories of my visits to Park Slope and Brooklyn in summer, but I will offer something much more interesting instead and encourage you to have a look at their website & associated Yahoo Group: www.nycwargames.com.

Oh, and the game report? Here you go: Fall of France – Game Report No 1.


1942 MAY II Soviet Turn

“Take the baby! Please! Take my little ditya!” the mother screams to the naval orderly. Reluctantly he agrees. “Ok! Quickly!”  Just then a shell lands close by sending a spray of water over sailor, mother, baby and the large rowboat already overladen with waiting, screaming and weeping  civilians and military alike. “Leave it”! Shouts one “We can’t wait, let’s get going all we’ll all die!“. “Thr ow him to me!” shouts the sailor as the boat starts to move off.

Out of sheer desperation the mother flings the wriggling, wailing bundle the last few feet as the boat is pushed off from its moorings. More shells land one just missing the boat which rocks and takes on some water. Furiously many hands start bailing and the lumbering boat inchers away from the wharf and slowly moves to the waiting destroyer in the bay. The mother turns, her job done, and runs for the cover of a nearby shop front long denuded of glass or produce. As she does so a cry goes up from the others crowding on the embankment. The Rumanians are coming! Run!!. Some jump, fall or are pushed into the rough seas of the bay and some hide behind what cover they can find but most flee inwards towards the mother’s hiding place and others like it. Seconds later solders burst from a side street shooting at the few remaining naval troops along the embankment. They return fire. Anyone, military or civilian, unlucky enough to be still standing in the open is cut down in the exchange. More shells explode in and around the wharf. From the relative safety of the shop front the mother sees the boat containing its precious cargo reach the larger ship which is already at full steam ready to depart. Just then a screech from above heralds the arrival of enemy aircraft and bombs fall adding to the carnage. Thankfully most drop wide of their mark and the destroyer is untouched. The last image burned into the mother’s eyes is that of a small bundle being thrown to waiting arms aboard the big ship and it turning out to sea. She drops her head and mutters a secret prayer for the safety of her little one.

Odessa has fallen.

Finish Front: In the centre the impudent German Ski unit which caused the loss of the rail gun has the favour returned.

In the south the failure of the Finish attack is taken as a reprieve and defences strengthened.

'42 May II: Frontlines in the Arctic before the Axis summer offensive

’42 May II: Frontlines in the Arctic before the Axis summer offensive

Leningrad Front: The attempt to liberate the spearhead is abandoned and troops fall back to the pre-winter fort line.  The spearhead forces themselves however are not content to go without a fight and attack a second line infantry division but can only retreat the defender.

The assault out of Narva continues towards Tallinn against a security division which the Germans had thrown into the line but air cover out of Riga allows this unit to retreat without loss.

North of the Valdai there are signs that the rout is slowing as fresh troops move into the area solidifying the defences.

'42 May II: Soviet breakout attempt south of Leningrad

’42 May II: Soviet breakout attempt south of Leningrad

Moscow Front:  The German bridgehead is contained but no attempt is made to counter attack it.  The west bank of the upper Volga begins to be evacuated.

Voronezh Front: Most of the 1st Shock Army is now back to the fortified line. Some stragglers remain and are given DAS to cover their retreat but hopes for their survival are low.

Rostov Front (AKA Crimea & Odessa).  With the fall of Odessa the Black Sea fleet and remaining air transports are withdrawn. The ground troops on this front continue to prepare their defence and await the Axis next move with bated breath.

'42 May II: Rostov awaits the Axis assault

’42 May II: Rostov awaits the Axis assault

Partisans: Get a special mention this turn for a series of raids across the occupied territories resulting in  a total of 5 rail breaks.

Air War: A few raids are made to disrupt Axis rail connections around their jump off points but most success is made in Estonia, breaking the rail line to Tallinn in two places to hinder any Axis counter strike against the Narva operation.

Battle Report:
Diced Attacks = 2;
Auto Attacks = 1
Losses;   German = 1

1942 MAY II Axis Turn

The Soviet meteorological office reports the winter of 41/42 to be the wettest on record with heavy rains persisting to the end of May making movement almost impossible across the vast bulk of the country. Perversely both sides welcome the deferment of the summer campaigning season.

For the Axis while in the South the motorised forces are in place much of the infantry is still tied up in the pursuit of the retreating 1st Shock Army and the Rumanians have an entire army still engaged at Odessa. Artillery assets are very sparse and will be useful in any breach of the Soviets river defences.

North of Moscow in the Kalinin bulge while pre-invasion preparations are continuing in widening the breach and clearing the west bank of the upper Volga troop levels are still short of those required to consider a major offensive. In part this is due to the diversion of troops eliminating the Soviet spearhead south of Leningrad. This work will require at least another month before significant forces can be transferred to the Kalinin area for Operation Fleischwolf.

For the Soviets every month is an opportunity to build their second defence line both from 1st Shock army transfers and newly arriving troops and reinforcements. The 8 Tank Corps received earlier in the month being a good example.

'42 May II: Frontlines before the Axis summer offensive

’42 May II: Frontlines before the Axis summer offensive

Weather: No Change!  A= S, B = M, C = M,  D = C, G = C

Finland & Army of Norway. Ground troops continue to push south from Murmansk while Luftwaffe squadrons launch an operation against an aborted P40E at a local base sending it straight to the remnants pile.

In the centre a lone German ski battalion takes advantage of a Soviet error and slips through the lines destroying a naval rail gun unit which has been left unguarded.

In the south the Fins try to push forward on a one hex front but retreat in the face of Soviet resistance and air cover. A full strength German panzer division arrives in theatre but is detrained too far away from the action to engage this turn.

May II '42: The Axis advances south of Leningrad, pocketing isolated Soviet units

May II ’42: The Axis advances south of Leningrad, pocketing isolated Soviet units

AGN: The forces south of Leningrad continue to push north ignoring the trapped soviet spearhead and strengthening the barrier between it and the Soviet front lines, The pocket contains 1x Guards Infantry, 1x Guards cavalry, 1x Regular infantry, 1x Naval rifle brigade, 3X Katyushas and 3x Artillery.

In the Valdai/Kalinin sector pursuit operations continue against the retreating Soviet defenders and newly arriving Soviet reinforcements alike. Operations continue by motorised elements to clear the west bank of the river north of Moscow. Rail conversion and truck transports will place the whole area in full supply by mid-month.

The general in charge of the breakout from the Volga canal bridgehead adjacent the NE Moscow hex takes the initiative and attacks the Soviet fortified line to the north in order to widen the bridgehead. He is granted, air support which damages but does not eliminate the supporting river flotilla. Under pressure of the attack the defenders abandon their fortified line but retreat in good order.

May II ’42: The Axis moves to attack Kalinin.

AGC: The forces shift infantry and motorised assets out of theatre and move to a defensive stance.

At the south of the sector some pursuit of the retreating 1st Shock army eliminates more troops struggling to return to their fortified lines through the mud.

AGS: Forces continue to build around the proposed jump-off point north of Kharkov. The scarcity of artillery assets has necessitated a shift in the penetration of the soviet MLR north of the original planned assault point to avoid river lines. This also allows infantry moving south to be in place in time for good weather.

11th Army and Odessa: The arrival of German railway guns allows the primarily Rumanian assault to go ahead irrespective of the Soviet Supply situation. The city is stormed and the attack result is a ½ EX bringing the 250 day siege to an end.

Kerch is taken by a mixed Axis assault – no current plans call for 11th Army to cross the straights which the Soviets have now fortified.

Air War:

In the south in preparation of the offensive and to support the deception that Operation Angelhanken is the main effort a massive area bombardment of the rail network is undertaken to isolate the proposed attack point from reinforcements. 5 hits are achieved for the loss of one Hungarian J88A

In the north a similar operation east of Leningrad goes awry as fierce fighter opposition downs 3 German aircraft for a single abort and fails to inflict a single hit on the rail net.

In the Centre a dive bomber assault escorted by fighters from the Moscow air defence force eliminates 3 of the 4 soviet interceptors in exchange for one abort but inaccurate bombing fails to eliminate the River flotilla target.

Battle Report
Diced Attacks = 13 Automatic = 2
Losses; Soviets; Isolated = 19,   Un-isolated = 36
Rumanian = 10

1942 MAY I Soviet Turn

Gregor raced towards the hedge line, his breathing heavy with exertion and his feet heavy with the cloying mud which seemed to pervade the whole landscape. He heard the whine of bullets pass his ear and instinctively dodged sideways.  His blue tunic was brown from the waist down, a sorry sight and not as it should be. He was part of a marine regiment and had spent the first part of the war in his home town of Leningrad. He was born there although in those days it was called St Petersburg. He had survived the revolution and the purges and the first few months of the war spent on board ship.  His father had been a stoker for the Imperial fleet so it was natural that he and his twin brother Prokhor would join up as soon as they were of age. Prokhor had been sent north to the Artic squadron and seemed to have got the better part of it but Gregor had heard nothing from him now for 3 months and the news from Murmansk was not good. He hoped his brother had somehow found safety but each day without news increased his fear that this might not be so. 

For his own part after the fleet was bottled up in Kronshtadt a call had gone out for volunteers for a territorial unit so he had joined up for some of the action and now found himself in the thick of things. Last time he has passed this way he had been moving south over clean crisp snow and they had swept the fascist invaders from their path. But shortly afterwards things started to go awry and now they were fighting for their very existence.  

His blood pounding in his ears as loud as the artillery shells pounding the earth ahead he raced towards the enemy position. A figure in dark green/grey appeared before him. Gregor squeezed the trigger and let out a burst from his sub machine gun which spluttered to empty after a dozen rounds. Luckily it was enough as the enemy fell backward. He burst through the hedge and into the ditch behind. Sensing rather than seeing a figure to his right he swung his now empty weapon around, butt extended. Catching the enemy combatant off guard the butt contacted hard against steel and flesh. The “coal scuttle” arched into the air as the adversary fell backwards with a groan. Gregor pinned him with his boot and grabbing the enemy’s machine pistol. He pulled it upwards; the force of his action dislocating the enemy’s shoulder as the strap was freed from its hapless former owner. Fumbling with the unfamiliar mechanism he swung right and sprayed the third occupant of the ditch. This fellow had been so intent in defending against Gregor’s comrades racing towards him that the savage scene to his right had gone unnoticed and he offered no resistance.

Not stopping, fuelled by desperation and adrenalin Gregor sprung out of the ditch and pressed onwards towards the next ridge line. A group of soldiers were racing towards him. He raised his newly acquired machine-pistol and aimed to fire a burst at the oncoming figures “Nyet comrade, Nyet!! – -they were Russians!!. He crumpled before then the sudden relief draining his ability and will to go further. He was saved, he was safe – for now at least…..

(Note: The stories normally provide a narrative to support a game event such as the Soviet spearhead breaking back to Soviet lines south of Leningrad,. In this case I wrote the story before the die roll and the Soviets rolled a 1! (4:1 attack) and thus failed to achieve the breakout. So a bit of artistic licence here. Let us just suppose Gregor’s unit found a weak spot in the German lines and slipped through before the ring was fully sealed)


MAY I '42: Failed breakout of encircled Soviet troops in the North

MAY I ’42: Failed breakout of encircled Soviet troops in the North

Finish Front: At Murmansk the inadequate Soviet forces can only hold their ground in front of the wall of now fully supplied German mountain divisions. In the centre however the attacks are pressed forward eliminating a Finish regiment and the advance reaches the pre-invasion border.

Around the southern lakes the Soviets consider their options but decide to take a defensive stance aided by air support from Leningrad.

Leningrad Front: The Soviet advance West from Narva continues attempting to draw off troops from the south as much as for any territorial advantage. The attacks cadre a German light division.

South of Leningrad the desperate isolated spearhead attempts a breakout, aided both by troops fleeing from the west and by new arrivals. The attack stalls against the German infantry division which holds firm.

The breach north of Kalinin now stretching to the Valdai continues to be a widening sore as troops rush south from Leningrad and others pull back to try and seal the breach.

Moscow Front: The troops west of the upper Volga cling onto the West bank while reinforcement and fortification of the East bank continues. Fresh troops are railed north of the German advance to occupy the region’s swamps and forests.

Tula’s defensive works continue to be strengthened.

May I 42: Sourthern Front reinforces its defensive lines

May I 42: Sourthern Front reinforces its defensive lines

Voronezh Front: The main Soviet attack force struggles to disengage. Harried by Axis patrols and probing attacks they can only withdraw at the speed of their lumbering artillery and rocket units; no more than one hex in most cases. This hinders the more mobile motorized units which are tasked to cover the retreat of their slower comrades.

Rostov Front (AKA Crimea & Odessa) A secondary line comprised of individual forts and mech stacks built around the newly formed tank corps take up position to the east of the fortified MLR providing depth to the defence,

The loss of the isthmus fort west of Kerch leaves the defenders no choice but to retreat. Those which can move to the safety of the east bank of the straights. A lone infantry brigade stays as a rear guard in the city.

Air War. Much airpower is devoted to DAS this turn. Long range bombers carry out a number of deep raids into the Axis rear with no effect. Unfortunately the retreat from Kerch exposes an aborted Transport aircraft left in the city. As a result of steady losses to the transport fleet the VVS decides to remove them from harm leaving Odessa to be supplied by the Black Sea Fleet once again.

Combat Report:
Attacks Diced = 4.
Losses:   German = 4,    Fins = 1


After Barbarossa – The status of Ken Newalls Scorched Earth game

Those of you following us on Twitter or are members of the Yahoo Europa Group will have recieved the biweekly updates to Ken Newalls ongoing game of Scorched Earth. All others hopefully will have taken a look at the expanding game report in the Archive now and then. For those who missed it, here’s a short summary: The game has reached May 1942, with the Axis having occupied Murmansk, the Baltics, and successfully conquered most of Moscow. The Soviets still hold out in the ruins of the eastern part of the city, and have successfully pushed from Leningrad to Narva and into the gap between lake peipus and the Valdai hills.

Now both sides evaluating their strategies for the upcoming summer, and since so many games of FiTE have ended at this point, Kens writings on the matter make for a facinating read we can only recommend. You can read the Soviet side here, and the Axis deliberations are part of the May I turn report.

May II 40

The second May II turn extended the surging momentum the German armies built up. By now, the front line corps were maxed out with 3 strong divisions, 3 appropriate supporting non-divisional units and two artillery units each. The armor corps approach 60 SP each, and get the favorable armor DRM for being 100% armor!

There were three main themes for the Germans this turn:

1) In Belgium, focus on screening in front of Antwerp and smashing the exposed southern flank to move behind it and cut it off. A combination of overruns and successful combats brought the 4 German corps tasked with this attack two hexes closer. The southern portion of the army group is focused on protecting the right flank of the forces in the Ardennes.

2) From one to four hexes behind the front line near the Meuse in the Ardennes, the focus this turn was bringing up all the strong infantry divisions and getting them stacked to the max. Thus, just behind the front line there are at least 10 strong corps of infantry waiting to exploit the breakout.

3) At the Meuse, maximum effort to breaching that obstacle. The TEC grants defenders great benefits (attackers 1/2 SP, and since most are in woods, favorable DRM to the defender), so the French are motivated to hold the line at all cost. And cost it did. But, in the end, two powerful German corps (XV and XVIII if you have access to the photos) bullied their way to the west bank of the Meuse. This was probably the highest-risk moment in the campaign so far, leaving these corps exposed. They would not be able to retreat without losses in the case of a strong French counter attack.

Air power concentrated on the two main points of attack at the Meuse, with a spread of combat support elsewhere. Since several French and British air units were inoperable, it was worthwhile running airfield bombing missions (a hit on an inoperable unit destroys it). Two French units were thus destroyed.

German exploitation movement saw the final adjustment of the motorized units, filled in some gaps in the line, filled in an open spot or two in the front line corps. Now, it was time for the French to roll the dice…

May II 40 - Overview

May II 40 – Overview

The French and British army staged three main operations this turn.

1) Paris Reserve: Units from around the country gathered in Paris. Now there is a strong corps-sized formation (that is, the full 8 units in a stack) and more on the way. The trick is not to deplete the front line defenders, but to keep some punch around the capital. Also, the engineer corps is busy building a ring of defensive fortifications around Paris (if you have access to the photos, you’ll see three of them just to the east of Paris, hatching forts that should come into play next turn.

2) Strong Left Flank: Still under the delusion that the main thrust will come through Holland and along the channel, the French and British are lining up their strong motorized and mechanized corps around Brussels. The remnant of the Belgian army strongly holds Antwerp, and it actually looks like they could make a fight of it … if this was where the fight really was! …

3) Strong Counter-attack: Much effort went into building the strongest possible forces around the front-most German corps, and surrounding them to prevent retreat without loss. Most of the French and British air force flew combat support bombing missions on the three points of attack (I corps, XV corps, XVIII corps). The French were hampered by the Blitzkrieg rule, in effect for this last turn, that reduced any moving units’ SPs in half … so any units that moved up for the counter attack were weakened, but still took up the same amount of space in the stacks.

Once ready the attacks began … and disaster struck. The first attack in the north was AR, with many of the French and Belgian units also trapped in ZOCs (friendly units do NOT negate ZOCs for combat retreat). Many losses. Next, the critical attack to push the German armor back over the Meuse resulted in an AH (half attacking SPs gone, the rest retreat) and NE (no effect).

May II 40: Paris prepares for defence

May II 40: Paris prepares for defence

The stunned French high command used Exploitation movement (at 1/2 MP due to Blitzkrieg) to fill in some blanks, position some French motorized infantry to threaten the German right flank in the Ardennes. Also, filling in some defending stacks so they get the favorable defensive DRMs next turn for having 1/5th armor REs in the stack. The turn ended on a gloomy note for the Allies.

May I 40

After the invasion turn, the Germans get a regular game turn, no restrictions.

The German’s continued to follow their plan: a strong force fought north and west aiming for the rivers just south of Rotterdam. Several overruns put them into perfect position by the end of movement.

In the center, almost all the German armor is consolidated into three corps, headed directly west, overruning whatever they could. The rest of the turn involved moving the supporting troops into position, forming strong infantry / artillery forces to follow the armor through any breaches they created.

And, the brave defenders of Liege were surrounded and, this time, there was no miracle … all were lost and the Germans rolled forward into Belgium.

May I 40: the Benelux overrun.

May I 40: the Benelux overrun.

More German divisions peeled off the southern West Wall and from hexes facing the Maginot line and headed north to join the Schwerpunkt … a mistake as we will see later.

The air phase was, again, brutal. German pilots concentrated on ground support again, piling in on the two key combats in the north that would secure victory over Holland, and on the defenders east of the Meuse that stood between the armor corps and their objectives.

The French and British fighters were positioned to fly some CAP and intercept, but at great cost, but managing to turn back and render inoperable a reasonable number of German air formations. Perhaps next turn will see a more strategic air war, but this turn was all about punching through the Allied lines and keeping them reeling backwards.

The German combat phase was a great success. Holland was all but isolated, only one hex left to pass supply. Numerous strong Belgian divisions and handfulls of non-divisional units were eliminated.

The armored spearhead reached the Meuse and due to the stubborn Belgians and bad terrain didn’t manage to breach that critical river. The combat phase ended with a wall of German armor, flanked by strong infantry divisions and backed by several motorized divisions lined up along the Meuse. Facing them were the fortifications of the French defenders.

The exploitation phase saw the last Dutch defender run-over and the steel trap door slammed shut on the Dutch supply lines. A few minor overruns in the center, more consolidation and readying for the big push next turn.

Battle for the Ardennes, May I 40

Battle for the Ardennes, May I 40

The Allied Supply phase was dramatic: Holland collapsed and the entire Dutch army (all out of supply) surrendered. A pause here: that must have been a severe blow to the Allies and it becomes obvious when you see it happen in the game. Simulation!

Allied movement is still restricted. Units that moved in the previous reaction phase (the entire British army and all the strong French motorized divisions north of Paris) cannot move. Only the Strategic Reserve can move full speed, the rest at 1/2 MP. And, due to the Blitzkrieg rule, if they do move, they attack at 1/2 SP!

All that said, the French pulled units from near and far, using the excellent rail net, and shored up the defenders along the Meuse. A second line was formed up in front of Paris and even some troops sent directly to Paris to start a defense force.

THe game allows for North African troops to be siphoned off and sent to defend the homeland … 2 infantry divisions (6 regimental equivalents, the limit per turn) embarked and will arrive next turn.

At the northern edge of the Maginot Line the French generals spotted a German stack that was a bit too far forward, and was already partially surrounded. Several divisions were sent to build an attack, along with a considerable amount of railroad artillery.

The Allied air phase was interesting: about 3/4 of the Allied planes flew defensive missions over their defenders along the Meuse … they will remain in place through the next German combat phase and add their Tactical Bombing Factors to the defense strength.

View from the North: May I 40.

View from the North: May I 40.

The rest of the air units got aggressive, braving CAP and fighter interception and flew air base bombing missions, hoping to take out some of the mid range German bombers. Also, the Allies have a lot more night fighters and bombers which cannot be touched by the regular air units. The value of the British Air Command, long range night bombers based in London, became apparent.

The Allied Combat Phase was brief but dramatic. The two attacks went off well, one resulting in a DE (defenders eliminated unless they have a reduced side, in which case they flip and retreat) and a DH (1/2 the defenders are eliminated, an equal number of attackers and the rest retreat). A German division eliminated, and several more reduced to Cadres! Not much, but a real morale boost.

Finally, the Allied exploitation phase was minor, seeing some repositioning of the armor and motorized units to best leverage the armor / anti-tank defensive bonus.

Invasion Turn

After a truncated attempt and a reset of the game (I forgot non-divisional units don’t have ZOCs) I’ve gotten to complete the Invasion Turn. Here’s a brief summary:

German Movement: In this phase the Germans get to take a full movement phase. Most of the units can move, thought the Reserve remains in place. The Plan is simple: – On the right flank, slice north and west to capture the cities and knock Holland and Belgium out of the war.

– In the center, punch straight through Luxembourg and the Ardennes, and breach the Meuse as quickly as possible.

– The southern flank is static

This phase saw a significant number of over-runs, driving the German corps (note the use of corps markers) over the border and up against the second line of defense. Eben Emael fell (well, the rules give a virtual step-by-step guide how to capture this air-assault-vunerable fortress. But what the hay, I went for it). In southern Holland the German armor was able to double-overrun.

View over the board from the south during the invasion turn

View over the board from the south during the invasion turn

I made the strategic decision not to force the Maginot Line at all. Thus a significant number of divisions moved north and joined the effort in the Ardennes. Joe and I conferred on the validity of this approach and decided it was OK. We agreed that the Germans should leave a reasonable force on the West Wall since they couldn’t be sure a counter thrust was not coming.

German Air Movement: The air war is a game in itself. For you non-Euproists (Europanians?), the phasing player sends out his / her planes on missions (what you expect: bombing, combat support, rail line bombing, etc.). The defending player has a CAP where fighters within 1/2 movement range attempt force attackers to abort the mission (roll a 6 or if superior factors, 5 or 6). Then the non-phasing player gets to send the fighters out on interceptions that can result in planes getting sent home or even shot down. The surviving attackers execute their missions at the appropriate point in the game (i.e. combat support will execute in the combat phase).

The German air force is a bit smaller than the French, but the ME109 fighters (excellent air attack strength) and the Ju878 (powerful short range bomber) more than compensate. There were some notable heroics by the Allies, with the tiny Dutch air force turning back some German fighters. And French aviators must have had their Wheaties for petit-dejeuner, because the casualty rate was 3:1 in their favor.

The German Luftwaffe strategy was almost exclusively centered on combat support. They heavily supported attacks on hard points like forts and river crossings. Very little air field bombing or interdiction was attempted, that will wait for future turns.

The Benelux countries during invasion turn

The Benelux countries during invasion turn

German Combat: As expected, the Germans pretty much ruled. Almost every one of the 20 German corps was constructed with a mix of units that allows the maximum stack of 8 units (experience gained in my first attempt schooled me on this).

Infantry corps were endowed with artillery and engineers to minimize the defensive value of Allied forts. The armor corps were kept pure armor and motorized as possible … this allowed them to get from 50% to 100% of the Armor Effectiveness Capability DRMs as possible (anything from +1 to +3 on the die, enough to neutralize terrain and fortification benefits.)

Notable heroics on by the Allies at Liege resulted in that city remaining in Allied hands. This puts a crimp in the German assault, as that stout defense left 3 of 4 surrounding German corps on the wrong side of a river (attackers halved) and in a ZOC, which will slow movement next phase.

View over the board from the west during the invasion turn

View over the board from the west during the invasion turn

Allied Reaction: In this phase the Dutch and Belgians get to react with a limited move. The French and British can move as well, but only the troops north and west of Paris, and they must remain north of the Meuse. Basically, the Dutch and Belgians filled in their lines, re-inforced river lines, pulled the large, valuable divisions out of now-doomed Liege to fight another day. The French and British rushed forward (as per scenario rules) and deployed around Brussels awaiting the assault.

The Blitzkrieg rules are an important factor: you can move during reaction, or during the subsequent Allied movement phase in Turn 1 but not both. For the first few turns, most Allied troops will only move 1/2 their MP and, if they move, attack at 1/2 SP! It takes a few turns until they figure out how to march and chew gum at the same time, when these restrictions are lifted.

I wanted to move now so any counter attacks next turn will be at full strength. I’m risking getting cut off and destroyed, but if I can take down some German divisions and special units now it may blunt the blitz just enough.

Valencia, dear Valencia mine

Dan Waldstein graciously shared his report of a full game of FWtBT using a variable beginning of the revolution. The biggest upset during the start of the game was that Valencia also declared for the insurgency, and the Spanish Republic never recovered from that. In September 1937, all was over. How it happened, you can read here. We say thank you, and hope you’ll enjoy the read!


1942 MAY I Axis Turn

The Axis use the lull to examine their options for the upcoming summer offensive. A number of options are considered:

A Northern Offensive – Primary Aim – to shorten the front and gain full Finish involvement in the East.
This offensive essentially aims to cut off Leningrad as far East as possible by driving North from the Kalinin bulge. In association with this will be a general drive north via the direct route pushing back the Soviet gains south of Leningrad. In the meantime maximum assistance will be given to Finland. This offensive gains little in Resource reduction (3 points for Leningrad but will dislocate the factory) or inflict massive manpower losses but it will considerably shorten the line allowing greater defensive concentrations for the future. The disadvantage of this plan is that there is tough terrain and the main German advantages of mobility and armoured strike power is minimised. Another factor in this plans favour is that the bulk of the Soviet army is far to the south.

A North/Central Offensive: Primary Aim: To take Moscow, Tula and Gorky and eliminate a significant part of the Soviet army in the process.
This is primarily an extension of the 1941 assault and aims to encircle Moscow. Again a drive from the Kalinin bulge but due East then curving south via Ivanavo to Gorky. A second pincer driving from Orel will drive behind Tula and north to meet the northern hook. This aims to maximise Russian losses and will reduce Soviet production by 7 points.

The advantage of this plan is the relatively small geographical area and the fact that the northern flank is screened by impenetrable terrain making a Soviet counter strike unlikely from this direction. The disadvantage is the vast Soviet assault army is to the south which will no doubt move to eliminate the southern pincer.

A South/Central Offensive: This offensives only aim is to eliminate the large body of Soviet Assault troops to the West of Voronezh. This would be a limited positioning offensive with one pincer driving south of Orel and one north from Kharkov. The aim to eliminate as many Soviet troops as possible, The advantage is that this is prime tank country with  lots of rail lines for supply few natural defensive terrain features other than some minor river lines. The advantage is that the Soviets have no offensive concentrations to the south so this flank would be secure, conversely though the northern drive with its flank hard against Tula could suffer attacks from the north and Voronezh in the centre is well defended and fortified. This offensive gains one IRP reduction only.

A Southern Offensive This plan is for a strong mobile force to strike from Kharkov with two divergent thrusts. One aiming at Astrakhans via Stalingrad to secure the city and the flank of the main drive south to Rostov and the Caucuses. The advantage is that his offensive is against the weakest part of the Soviet line and the short hook to Rostov would pocket Stalino and the southernmost part of the soviet fortified line relatively easily. The main drive could capture or eliminate/disrupt 2 factories, the Baku production and 7 or more IRP centres.

The disadvantage of this plan is the vast amount of territory and the fact that the van guard will inevitably plunge out of supply. As with the central plan another disadvantage is the currently unemployed large Soviet assault army which lies to the immediate north which will harry and threaten the long exposed northern flank of this attack.

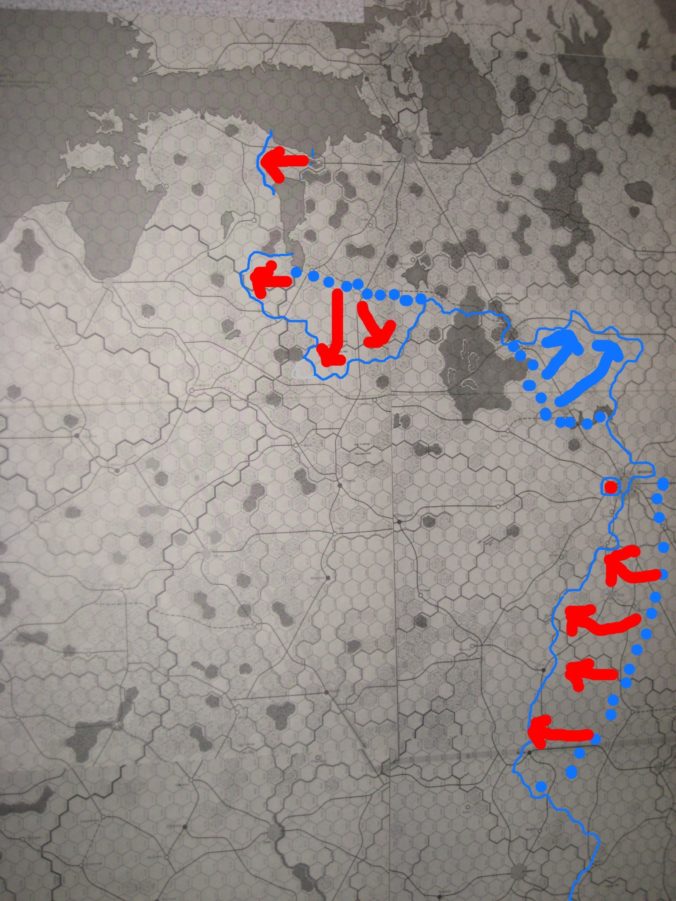
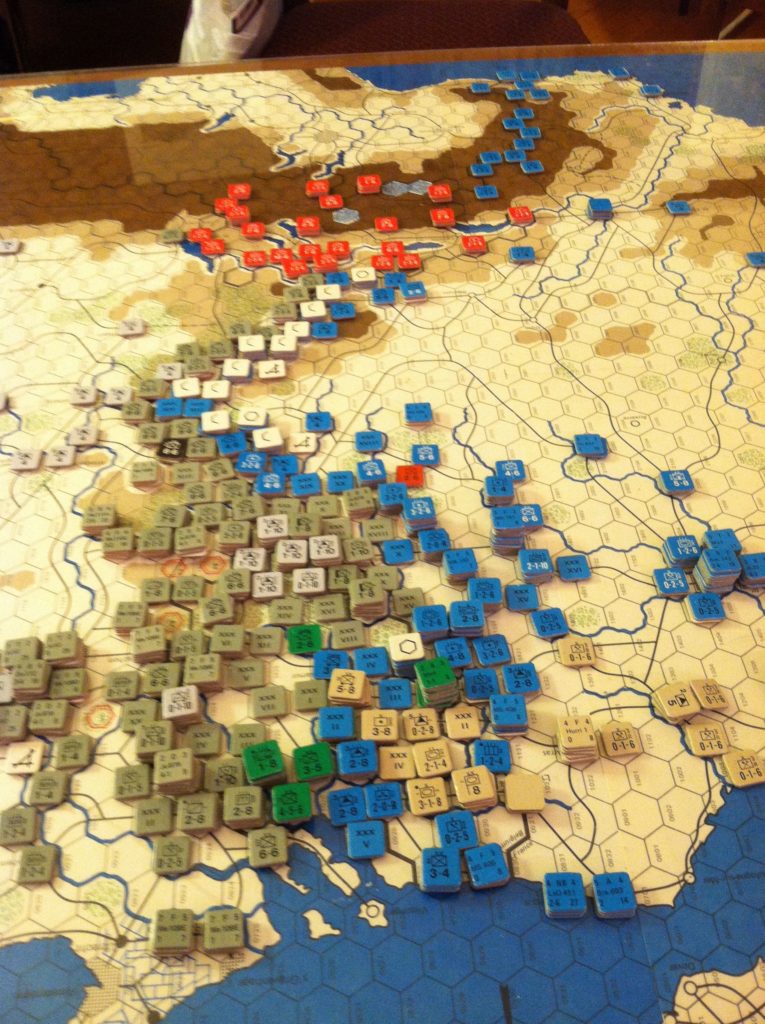
The Final Plan: Some combination plans are discussed such as a Central/South combination but this is discounted as too ambitious. After much debate Hitler and his General staff agree that Leningrad is to be the key. However there will be some variations and additions to the plan above. The Kalinin drive will strike east to capture the rail triangle with its apexes at Ivanovo, Kostroma and Vologda. This eliminates any help from the east and does not rely on the Finns capturing and holding the line south from Archangelsk north of Lake Ladoga. The single hex bridgehead over the northern Volga adjacent to the NE Moscow hex will try a direct assault to supplement this drive. The offensive will be made in association with a general push north in particular along the direct route from Veliki Luki aiming to reverse the Soviet gains south of Leningrad and taking advantage of the current dislocation caused by their own failed offensive. This drive will be infantry/artillery lead with some panzer support. Code name Operation Fleischwolf. (Meat grinder)

In order to mislead the Soviets as to the true intent of the summer offensive a second drive employing the panzers will be aimed at Rostov in the south. This is essentially the “small hook” part of the Southern Plan aiming to secure Rostov and the Don bend as a defensive line while capturing Stalino and eliminating the Soviet line south to the sea. This will launch some weeks ahead of the Northern push in the hopes of drawing the Soviet central army south. Code name Operation Angelhaken (Fish hook)

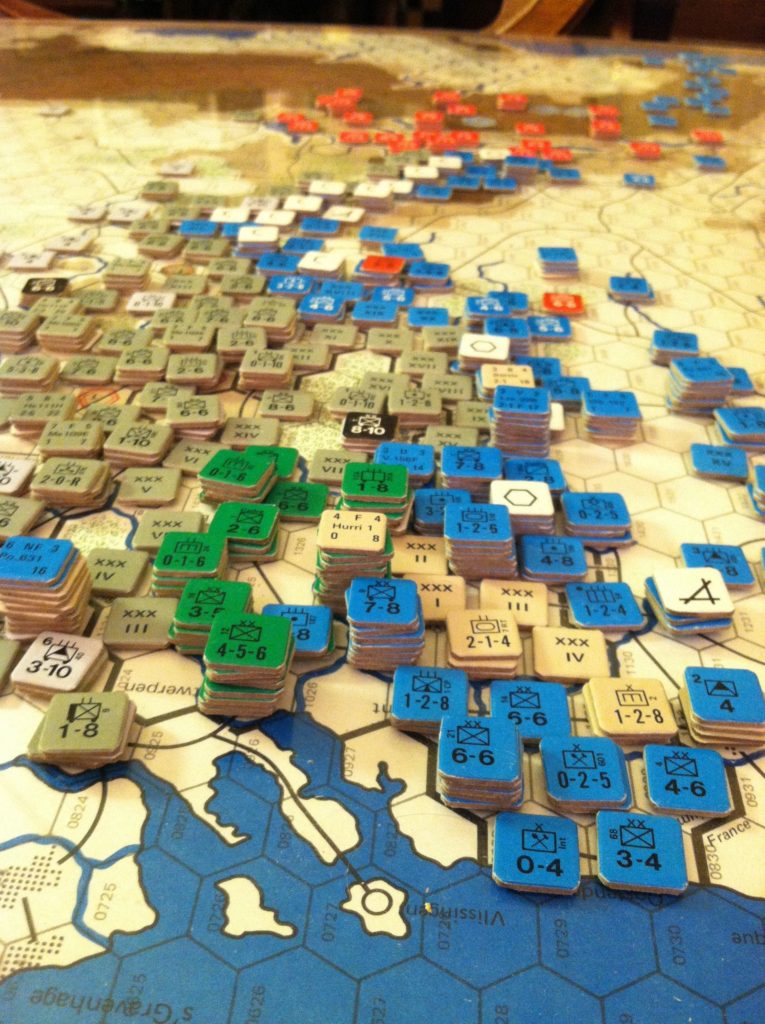
Pre-offensive moves. To prepare for the return of clear weather the central Axis forces will pursue the retreating Soviet army and keep in contact with it to reduce its mobility. This will however be an infantry pursuit allowing the mobile forces to move south to take up their pre-assault positions around Kharkov.

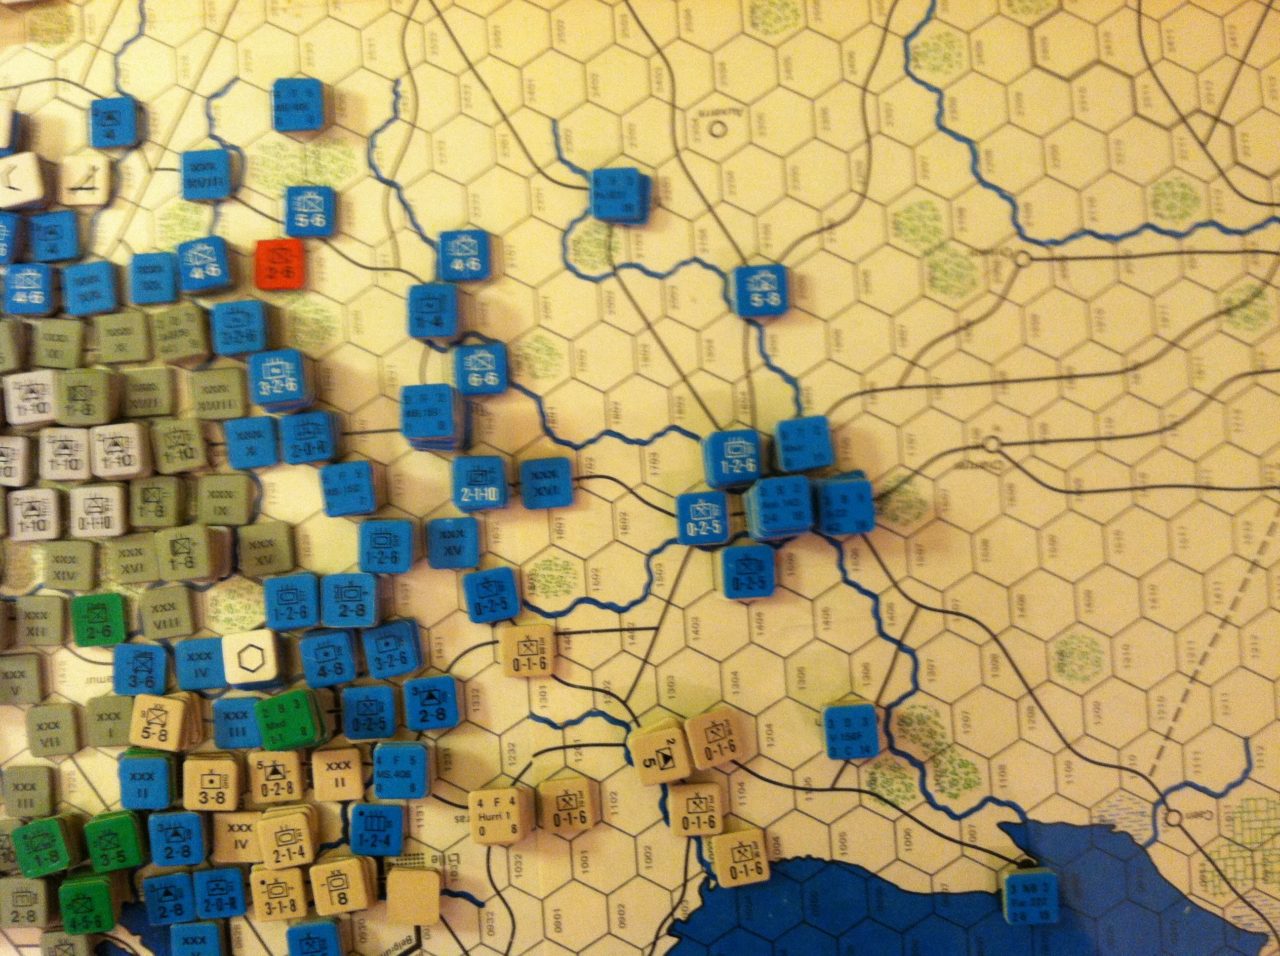
At Moscow infantry and defensive artillery will replace the panzers in the city while the panzers will occupy the important bridgehead east of the Volga adjacent to the NE Moscow hex. The west bank of the upper Volga north of the lakes will be cleared.

To minimise interference the Finns will be reinforced with a full strength Panzer division and tasked to sever the line south from Archangelsk.

North of Kalinin the rail line from the Valdai will be secured (and converted) and the infantry drive directly north reinforced to interdict or capture the East-West between Leningrad and Vologda.

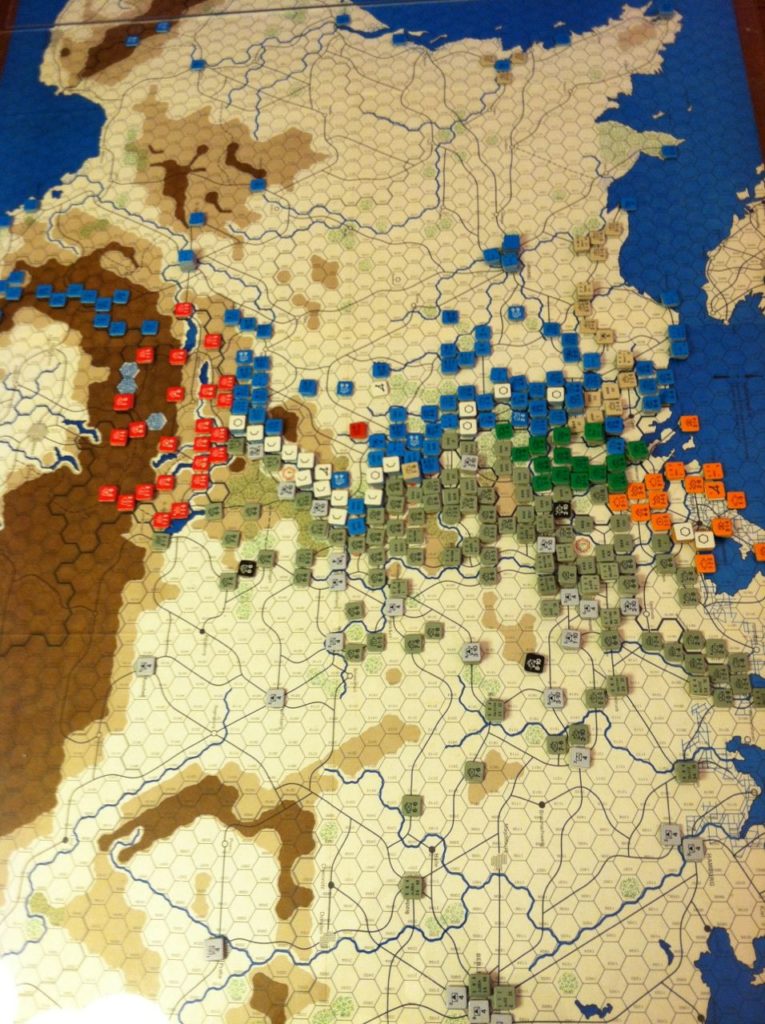
To support the 1942 summer offensive plan the army boundary between AGN and AGC is moved south so that the whole northern pincer is under unified control. The new boundary is set at the centre of Moscow. Similarly AGCs control span moves to just north of Kharkov.

This turn:

Weather –No Change Snow in the Arctic zone, mud in B & C, clear elsewhere.

Finland & Army of Norway. A three hex assault against a key soviet fort south of Murmansk is successful allowing a Mtn division to advance and widen the route to Norway which had been constrained to a one hex wide corridor.

In the south the main assault is losing steam against a stiffening defence but manages to remove an infantry brigade from the northern flank of the advance.

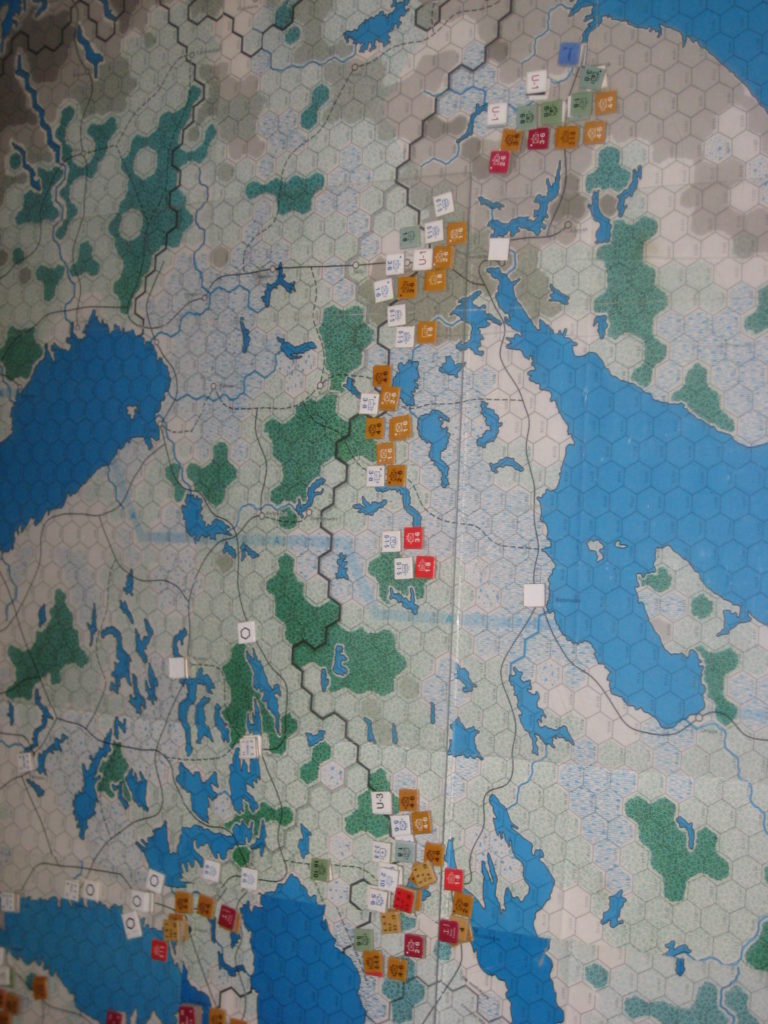
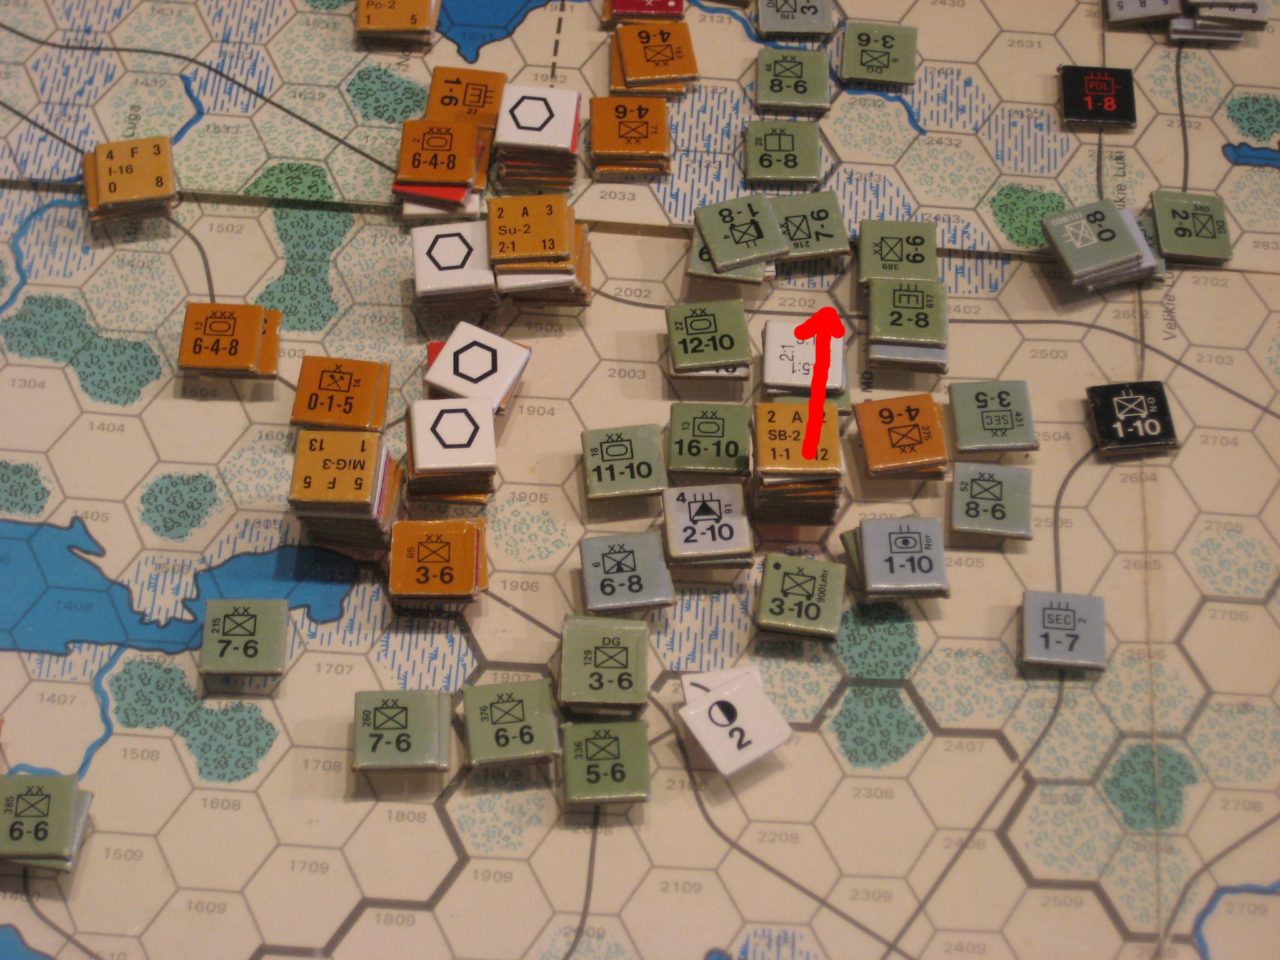
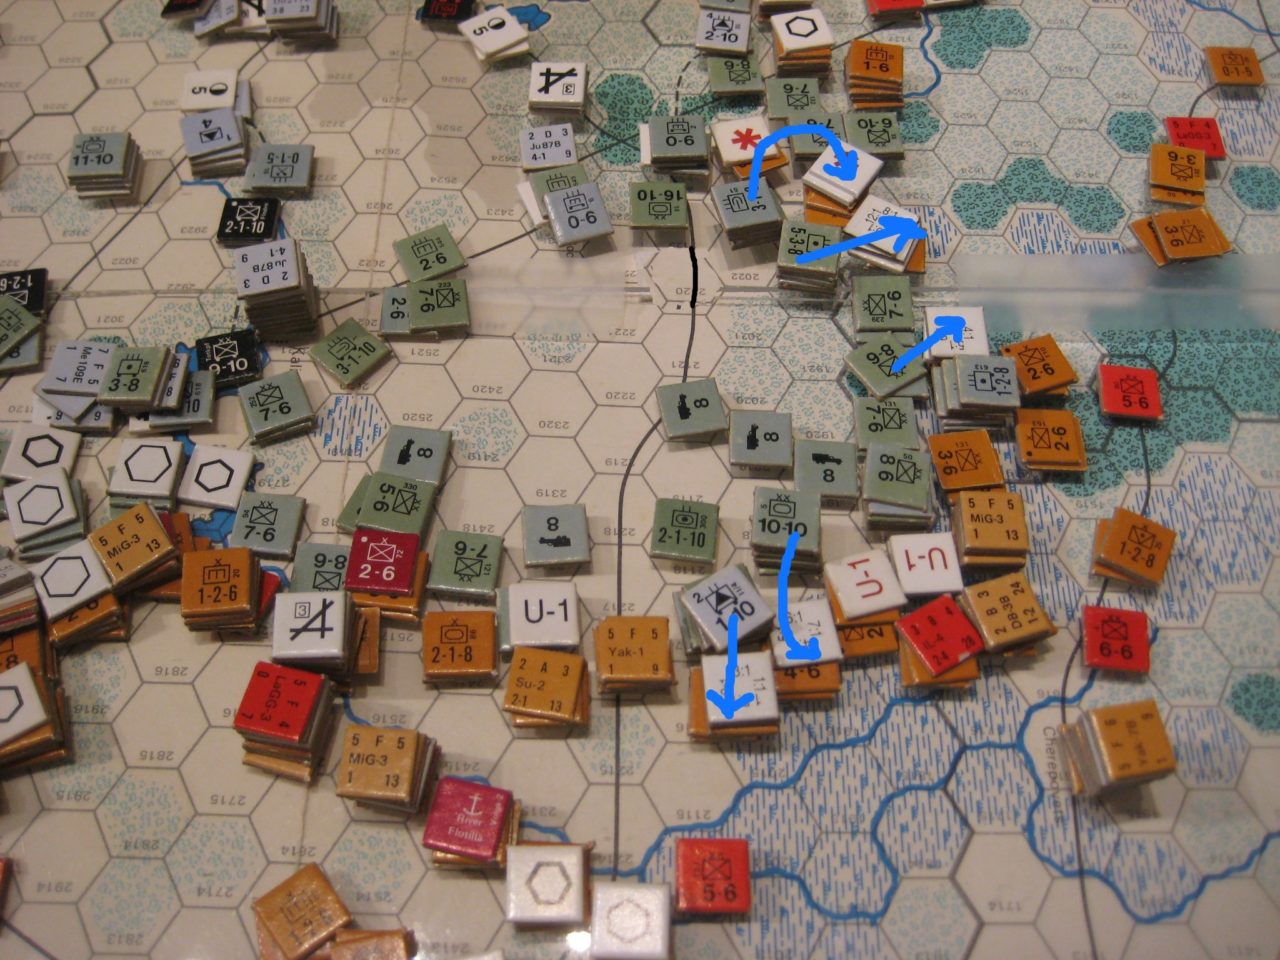
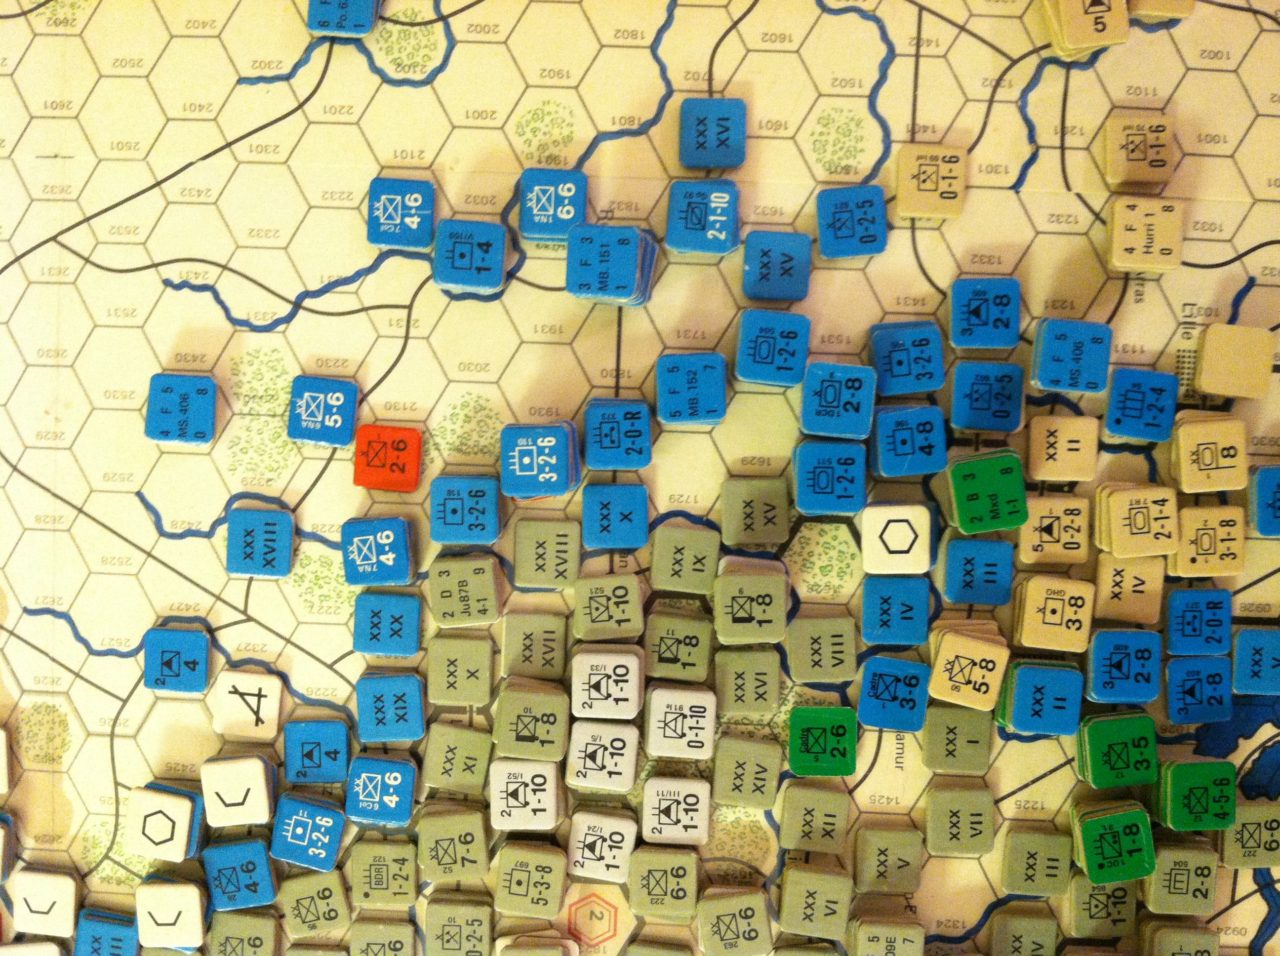
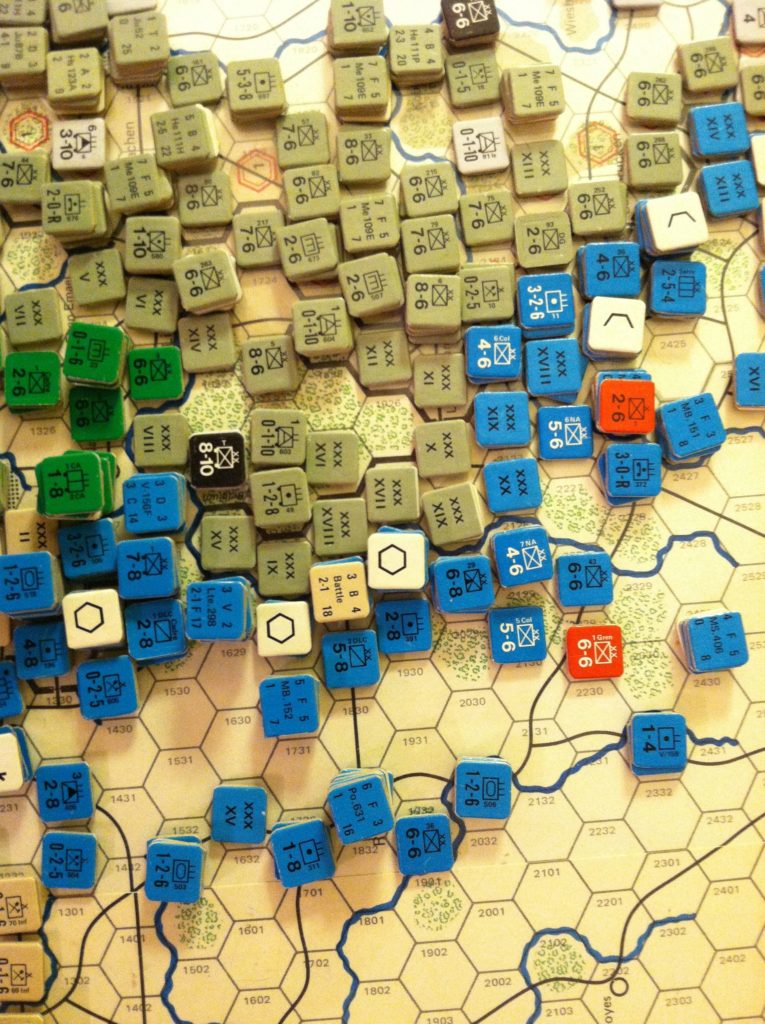
AGN: AGN moves into offensive mode attempting to capitalize on the tentative encirclement of the Soviet spearhead south of Leningrad. 3 panzer divisions with support troops, mountain, light and infantry divisions launch a pincer move and succeed in trapping the two remaining Soviet assault stacks.  A third attack in this sector eliminates a 3-6 infantry retreating east from the Soviets moves towards Riga.

North of Kalinin the German forces continue to roll up the soviet flank north of the Valdai and the German forces consolidate their hold on the East – West rail line easing the stretched supply line serving the thrust.

May I '42: Heavy fighting along the shoulders of the Kalinin bulge

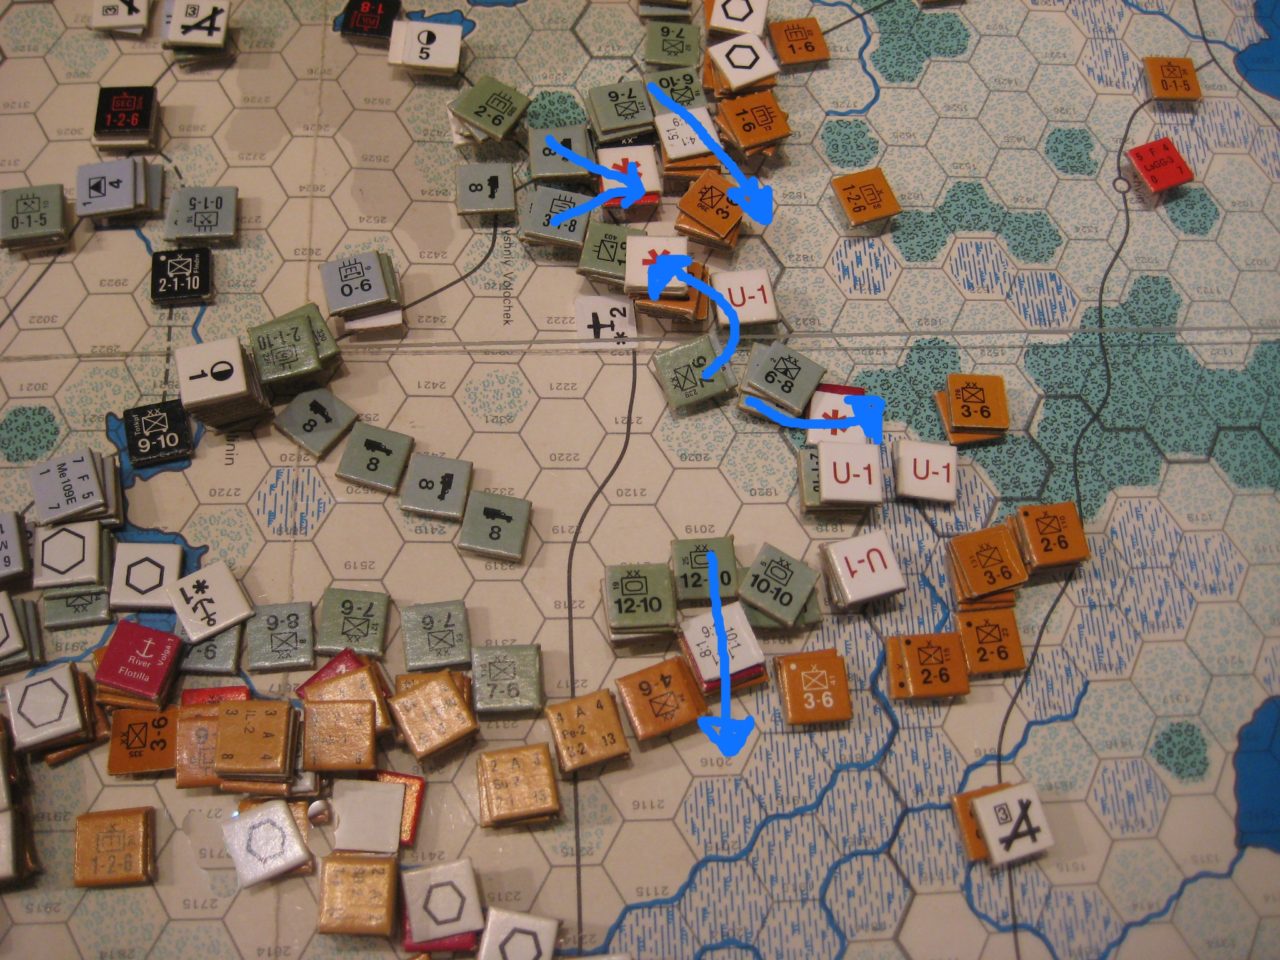
May I ’42: Heavy fighting along the shoulders of the Kalinin bulge

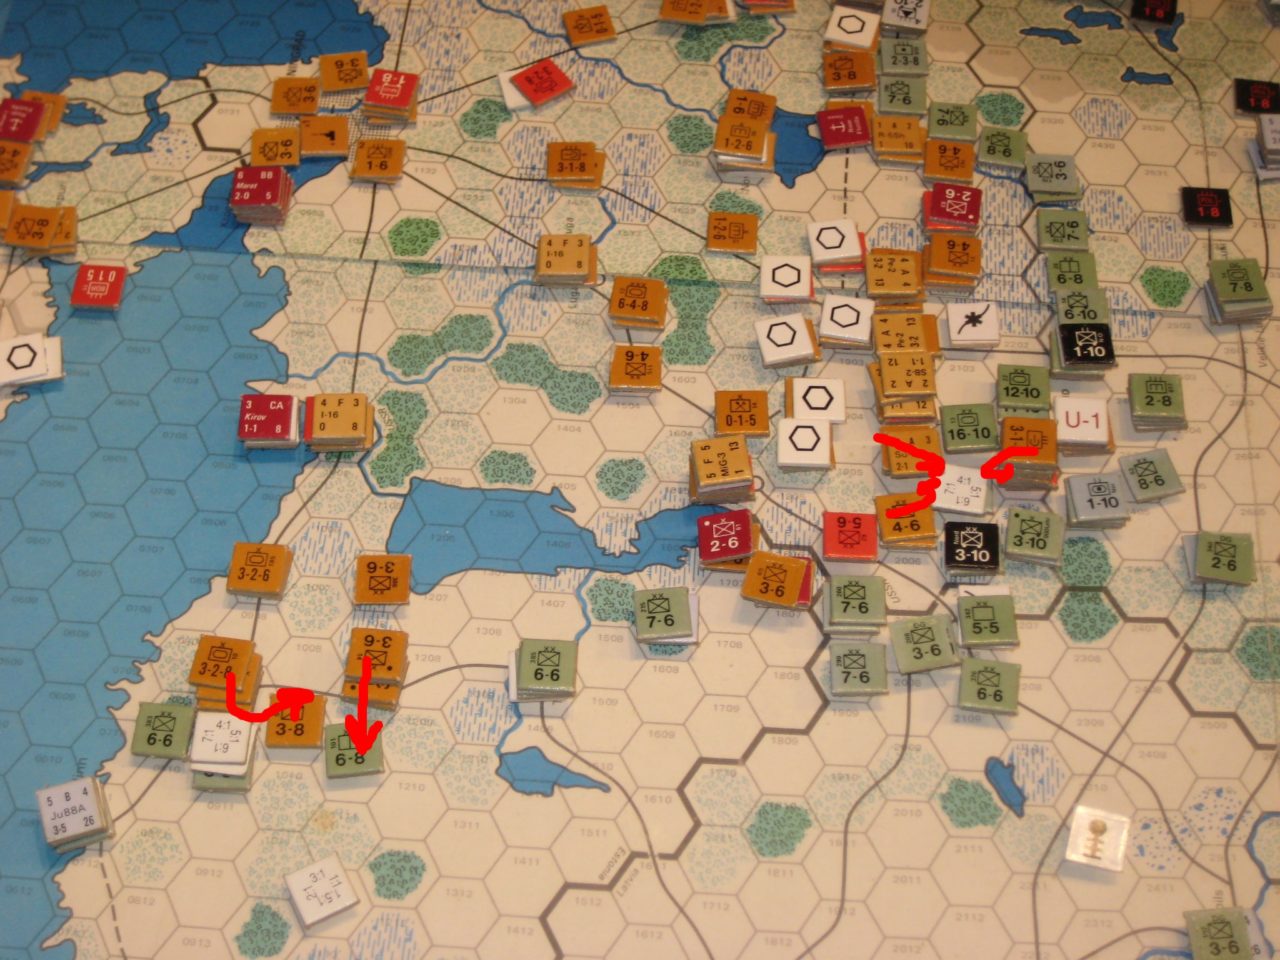
The Germans also begin the pre-offensive moves to clear the west banks of the upper Volga and start to replace infantry defenders with panzers in the eastern bridgehead over the canal adjacent to Moscow.

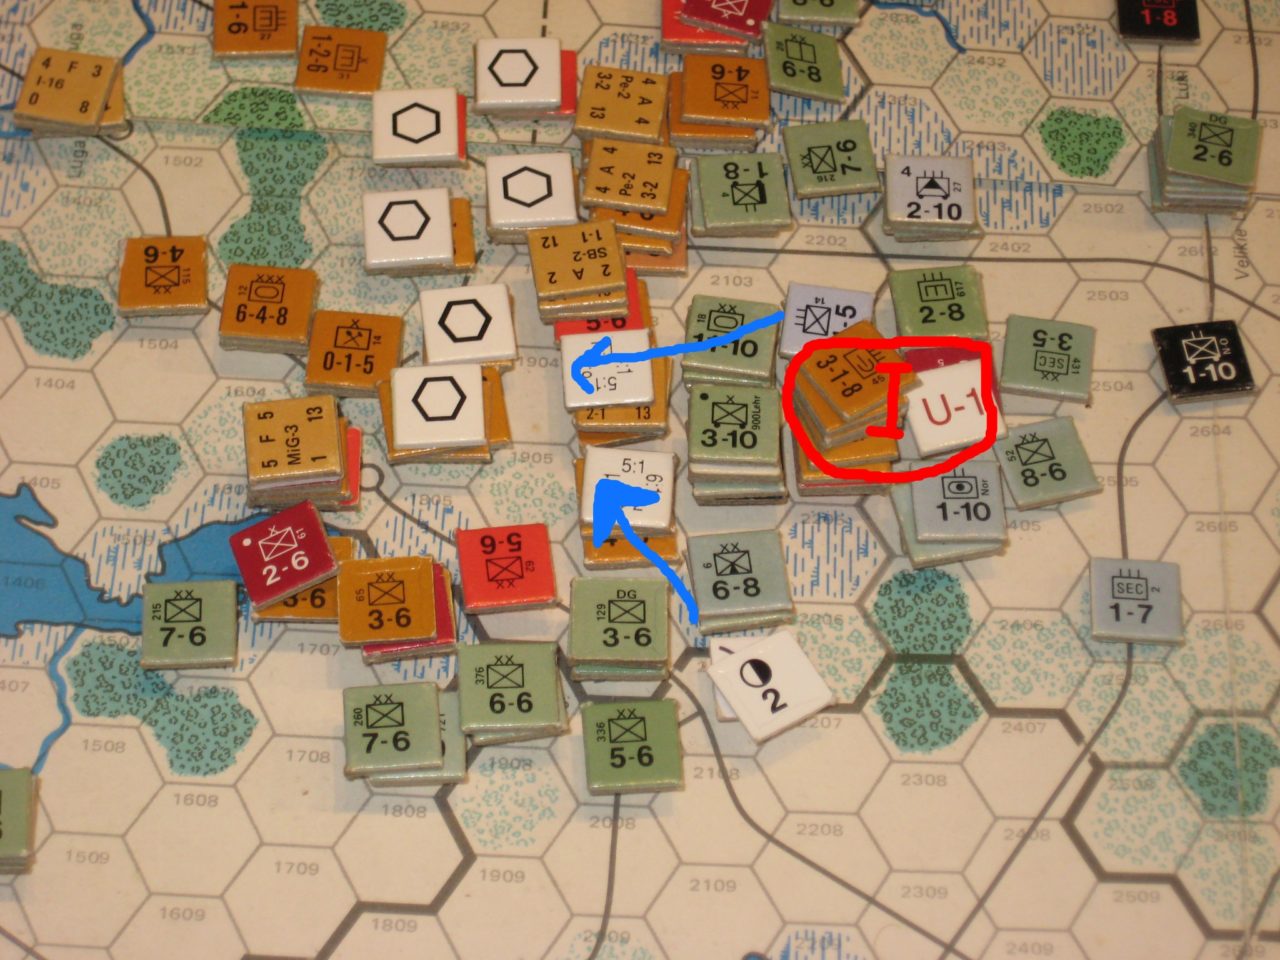
AGC: Around Orel/Tula the line thins as motorized assets are withdrawn to prepare for the summer offensive.  Further south in the Kursk sector AGC pursues the retreating Soviet Ist Shock Army and eliminates 2.5 stacks of units in 3 assaults trapping another by infantry advances. Kursk is taken against light opposition as the soviet forces abandon their hard won gains of the last 3 months.

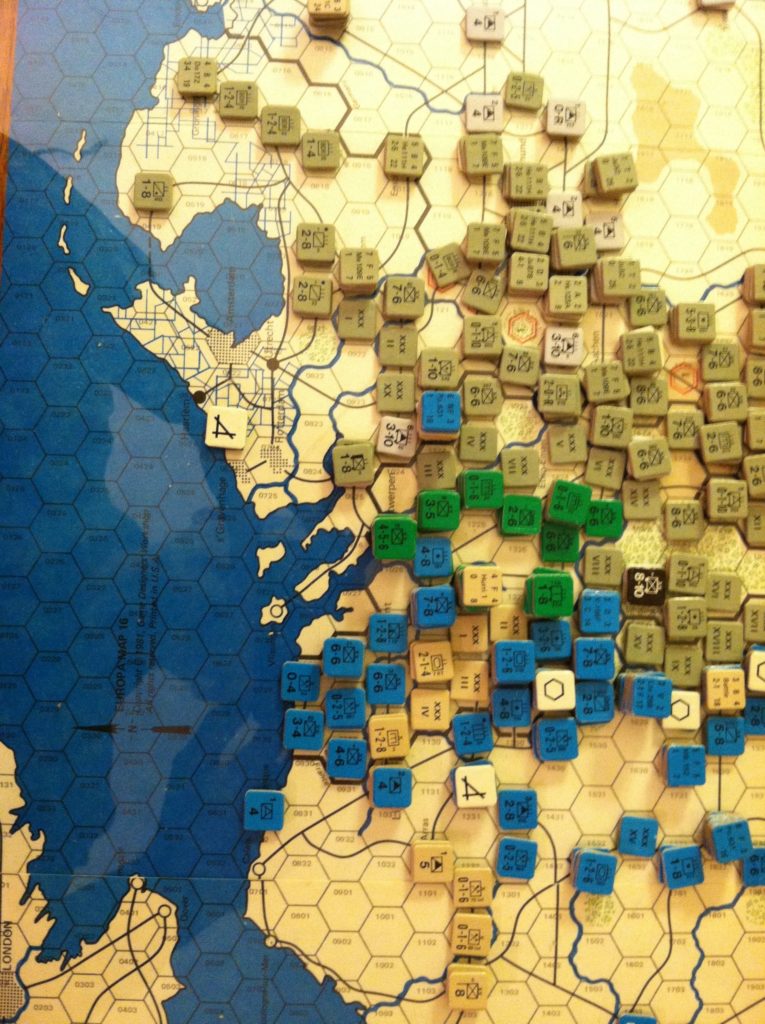
AGS:  Preparations are made to prepare rail lines prior to the launch of the summer offensive and to receive mechanised assets transferring in from AGC.

May I '42: Local Attacks by the Axis in the Central Sector

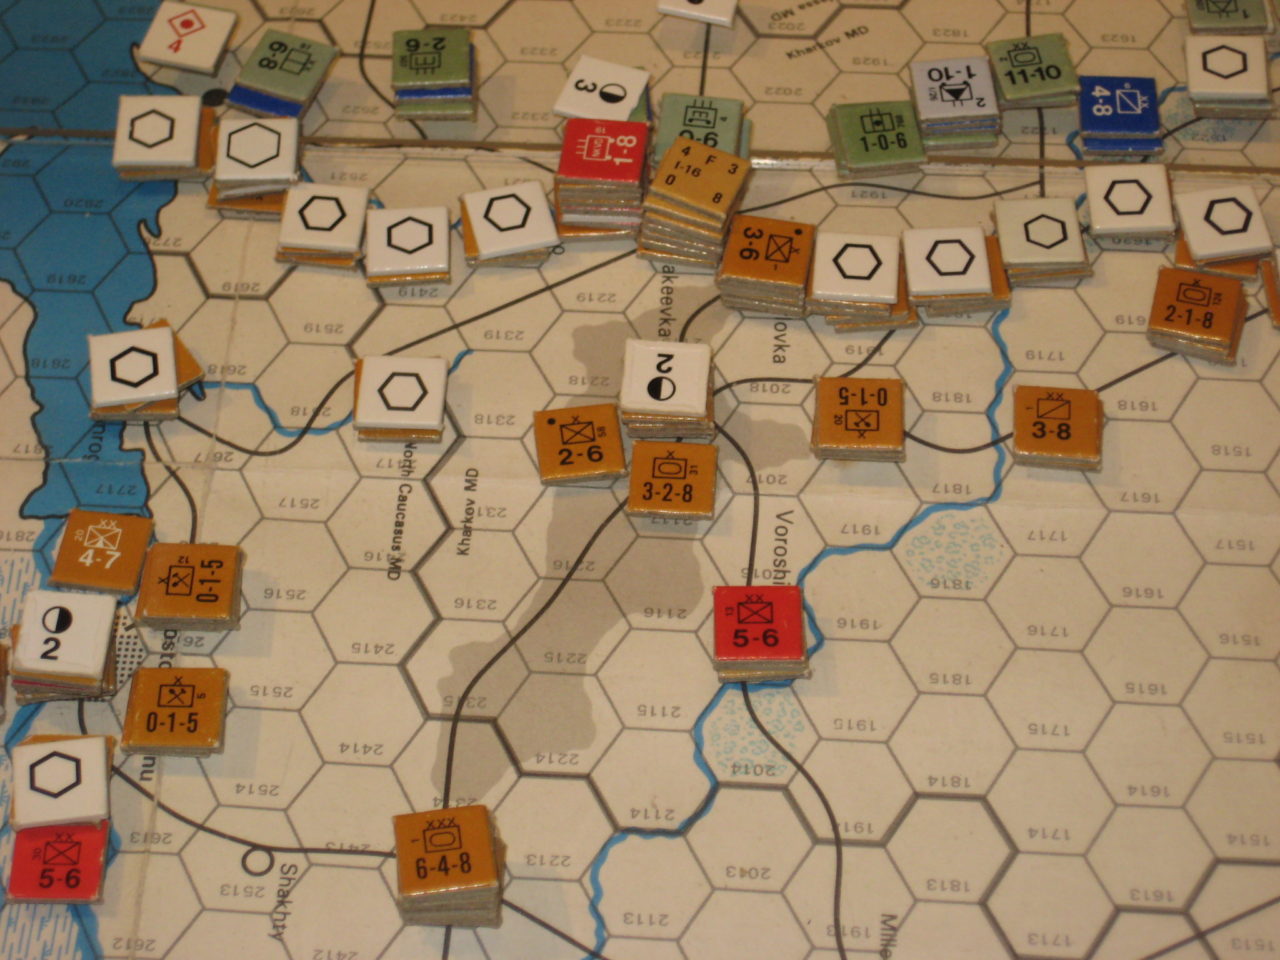
May I ’42: Local Attacks by the Axis in the Central Sector

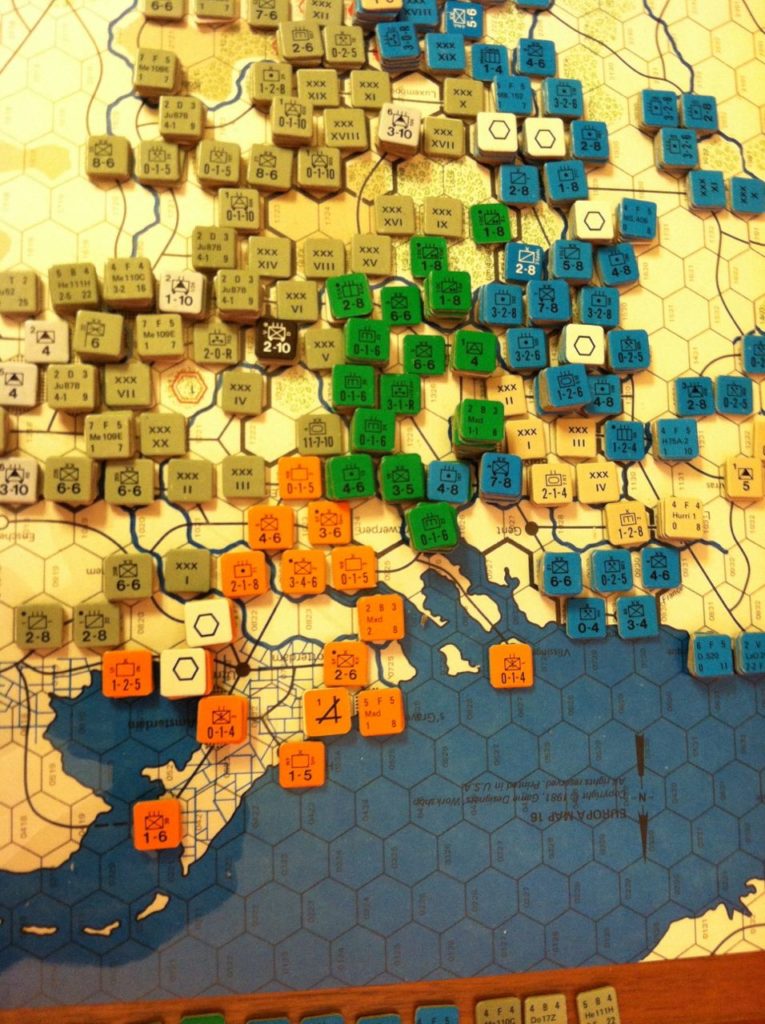
11th Army & Odessa Rail conversion reaches the outskirts of the city and the German siege assault train (Literally because composed primarily of rail guns including a new supper massive gun) arrives and prepares to aid the demoralized Rumanians

Although low odds against some tank support the Axis strike at the Soviet defenders at the neck of the isthmus and obtain a HX result and advance into the neck.

Air War. In the north rail strikes obtain hits against two of the lines radiating from Leningrad to hinder reinforcements to the soviet front line.

Central units are also tasked with starting to break up the soviet rail net around the proposed breakout point in the south. (Just north of Kharkov.

In the south the appearance of the Black Sea fleet temps the Luftwaffe against all past experience to try and sink the two CAs ferrying supplies to Odessa. All attempts fail and the ship remain intact. However some compensation is given in the form of two downed soviet fighters from the Odessa defence squadron.

Long range fighters again try to eliminate the soviet Air Transports at Kerch but are beaten back by Soviet fighters and AA one German aircraft is eliminated.

Battle Report
Attacks:    Diced = 11;   Auto elim = 4
Losses:    Soviets = 82   German = 5, Rum = 3

« Older posts