EOT Dispositions
Malta [end of turn]:
- The Br Hurri 2 F type air unit is in the Aborted Air Units Box of the Malta Command Replacement Pool.
- Malta Status: 8, end of turn [at start 9, + 0 hits May II Axis Turn, – 1 repair this turn = 8]
- Malta Repair Rate: 1 repair point each turn.
Valletta (18A:0407):
3-cap permanent airfield; one hit of damage
Valletta hex flack factor: 4 (3 intrinsic, + only 1 for the 0-1-8 hv AA II’s normally 2 flack factor, currently halved for still being Red U-2 because of the lack of gsp’s at Malta in the I. Phase).
3-6* Inf X 1 M
2-6* Inf X 2 M
1-8 MG II 2 Ch
0-1-8 Hv AA II AA=2 10
0-4 Cons X MC
4 gsp’s generated on the Jun I 41 Allied turn I. Phase [these were sea transported from Gibraltar, using 1 W Med NTP in the naval movement step of the M. Phase]
Note: This turn all ground units on Malta are still definitely Allied U-2 in the Allied I. Phase.
Jun I 41 Allied EOT dispositions: Libya, Sicily, and Malta
In Libya [end of turn]:
Tobruch (18A:4817) [clear terrain improved fortress/standard port]:
improved fortress; construction of the improved fortress was completed in the May II 41 Allied I. Phase.
3-cap temporary airfield; in the M. Phase the cons III expends MPs to increase the temp airfield cap to 3.
0-1-4 Cons X 66 RPC (Col) [never moved; expends 2 MPs in the hex to increase temporary airfield cap; this turn becomes technically Red U-3]
0-1-8 Hv AA II AA=2 51 [never moved; this turn becomes technically Red U-3]
7-8 Inf XX 9 (Aus) [never moved; this turn becomes technically Red U-3]
2-8 Inf X 16 [never moved; this turn becomes technically Red U-3]
2-1-6 Tnk II 7 RT [never moved; this turn becomes technically Red U-3]
3-8 Art X 13 [never moved; this turn becomes technically Red U-3]
2-8 Inf X 23 [never moved; technically still Black U-2]
one step of attack supply [turn reinf; sea transported to here]
one step of attack supply [began turn here; never moved]
Hurri 1 5F5 1/8 SAAF [operative; began turn here; never moved; technically still Black U-1]
12 gsp’s
- These gsp’s were broken down in the May II 41 Axis I. Phase from a step of attack supply present in the hex. This provides general supply to the forces in the Tobruch hex in the Jun I 41 Allied I. Phase and the Jun I 41 Axis I. Phase.
Jun I 41 Allied EOT dispositions: eastern Libya, western Egypt, Crete, mainland Greece, the Aegean Sea region
In Egypt [end of turn]:
19A:1219 [clear terrain Siwa road hex, 1 hex S of Matruh]:
1-10* Mot SG X AA=1 2 [began the turn here; never moved]
3-2-10 Arm X 7 [began the turn here; never moved]
19A:1320 [clear terrain hex]:
1-2-10* Mot SG X AA=1 7 [began the turn here; never moved]
1-10* Mot Inf X 3 (Ind) [began the turn here; never moved]
19A:1420 [clear terrain hex]:
3-8 Inf X 22 G [began the turn here; never moved]
Matruh (19A:1218) [clear terrain point city/minor port road/major rail junction coast hex]:
railhead marker
3-cap permanent airfield
fort marker (construction complete this I. Phase)
8* Inf XX HQ 6 [began turn here; never moved]
2-8 Inf X 5 (SA) [began turn here; never moved]
1-8 MG II 1 RNF [began turn here; never moved]
0-8 Lt AA II AA=1 57 [began turn here; never moved]
P-40C 5F5 1/13 SAAF [operative; began turn here; never moved]
Well 1C 3NB4 1-6/28 [inop; began turn here; late in the E. Phase did strat port bombing air mission to Porto Bardiya hex, scored a Hit; returned to base here]
19A:1418 [clear terrain major rail coast road hex]:
3-cap permanent airfield
19A:1521 [clear terrain hex]:
2-8* Inf X 5 (Ind) [began turn here; never moved]
19A:1621 [clear terrain hex; adjacent to Qattara Depression]:
2-8* Inf X 11 (Ind) [began turn here; never moved]
El Alamein 19A:2119/20A:5033 [clear terrain point city major rail coast road hex]:
2-cap temporary airfield
0-1-4 Cons X 43 RPC [began turn at Suda Bay, on Crete; successfully sea transported from Crete to Alexandria, where it disembarked; then railed to here]
- In the 1941 ME/ER-II/Crete Scenario this unit is considered a fragile unit and cannot be rebuilt if eliminated. This is per analysis of the WitD Allied OB booklet’s Jun I 41 ME Command Replacement Pool stipulation,found on p. 13, and the identical ER-II Allied OB stipulation.
Alexandria (20A:4930/19A:2416) [major port/full city hex/major rail line coast hex]:
Supply Terminal marker
3-cap permanent airfield
0-1-8 Hv AA II AA=2 68 [turn reinf; disembarked here; never moved]
2-8 Inf X 6 (NZ) [began turn at Suda Bay; retreated after combat to here from Khania on the previous May II 41 Axis Combat Phase; this turn successfully sea transported to Alexandria, where it disembarked; remained here]
2-8 Inf X 19 (Aus) [began turn at Suda Bay; did Reaction movement into Suda Bay hex on the previous May II 41 Axis M. Phase; this turn successfully sea transported to Alexandria, where it disembarked; remained here]
Glad 3F3 0/8 [operative; began turn here; never moved]
Blen 4 3B3 1-2/23 [inop.; began turn at 19A:1418; in C. Phase staged to Cairo partial city hex and performed GS air mission at 20A:4509, in the Vichy French Levant; returned to base here at the end of the C. Phase]
1 resource point [never moved]
one step of attack supply [never moved]
4 gsp’s, generated in the current turn’s I. Phase
Cairo (19A:3320) [clear terrain partial city hex]:
3-cap permanent airfield
Suez (19A:3718) [clear terrain reference city/major port major rail line terminus coast hex]:
Supply Terminal marker
4 gsp’s, generated in the current turn’s I. Phase
In Palestine [end of turn]:
Tel Aviv (20A:5011) [clear terrain dot city/minor port major rail line junction coast hex]:
0-8 Hv AA II AA=1 2 (Aus) [began turn at 19A:1418, in Egypt; railed to here]
A-22 3A3 2-1/19 [inop.; began turn at Matruh; in C. Phase staged to Mansura (19A:3115), in the Delta zone, and performed GS air mission at 20A:4509, in the Vichy French Levant; returned to base here at the end of the C. Phase]
Blen 4 3B3 1-2/23 [inop.; began turn at 19A:1418; in C. Phase staged to Cairo partial city hex and performed GS air mission at 20A:4509, in the Vichy French Levant; returned to base here at the end of the C. Phase]
Haifa (20A:4710) [clear terrain dot city/major port transportation line junction coast hex]:
railhead marker [per WW Rule 41B1a-Western Desert Campaign Starting Conditions, “the transportation line from Haifa to Tripoli (20A:4005) is a road, not a railroad.” This stipulation is used in the 1941 ME/ER-II/Crete Scenario. More later on its construction.]
0-8 Marine Cmdo II ME [began turn at Haifa; never moved]
1-8 Inf II 11 (CS) [began turn at Rutbah (21A:5023); air transported to here by the Bombay T type air unit at the beginning of the the M. Phase]
Bombay 1T2 1-2/15 [inop.; began turn at Rutbah; air transported the 1-8 Inf II 11 (CS) to Haifa in the M. Phase; rebased here]
Hurri 1 5F5 1/8 [inop.; began turn at Haifa; in the C. Phase flew the Escort air mission to the 20A:4607 target hex, in the Vichy French Levant; returned to base here at the end of the C. Phase]
20A:4609 [clear terrain transportation line coast hex, N of Haifa]:
3-8* Mtn X Karp (Pol) [began turn at Haifa; moved one hex north to here; in the C. Phase participated in an attack at Sour (20A:4509), in the Vichy French Levant; remained here after the Combat]
Safad (20A:4608) [rough terrain point city hex]:
2-8 Inf X 14 [began turn at Rethymnon, on Crete; successfully sea transported from Crete to Haifa, then regular moved 2 hexes to here; in the C. Phase participated in an attack at 20A:4508, in the Vichy French Levant; remained here after Combat]
1-8 Cav X 5 [began turn at Haifa; regular moved 2 hexes to here; in the C. Phase participated in an attack at 20A:4508; remained here after Combat]
20A:4808 [rough terrain hex]:
1-8 Cav X 6 [began turn at Tel Aviv; regular moved to here]
Allied Units in the Vichy French Levant [end of turn]:
Sour (20A:4509) [clear terrain point city transportation line coast hex]:
2-8 Eng X 1 (Aus) [began turn at El Alamein; railed to Haifa, then moved one hex north to 20A:4609; in the C. Phase participated in an attack at Sour, in the Vichy French Levant; moved into the hex after the Combat]
1-8 Art II 1 (Aus) [turn reinf; disembarked at Haifa, then moved one hex north to 20A:4609; in the C. Phase participated in an attack at Sour, in the Vichy French Levant; moved into the hex after the Combat]
2-1-6 Tnk II 4 RT [began turn at Nazareth (20A:4809); regular moved 2 hexes north to Safad (20A:4608); in C. Phase participated in an attack at 20A:4508, in the Vichy French Levant; advanced into 4508 after Combat; in the E. Phase exploited one hex to here]
20A:4508 [rough terrain hex]:
7-8 Inf XX 7 (Aus) [began turn at Alexandria; railed to Haifa, then regular moved 2 hexes to Safad (20A:4608); in the C. Phase participated in an attack at 20A:4508, in the Vichy French Levant; advanced into the hex after Combat]
20A:4708 [rough terrain hex]:
2-8* Inf X 7 (Ind) [began turn at 20A:4709, in Palestine; regular moved to here; in the C. Phase participated in an attack at 20A:4607; remained here at 4708 after Combat]
20A:4607 [rough terrain hex]:
3-8* Inf X 1 FL (FF) [began turn at Haifa; regular moved to 20A:4708; in the C. Phase participated in an attack in at 20A:4607, in the Vichy French Levant; advanced into the hex after Combat]
1-8 AT II 65 [began turn at Haifa; regular moved 2 hexes to Safad (20A:4608); in the C. Phase participated in an attack at 20A:4607, in the Vichy French Levant; advanced into the hex after Combat]
21A:3116[clear terrain road hex]:
2-1-10* Mot Inf X Hab [began turn at 22A:2826, W of Baghdad, in Iraq; admin moves northwards along major rail line to 21A:3608, SE of Mosul, in Iraq; moves through Mosul in the E. Phase, exploiting westwards along the major rail line hexes and ending the turn inside the Vichy French Levant.]
On Cyprus [end of turn]:
Limassol (20A:3615) [clear terrain point city/standard port coast road hex]:
1-cap permanent airstrip [per WitD Allied OB booklet]
5 pos flk unit AA=1 [Br; began turn at Suda Bay; successfully sea transported from Crete to Limassol; remained here]
Nicosia (20A:3413) [clear terrain reference city road hex]:
Glad 3F3 0/8 [inop.; began turn at Haifa; air transferred to here late in the E. Phase]
Famagusta (20A:3411) [clear terrain point city/standard port coast road hex]:
1-cap permanent airstrip [per WitD allied OB booklet]
Jun I 41 Allied EOT dispositions: the vast east Mediterranean Sea basin
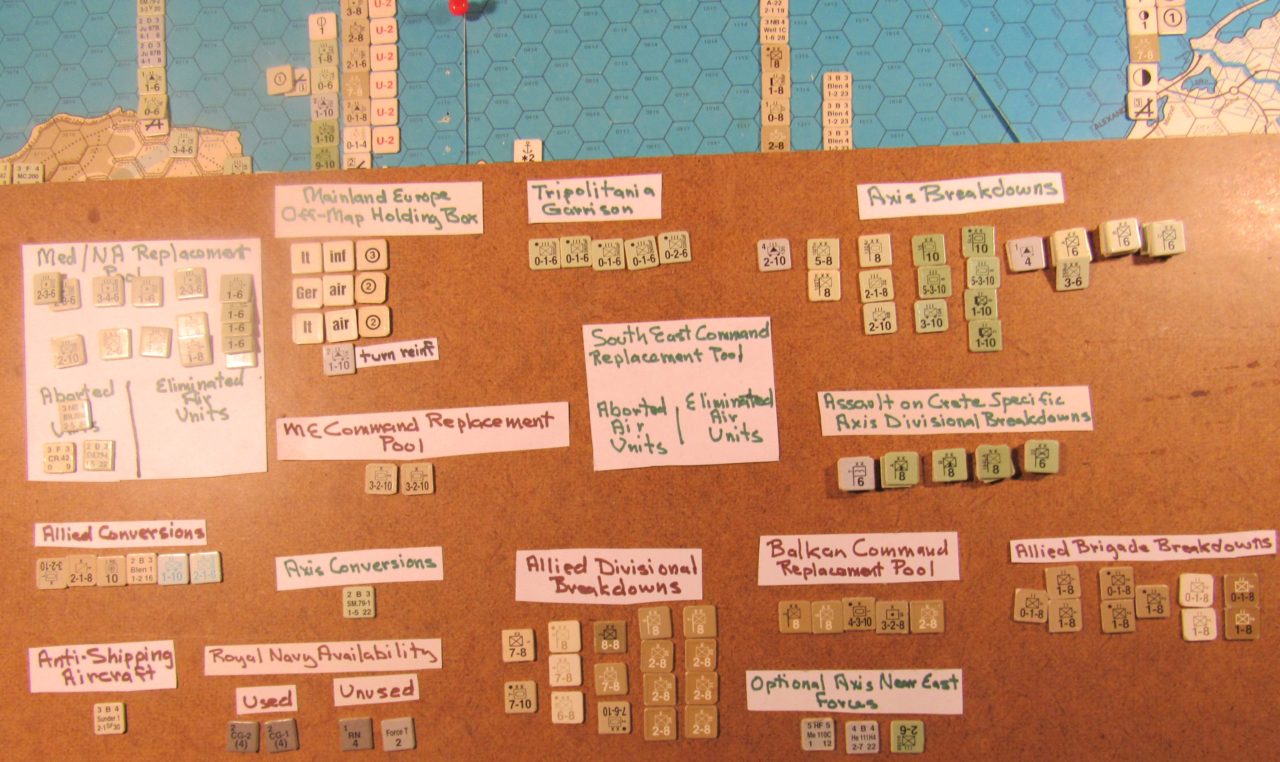
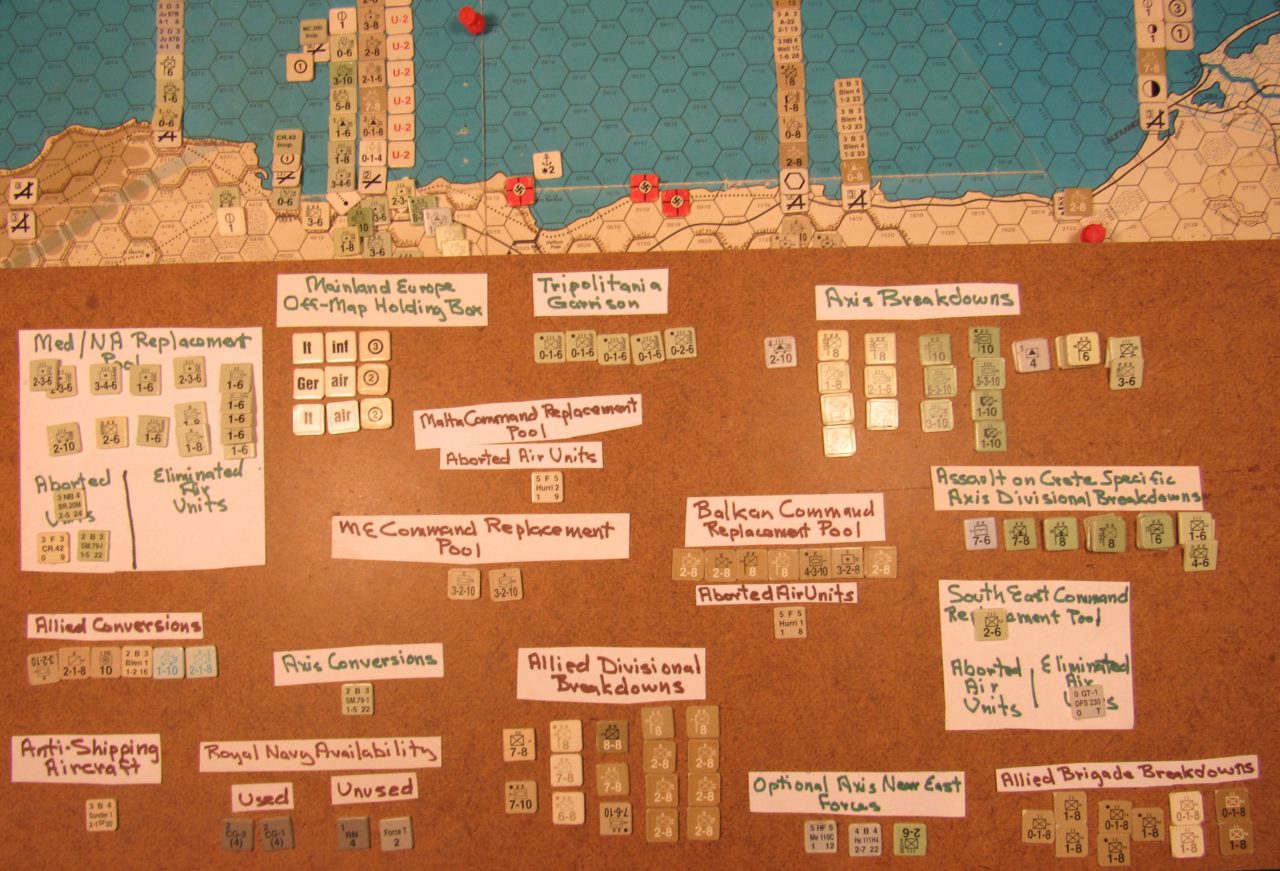
Middle East (ME) Command Replacement Pool [end of turn]:
3-2-10 Arm X 3 [eliminated in combat on the Mar II 41 Axis turn C. Phase of the EA game report]
3-2-10 Arm X 4 [in the Scenario at-start in the ME Replacement Pool, per ER-II]
Eliminated Air Units Box:
Blen 4 3B3 1-2/23 [inop.; began turn at 19A:1418; in C. Phase it staged to Cairo partial city hex and flew the GS air mission at 20A:4607, participating in the first Allied attack in the Vichy French Levant; killed in air combat w/ the bypassing Vichy Fr D 520 F type air unit flying the Interception air mission]
In the Allied Near East Command:
In Iraq [end of turn]:
- Iraqi coup collapse occurs in the May II 41 Axis I. Phase. At that time all Iraqi forces/production are removed from the map and the Iraq Replacement Pool. At the end of that turn all Iraqi territory is Allied owned; except in our case the Mosul hex, which at the time contained the Axis Conditional Reinforcement Ger LW Mxd A type air unit.
- At the beginning of this turn the new Allied Iraqi railnet-cap is 3 1/2.
Jun I 41 Allied EOT dispositions: Iraq and eastern Vichy Syria
Jun I 41 Allied EOT dispositons: off-map display details
Allied Conditional Reinforcements
Iraqi Coup Reaction Forces
Coup Turn 5/Jun I 41 Allied Turn
Near East:
Arrive:
2 x 2-8 Inf X 24, 25 (Ind)
Rutbah (21A:5023) [stony desert point city road junction hex]:
1-cap permanent airstrip [Allied owned]
1-10 Mot Cav III AL (T-J) [Arab Legion; began turn at 22A:2827, E of Habbaniya; admin moved to here. This is a provisional new unit introduced in the 1941 ME/ER-II/Crete Scenario on the May I 41 Allied turn. For more details, see that posted EA game report.]
Habbaniya (22A:2828) [clear terrain point city hex]:
3-cap permanent airfield
0-1-4 Static II 1 As (Col) [began turn at 22A:2826, W of Baghdad; regular moved to here]
Audax 1A1 1/8 [operative; began turn here; never moved]
Baghdad 22A:2825 [clear terrain partial city transportation line junction hex]:
one hit marker on airbase
21A:4109 [clear terrain major rail hex, to Mosul]:
2-8 Inf X 21 (Ind) [began turn at Habbaniya; admin moved along transportation lines to here]
21A:4507 [clear terrain major rail hex, to Mosul]:
8* Inf XX HQ 10 (Ind) [began turn at 22A:3324; admin moves along transportation lines to here]
1-8 Inf X 20 (Ind) [began turn at 22A:3324; admin moves along transportation lines to here]
22A:3022 [clear terrain road hex (on map 22A it is shown as a secondary rail line)]:
2-8 Inf X 25 (Ind) [turn Allied Conditional Reinforcement; disembarked at Kut-al-Imara port hex (w/ a major river hexside) 22A:3219; regular moved to here after crossing the major river hexside]
22A:4217 [clear terrain secondary rail line hex]:
one step of attack supply [began turn at 22A:4021; in E. Phase spends 5 SMPs moving to here]
Shaibah (22A:4314) [clear terrain secondary rail line hex]:
3-cap permanent airfield
0-1-4 Static II 2 As (Col) [began turn at Basra; moved one hex to here]
Basra (22A:4313) [clear terrain dot city/major port, w/ a major river hexside]:
Allied Supply Terminal marker
2-8 Inf X 24 (Ind) [turn Allied Conditional Reinforcement; disembarked at Basra; remained here]
one step of attack supply [never moved]
Allied Balkan Command
Special Assault on Crete Segment Jun I 41 Allied Dispositions [{at start}/end of turn]:
Crete:
- The island has both Allied and Axis forces on it.
Suda Bay 18A:4503/15B:2113 [for “Suda Bay,” see Rule 12C1c; rough terrain coast road hex]:
Allied Supply Terminal marker
port upgrade marker
{3-cap temporary airfield (w/ one hit) [the temporary airfield is removed early in the M. Phase after the 0-1-4 cons X beginning the turn in the hex embarks on an E Med NTP and evacuates Crete]}
1-4 Static X Khania (Greek) [began turn at Suda Bay; never moved]
0-2-0 Hv AA X AA=4 MNBDO 1 [began turn at Suda Bay; never moved]
Rethymnon (18A:4603/15B:2212) [rough terrain point city/standard port coast road hex]:
1-4 Static X Reth (Greek) [began turn here; never moved]
Erakleion (18A:4903/15B:2310) [rough terrain reference city/standard terrain coast road hex]:
hit marker on the reference city airbase
1-4 Static X Erak (Greek) [began turn here; never moved]
Balkan Command Replacement Pool [end of turn]:
4-3-10* Arm X 1
3-2-8 Art X W
8 Inf XX HQ 2 (NZ)
8 Inf XX HQ 6 (Aus)
2-8 Inf X 4 (NZ) [eliminated in May II 41 Axis Combat Phase]
2-8 Inf X 16 (Aus) [eliminated in May II 41 Axis Combat Phase]
3-8 Inf X 5 (NZ) [began turn at Suda Bay; eliminated this turn in sea transport from Crete due to Axis Naval Patrol bombing]
1-8 Marine Cmdo X Layf [began turn at Hagios Nikolaus; eliminated this turn in sea transport from Crete due to Axis Naval Patrol bombing]
2-8 Inf X 17 (Aus)
- In the May II 41 Allied turn EA game report for the WW 1941 ME/ER-II/Crete Scenario, at the beginning of the special Assault on Crete segment, this unit was initially placed in the BC Replacement Pool. This is because it was not indicated as part of the Allied initial forces of the WW Assault on Crete Scenario, found in the WW OB booklet, although it was duly sent to Greece on the Mar II 41 Allied turn, per the WW Balkan Campaign Scenario Allied OB. However, there are good indications per F. Watson’s “Syria: Operation Exporter” Europa battle scenario Scenario Notes, found in TEM#81, and also in Vol. 2 of Playfair’s history, at p. 101, that the beach evacuated components of this unit (and also the Aus 16th Inf X) from mainland Greece, in the southern Peloponnese, eventually made it to the Middle East prior to the final Allied evacuation of Crete. In game terms this would likely be essentially through the mechanics of WW Optional Rule 34D-Emergency Evacuation. Accordingly, very likely in the further worked draft OB for the new Scenario, which is intended to eventually be available at one or two websites, the 2-8 Inf X 17 (Aus) will Arrive at the ME Replacement Pool on the May II 41 Allied turn Initial Phase, along with 1 Aus inf RP at any Middle East supply terminal hex, and thereby be available in the ME Command by the Jun I 41 Allied turn, just as in Watson’s “Syria” Europa battle scenario. But for now here we will stay the course done in the previous EA game reports.
Axis Southeast Command
Special Assault on Crete Segment Jun I 41 Allied turn non-phasing Axis Dispositions [{at start}/end of turn]:
At Rodi:
Rodi (20A:2230): [clear terrain major port point city coast hex]
3-cap-permanent airfield
3-4-6 Inf XX 50 Reg
1-2-5 Art X 35
1-2-5 Art X 36
1-0-6 Lt Tnk II 312
0-6 Lt AA II AA=1 Rodi
Mxd F 2F2 0/8 [operative; began turn here; never moved]
Ju 52 1T2 0/20 [inop.; began turn here; Axis Conditional Reinforcement; flipped to its inop side at step 21 of the I. Phase due to airfield capacity]
MC 200 3F4 1/8 [inop.; began turn here; late in I. Phase flew a non-phasing CAP air mission over the Scarpanto airfield hex (19A:0701); returned to base here at the end of the E. Phase]
Mxd 2A3 1-1/16 (Ger LW) [operative; began turn here; Axis Conditional Reinforcement; never moved]
- I currently don’t believe this unit, or its conversion, should be allowed to do Naval Patrol air missions in the context of the new Scenario; nor should it be allowed to transfer to Sicily or the Western Desert. I’m currently thinking it could, however, do the GS or DAS air missions in Iraq, Vichy Levant, Palestine, Trans-Jordan, Cyprus, or Crete, in addition to port, transportation line, or airfield bombing air missions. Or it may well be soon permanently withdrawn, per WW Optional Rule 38J6.
20A:2331: [rough terrain coast hex]:
3-cap permanent airfield
1-6 Hv AA III AA=2 Rodi
Ju 88A1 3B5 3-5/26 (Ger LW) [inop.; began turn here; did Naval Patrol air mission; returned to base here]
Ju 88A1 3B5 3-5/26 (Ger LW) [inop.; began turn here; did Naval Patrol air mission; returned to base here]
Ju 88A1 3B5 3-5/26 (Ger LW) [inop.; began turn here; did Naval Patrol air mission; returned to base here]
Mxd B 1B2 1-2/21 [inop.; began turn here; Dodecanese garrison; flipped to its inop side at step 21 of the I. Phase due to airfield capacity]
On Scarpanto:
Scarpanto (19A:0701): [rough terrain minor port point city hex]
3-cap permanent airfield
0-1-6 Lt AA II AA=1 Scar
Me 110D 5HF5 4-2/12 (Ger LW) [inop.; began turn here; did Naval Patrol air mission; returned to base here]
Ju 87R 2D3 4-1/13 (Ger LW) [inop.; began turn here; did Naval Patrol air mission; returned to base here]
Ju 87B 2D3 4-1/8 (Ger LW) [inop,; began turn here; did Naval Patrol air mission; returned to base here]
On Melos (15B:1610):
3-cap permanent airfield
Me 109E 7F5 1/7 (Ger LW) [operative; began turn here; never moved]
Ju 87B 2D3 4-1/8 (Ger LW) [inop,; began turn here; did Naval Patrol air mission; returned to base here]
Ju 87B 2D3 4-1/8 (Ger LW) [inop.; began turn here; did Naval Patrol air mission; returned to base here]
On Crete:
- The island has both Axis and Allied forces on it.
18A:4304/15B:2115 [rough terrain coast hex; SW of Khania]:
1-5 Glider II 1 St (Ger LW) [still disrupted this turn; this turn becomes technically Red U-1]
2-5 Para III 1 St (Ger LW) [this turn becomes technically Red U-1]
Khania (18A:4403/15B:2115) [rough terrain reference city/standard port road terminus coast hex]:
2-5 Para III 7/1 (Ger LW) [this turn becomes technically Red U-1]
2-5 Para III 7/2 (Ger LW) [this turn becomes technically Red U-1]
2-5 Para III 7/3 (Ger LW) [this turn becomes technically Red U-1]
1-6 Marine Cmdo II Gr/SM [still disrupted this turn; this turn becomes Red U-1]
3-8 Mtn III A (Ger) [this turn becomes Red U-1; an unsupported component of the Ger 7-8 Mtn XX 5]
2-6 Eng III 685 (Ger) [this turn becomes Red U-1]
one gsp [generated in the May II 41 Axis I. Phase]
Me 110C 5HF5 1/12 (Ger LW) [operative; began turn here; never moved; this turn becomes technically Red U-1, but is in Axis designated special supply via the single gsp, also in the hex]
Mainland Greece:
15B:1415 [southeastern Peloponnese rough terrain coast hex]:
3-cap temporary airfield
5 pos flk AA=1 (Ger LW)
Me 109 E 7F5 1/7 (Ger LW) [inop.; began the turn here; late in the I. Phase flew a non-phasing CAP mission over the Suda Bay hex (18A:4503), on Crete; returned to base here at the end of the E. Phase]
He 111H 4B4 2-7/S/22 (Ger LW) [inop.; began turn here; did Naval Patrol air mission; returned to base here]
G 50 bis 3F3 0/10 [operative; began turn here; never moved]
Kalamai (15B:1118) [clear terrain reference city/standard port secondary rail line terminus coast hex]:
2 x 5 pos flk AA=2 (Ger LW)
Ju 52 1T2 0/20 (Ger LW) [operative; began turn here; never moved]
15B:0914 [eastern Peloponnese rough terrain coast hex; E of Nauplion, SE of Korinthos]:
3-cap temporary airfield
2 x 5 pos flk AA=2 (Ger LW)
Do 17Z 3B4 3-4/13 (Ger LW) [inop.; began turn here; did Naval Patrol air mission; returned to base here]
Do 17Z 3B4 3-4/13 (Ger LW) [inop.; began turn here; did Naval Patrol air mission; returned to base here]
{Do 17Z 3B4 3-4/13 (Ger LW) [Aborted; began turn here; did Naval Patrol air mission; aborted by E Med NTP flack and placed in the Aborted Air Units Box of the SE Command Replacement Pool]}
15B:0813 [rough terrain secondary rail line coast hex, E of Korinthos]:
3-cap temporary airfield
5 pos flk AA=1 (Ger LW)
3-8 Mtn III A (Ger) [unsupported breakdown of 7-8 Mtn XX 5]
Athenai (15B:0911) [great port/full hex city transportation line junction coast hex]:
6 Para XX HQ 7 (Ger LW)
7-8 Mtn XX 6 (Ger)
2-6 Eng III 690 [any] (Ger)
1-8 Ski II MC
2 x 5 pos flk AA=2 (Ger LW)
one step of attack supply
3 x Ju 52 1T2 0/20 (Ger LW) [all operative; all began turn here; all never moved]
Z 506B 2B3 2-4/F/22 [operative; began turn here; never moved]
15B:0811 [clear terrain secondary rail line coast hex, NW of Athena]:
3-cap permanent airfield
5 pos flk AA=1 (Ger LW) [began turn here; never moved]
2 x Ju 52 1T2 0/20 (Ger LW) [both operative; both began turn here; both never moved]
Lauren (15B:1111) [clear terrain point city/minor port secondary rail terminus coast hex]:
8 Mtn XX HQ A (Ger) [HQ unit breakdown of 7-8 Mtn XX 5]
15B:0711 [clear terrain transportation line junction coast hex, 2 hexes N of Athenai]:
3-cap temporary airfield
5 pos flk AA=1 (Ger LW)
2 x Ju 52 1T2 0/20 (Ger LW) [both operative; both began turn here; both never moved]
Levadia (15B:0612) [clear terrain major rail line hex]:
3-cap temporary airfield
3 x Ju 52 1T2 0/20 (Ger LW) [all operative; all began turn here; all never moved]
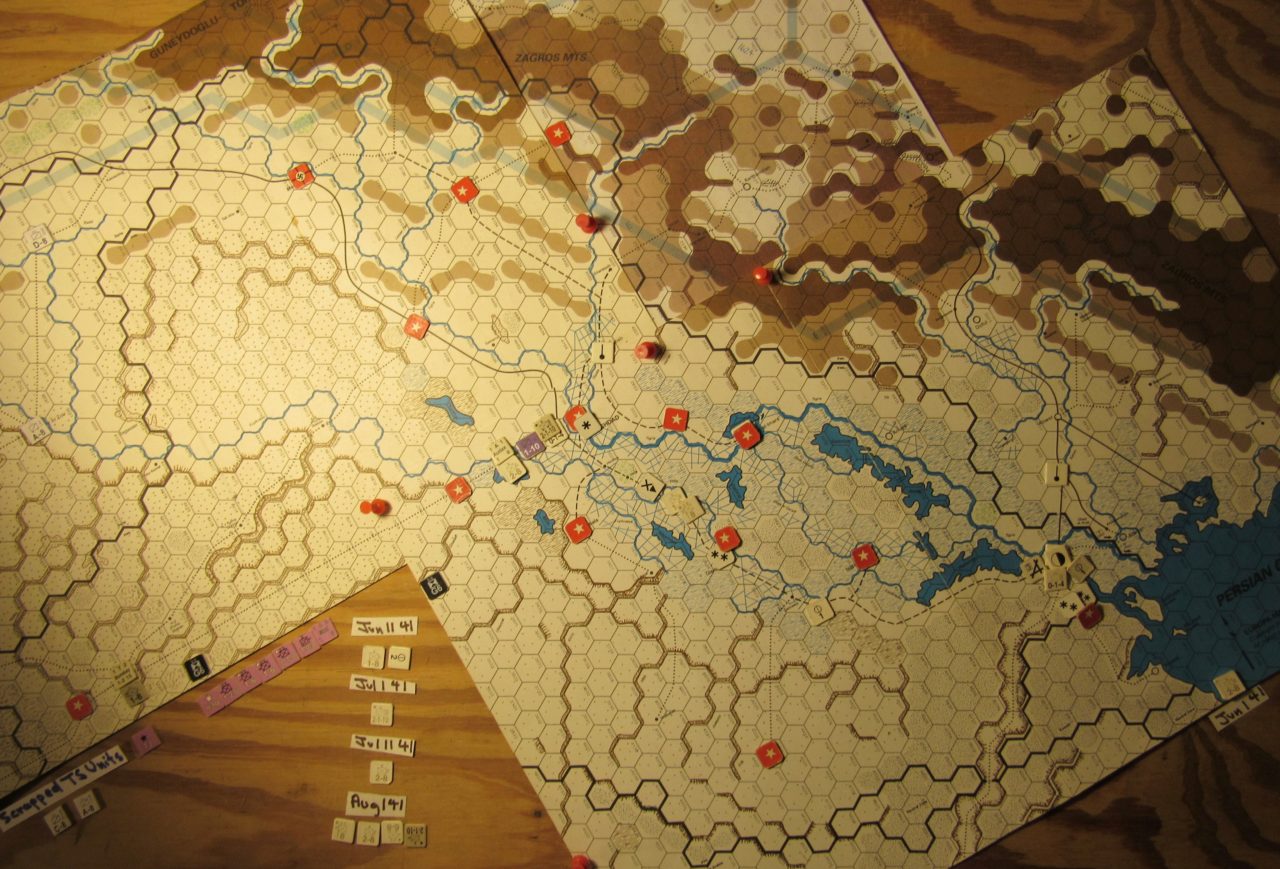
Jun I 41 Allied end of the I. Phase dispositons: Iraq
Initial Conditions
Standard Supply Terminals: Damas (20A:4505/19A4701) and Beyrouth (20A:4207).
Steps of attack supply: 1 step each at Damas and Beyrouth.
SMPs: 5
Rail Capacity, Levant Rail net: 4.
Airfields: a 1-cap permanent airstrip at Rayak (20A:4306) [based on Watson’s “Syria: Operation Exporter” Europa battle scenario, but he uses a 3-cap temporary airfield]
Intrinsic AA: Per the WW Intrinsic Light AA Summary, 1 point per dot and major city hex in the Levant.
Provisional Initial Forces Set-Up stipulations/requirements for the Vichy French Levant forces, done exclusively for the Jun I 41 turn of the EA reported Scenario project:
- The notation “TFL” refers to the TEM#81 article by Jean-Guy Rathe entitled “Troupes Francaises du Levant Order of Battle (Land), June 1941”.
- The notation “Syria” refers to the TEM#81 Europa Battle Scenario article by Frank Watson entitled “Syria, Operation Exporter: June-July 1941”.
- The “WW” reference is for the WW Western Desert Scenario Neutral Nations OB for Vichy Levant forces found only on the WD map group map 19A; and so this OB deliberately omits those Vichy French Levant forces found on the NE map group maps 20A and 21A.
- The “WitD” reference is for the WitD Neutral Nations OB booklet.
- The “Scenario” references are for the WW 1941 ME/ER-II/Crete Scenario project.
- The OB instructions below are the basic parameters used for the Vichy Levant set-up done expressly for the EA game report, just in case anyone might want to tinker with it. Right now these set-up “parameters” are intended to closely coincide with the finished Scenario product Vichy French Levant OB, pending any further input. In the EA reported Scenario some of the new Vichy Levant Troupes Speciales (TS) units have certain movement restrictions while other TS units don’t; but all non-TS Vichy French Levant units may move freely after the Allied invasion.
Within 2 hexes of the Palestine/Lebanon border:
2-6* Inf III 22 TA (Afr) [per “Syria,” WitD, WW, & TFL. The Scenario game report has it beginning at 20A:4509. It is eliminated in the Jun I 41 Allied C. Phase]
2-6* Inf III 29 TA (Afr) [per “Syria,” WitD, WW, & TFL. The Scenario game report has it beginning at 20A:4508. It is D-backed to 20A:4407 in the Jun I 41 Allied C. Phase]
C-8 Cav III Ligne (TS) [new TS unit per TFL; the Scenario draft OB Palestine/Lebanon border stipulation appears to correspond w/ his article. After the Allied invasion it can move freely. The Scenario game report has it stacked w/ the 1-8 Cav III 2 MS (Afr) at 20A:4607. In the Jun I 41 Allied C. Phase it is Dispersed in the cohesion check die roll and then placed in the Sud-Syrie territory box.]
Within 2 hexes of the Transjordan/Syria border:
1-2-6* Inf III 16 TT (Afr) [revised unit per TFL; “Syria,” WitD, and WW indicate it as a 1-6* inf III; the Scenario game report has the revised TFL unit beginning at 20A:4806]
2-6* Inf III 17 TS (Col) [revised unit per TFL; “Syria,” WitD, and WW indicate it as a 2-6* inf III; the Scenario game report has the revised TFL unit beginning at 20A:4707]
Damas (20A:4505) [clear terrain dot city transportation line junction hex]:
Standard Supply Terminal marker [Vichy French Levant specific]
2-1-6* Lt Arm III 6 CdA (Afr) [revised unit per TFL; “Syria,” WitD, and WW indicate it as a 1-6* lt arm II]
2-1-6* Lt Arm III 7 CA (Afr) [revised unit per TFL; “Syria,” WitD, and WW indicate it as a 1-6* lt arm II]
1-6 Inf II V/1 TM (Afr) [new unit per TFL; the Scenario draft OB placement appears to correspond w/ his article]
A-8 Cav III Tcher (TS) [new TS unit per TFL; the Scenario draft OB placement appears to correspond w/ his article. After the Allied invasion it can move freely. Note: It was decided to add this TS unit to the game in the process of the Jun I 41 Allied turn, and is admittedly not in the earlier posted photos of the game board.]
one step of attack supply [per WitD/WW and TFL; required set-up here per the Scenario draft OB]
Beyrouth (20A:4207) [rough terrain dot city/standard port transportation line junction coast hex]:
Standard Supply Terminal marker [Vichy French Levant specific]
one step of attack supply [per TFL; in the Scenario game report the step of attack supply is stacked w/ the 1-8 Cav III 1 SM (Afr), which is placed at-start “anywhere in the Levant.” Per the Scenario OB at least one permitted Vichy French Levant unit must be placed at-start at Beyrouth. This second step of Vichy French attack supply is not indicated in “Syria,” WitD, or WW.]
Tripoli (20A:4005) [rough terrain reference city minor port transportation line coast hex]:
railhead marker [per WW Rule 41B1a-Western Desert Campaign Starting Conditions, “the transportation line from Haifa to Tripoli (20A:4005) is a road, not a railroad.” This stipulation is used in the 1941 ME/ER-II/Crete Scenario. More later on its construction.]
3-6* Inf III 24 MC (Col) [per “Syria,” WitD, and TFL]
Alep (21A:3231) [clear terrain partial city transportation line junction hex]:
0-1-5 Cons X Lev (Col) [per “Syria,” WitD, and TFL]
4-3-6* Inf III 6 LE (LE) [revised unit per TFL; “Syria” and WitD indicate it as a 3-2-6* inf III]
C-8 Cav III NSyr (TS) [new TS unit per TFL. The Scenario draft OB places this unit at-start at Alep, and this appears to somewhat correspond w/ his article; but it can move freely after the Allied invasion.]
Lattique (20A:3405) [clear terrain reference city/minor port road terminus coast hex]:
A-5 Inf III 1 Lev (TS) [new TS unit per TFL. The Scenario game report places this unit at-start at Lattique, and this appears to correspond w/ his article. But in the Scenario draft OB at least one permitted Vichy French Levant ground unit must be placed at-start at Lattique. After the Allied invasion its operational area is restricted to the area north of the Lebanon border and on or west of the major rail line going from Tripoli-Homs-Hama-Alep-Turkish border, in Syria. This restriction is lifted if it is pushed/moved out of its operational area due to movement in a C. Phase.]
Hassetche (21A:3218) [clear terrain point city road hex]:
D-8 Cav III Djez (TS) [new TS unit per TFL; the Scenario draft OB places this unit at-start at Hassetche, and this appears to correspond w/ his article. In the Scenario draft OB it is a required at-start unit and must remain at Hassetche until it moves out of the hex by movement after combat, after which it may move freely. The reason is that evidently the historical Allied push into the Vichy French Levant from NW Iraq encountered definite although admittedly brief resistance at Hassetche, and it was likely due to this unit.]
Deir ez Zoir (21A:3922) [reference city road junction hex]:
A-8 Mot Cav III Lev (TS) [new TS unit per TFL; the Scenario draft OB requires this unit be placed at-start at either Damas, Palmyre, or Deir ez Zoir. In any event at least one permitted Vichy French Levant ground unit must be placed at-start at Dier ez Zoir. If placed at Damas it may move freely after the Allied invasion. If placed at Palmyre or Deir ez Zoir it may move freely on the 2nd turn of Invasion, eg., in our EA game reported case, on the Jun II 41 Axis turn.
Anywhere in the Levant:
1-8 Cav III 1 SM (Afr) [per “Syria,” WitD, WW and TFL. In the Scenario game report it begins at Beyrouth (20A:4207), stacked with the step of attack supply starting there, per TFL.]
1-8 Cav III 2 MS (Afr) [new unit per TFL. Rathe appears to substitute it for one of the other two 1-8 cav IIIs in WitD/WW, but he omits the third 1-8 cav III indicated in the “Syria,” WitD, and WW OBs. In the Scenario EA game report it begins at 20A:4607, close to the Palestine border, stacked w/ the C-8 Cav III Ligne (TS). In the Jun I 41 Allied C. Phase it is eliminated in combat. The C-8 Cav III Ligne (TS) is dispersed per the cohesion check die roll and placed in the Sud-Syrie territory box.]
Any airbase in the Levant:
D 520 6F5 0/11 [This is a Mar I 41 Axis turn conversion of the original Fr MS 406 4F4 0/8 air unit. In the Scenario EA game report it begins at Damas. On the Jun I 41 Allied C. Phase it performs the Intercept air mission at the 20A:4507 target hex, and after bypassing the escorting Br Hurri 1 air unit, kills in air combat the Br Blen 4 air unit there on the GS air mission. It rebases at Damas.]
Provisional special considerations regarding the Troupes Speciales (TS) units:
- Use the Troupes Speciales Rules found on pp.44-45 of Rathe’s TEM#81 article.
- At the start of the Scenario two TS units must be considered permanently Removed. One of these Removed units must be the D-8 Cav III PTch, which is evidently always “Removed” the “1st turn of invasion,” per Rathe’s article, p. 44. The other required Removed unit must be either the A-8 Cav III Tcher, or the A-8 Cav III Ligne, or the A-5 Inf III 1 Lev, or the B-5 Inf III 2 Lev, or the B-5 Inf III 3 Lev, or the C-8 Cav III NSyr, or the C-8 Cav III Druze.
- At the start of the Scenario at least two TS units must be scrapped. The two initially scrapped TS units must be either the A-8 Cav III Tcher, or the A-8 Cav III Ligne, or the A-5 Inf III 1 Lev, or the B-5 Inf III 2 Lev, or the B-5 Inf III 3 Lev, or the C-8 Cav III NSyr, or the C-8 III Druze. Scrapping these two units fetch the Axis player .5 TS inf RPs, stored at Damas, at the start of the Scenario.
- If the C-8 Cav III Druze (TS) is neither initially Removed nor scrapped, it must be placed at-start at Soueida (20A:4905). After the Allied invasion it may move freely. In the EA game report this unit is scrapped at-start, along with the B-5 Inf III 3 Lev (TS).
- If the B-5 Inf III 2 Lev is neither initially Removed nor scrapped, it must be placed at-start at either Damas or Deir ez Zoir. If placed at Damas it may move freely after the Allied invasion. If placed at Deir ez Zoir it may move freely on the 2nd turn of Invasion, eg., in our EA game reported case, on the Jun II 41 Axis turn. In the EA game report this unit is Removed at-start, along with the D-8 Cav III PTch (TS).
- If the B-5 Inf III 3 Lev (TS) is neither initially Removed nor scrapped, it must be placed at-start at any city hex in Lebanon. After the Allied invasion its operational area is Lebanon. This restriction is lifted if it is pushed/moved out of its operational area due to movement in a C. Phase. In the EA game report this unit is scrapped at-start, along with the C-8 Cav III Druze (TS).
Additional Vichy French Levant Considerations:
- Per WW Rule 38V1-[Vichy] Operational Area, the operational area of French Vichy Levant forces are the land hexes of the French Levant and the “adjacent sea zones.”
- The Conditional Reinforcements found in Rathe’s “Troupes Francaises du Levant” TEM article are essentially included in the Scenario draft OB, as are the Aug I 41 and the Oct I 41 Regular Reinforcements. For the 3rd Turn [Jul I 41] of Invasion 1 x Unimproved Fortified Hexside, the old Torch fortified single hexside counter can be used as a marker. The Vichy Levant Jun II 41 and Jul I 41 Regular Reinforcements in Watson’s “Syria: Operation Exporter” Europa battle scenario are used. Also used is the Surrender of the Levant withdrawal of the LeO 451 air unit, found on p. 5 of the WitD Neutral Nations OB booklet. Finally, if the Allies conquer the Levant, this kicks in the Free French Conditional Reinforcements found on p. 6 of the WitD Allied OB.
- Rathe’s May I 41 Vichy French Levant OB (Land) major reorganization is quite interesting, but presently cannot not be worked into the Scenario EA demonstration as an alternative set-up.
- The Scenario uses WW Optional Rule 38V3F-Variable Levant Surrender to Allies, which utilizes the Variable Levant Surrender Table, found of WW Game Play Chart 8-Political Events.
Special considerations regarding the 0-1-8 Inf II Fawzi unit:
- Axis, Vichy Levant, or Iraqi air units may not provide DAS to the Fawzi unit, which is similar to the Rathe’s provision for Vichy French TS ground units.
- The Fawzi unit cannot be eliminated by random movement die rolls (per WW Optional Rule 39E4) off the map edge or into prohibited hexes. In this case the Fawzi unit simply ends its random movement at the last rules-legal hex.
- Note that per WW Optional Rule 39E4 the Fawzi unit “may never stack with another unit (including another Axis, Iraqi, or Vichy French unit). If in guerrilla mode, Fawzi must always attempt to retreat before combat.”
Turn Activity
Quite significantly, at step 13 of the Initial Phase the Allied player does not declare the existence of a tight South Aegean Naval Interdiction Zone for this and also the following Axis player turn. This is likely a sure signal that the Allied player is done with continuing a stand at Crete.
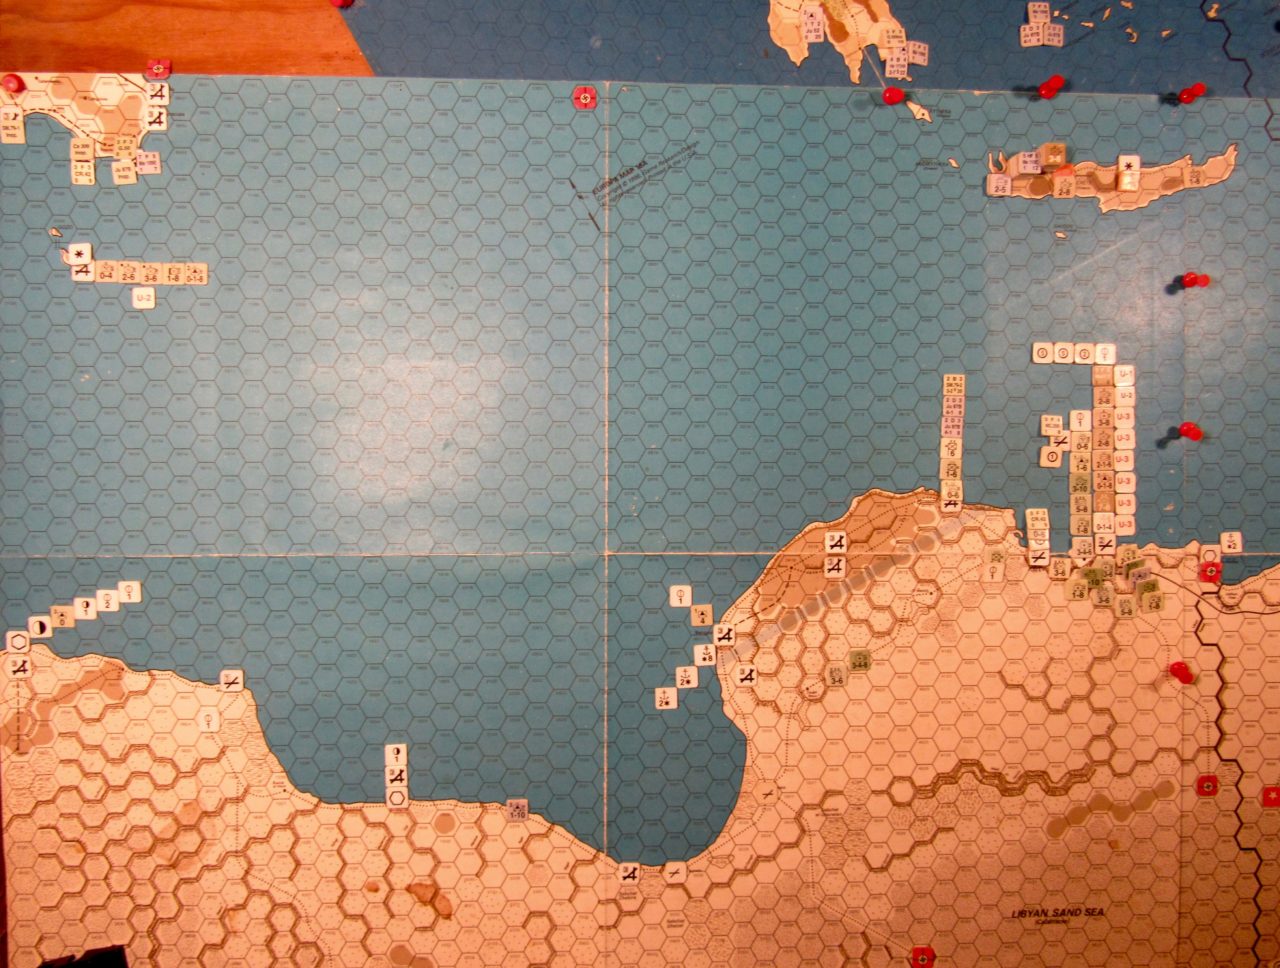
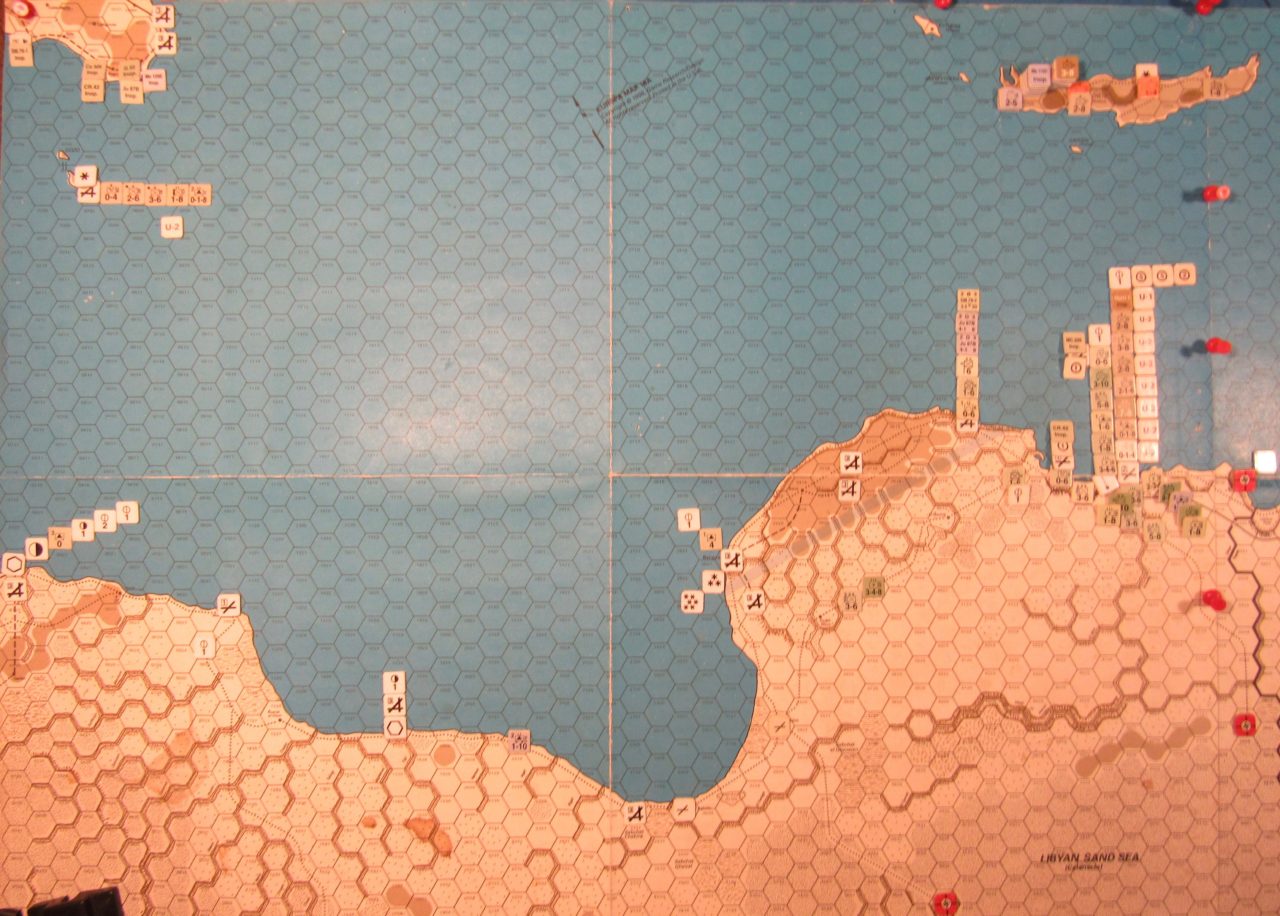
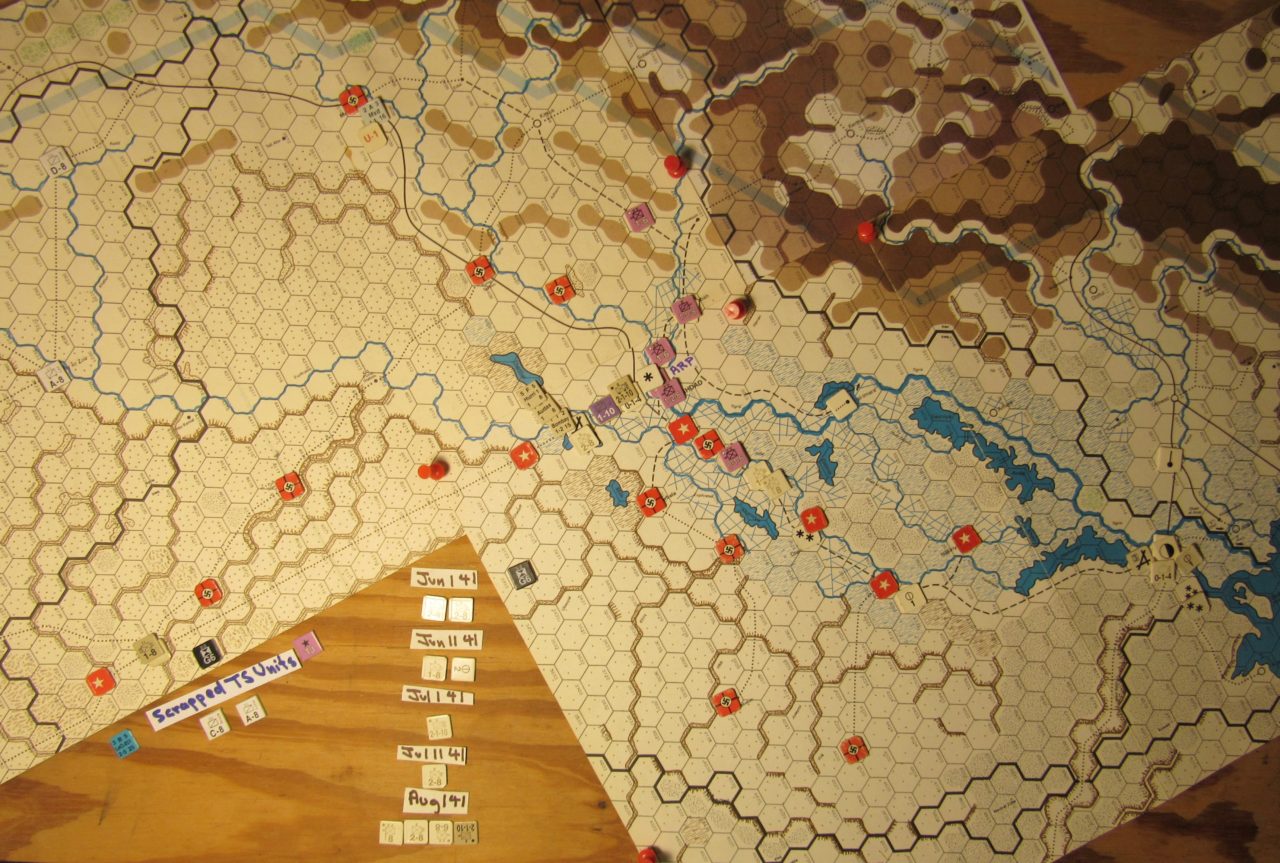
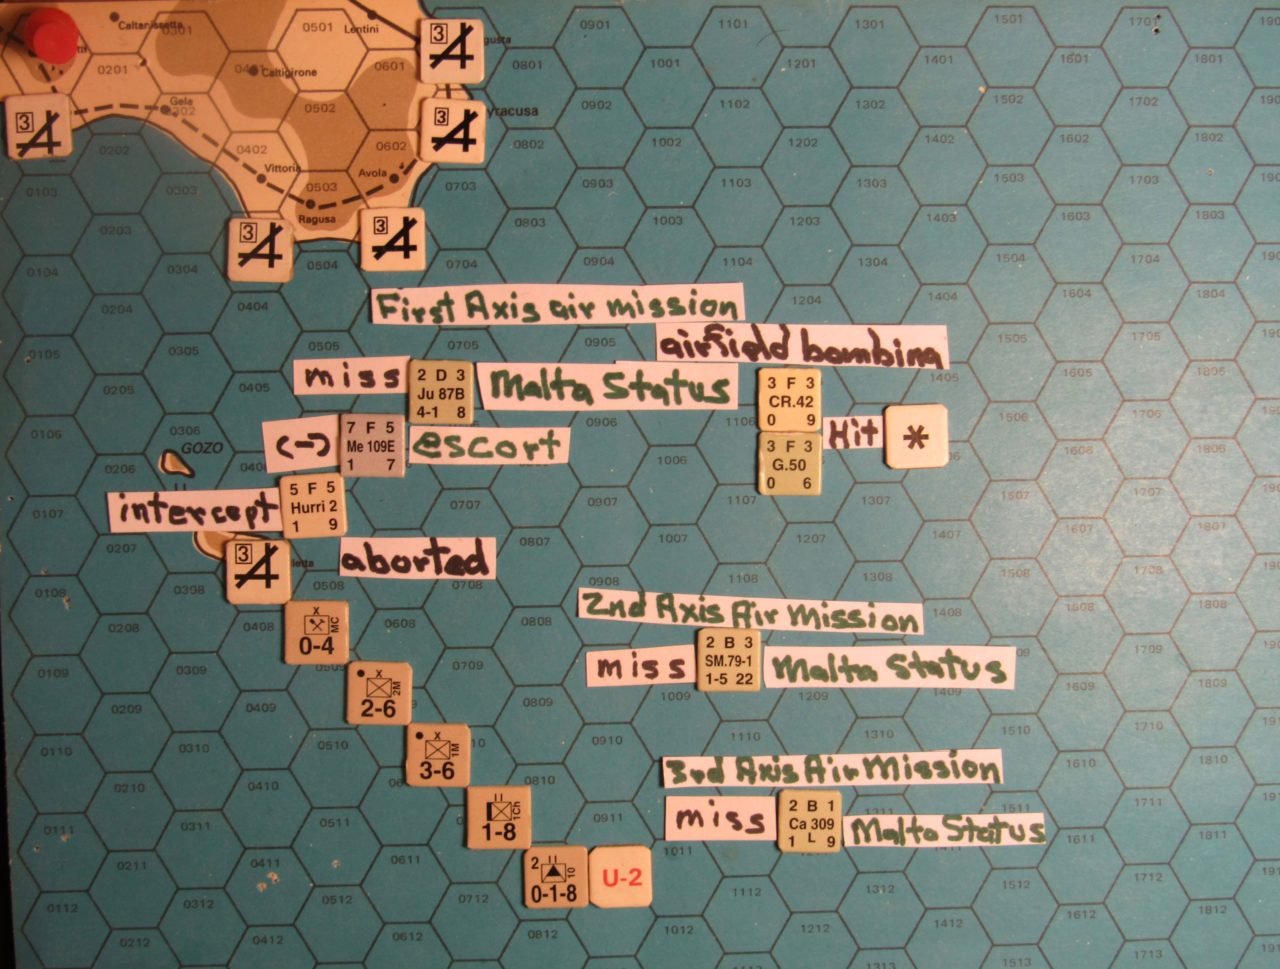
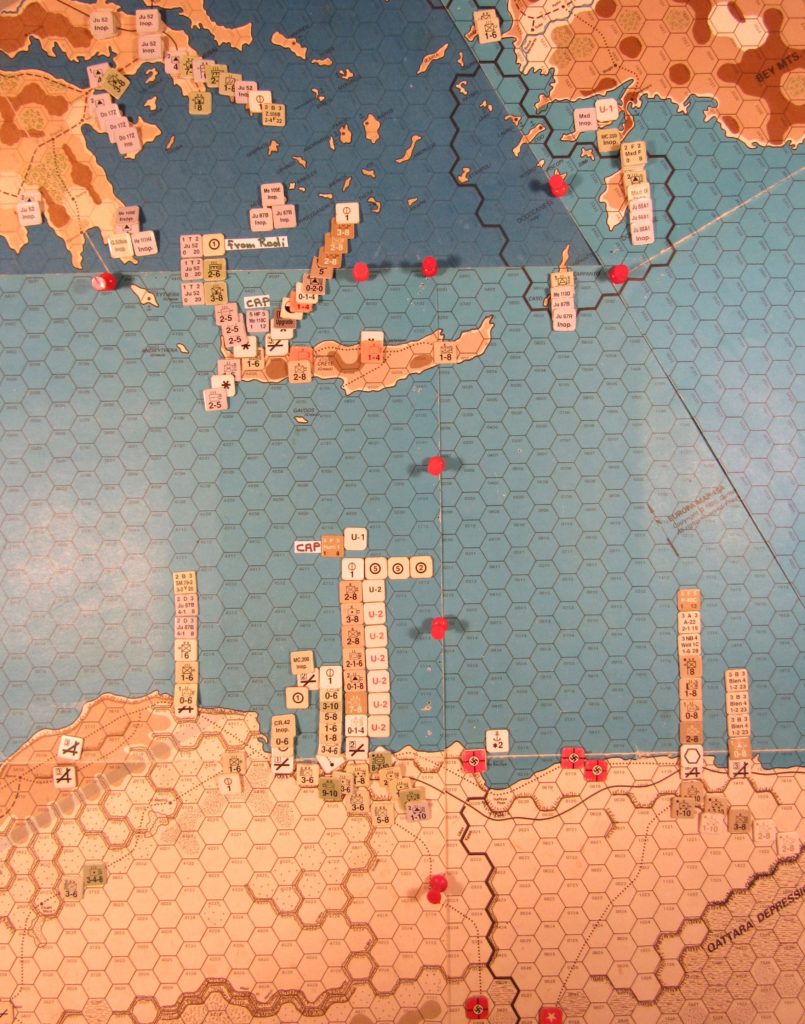
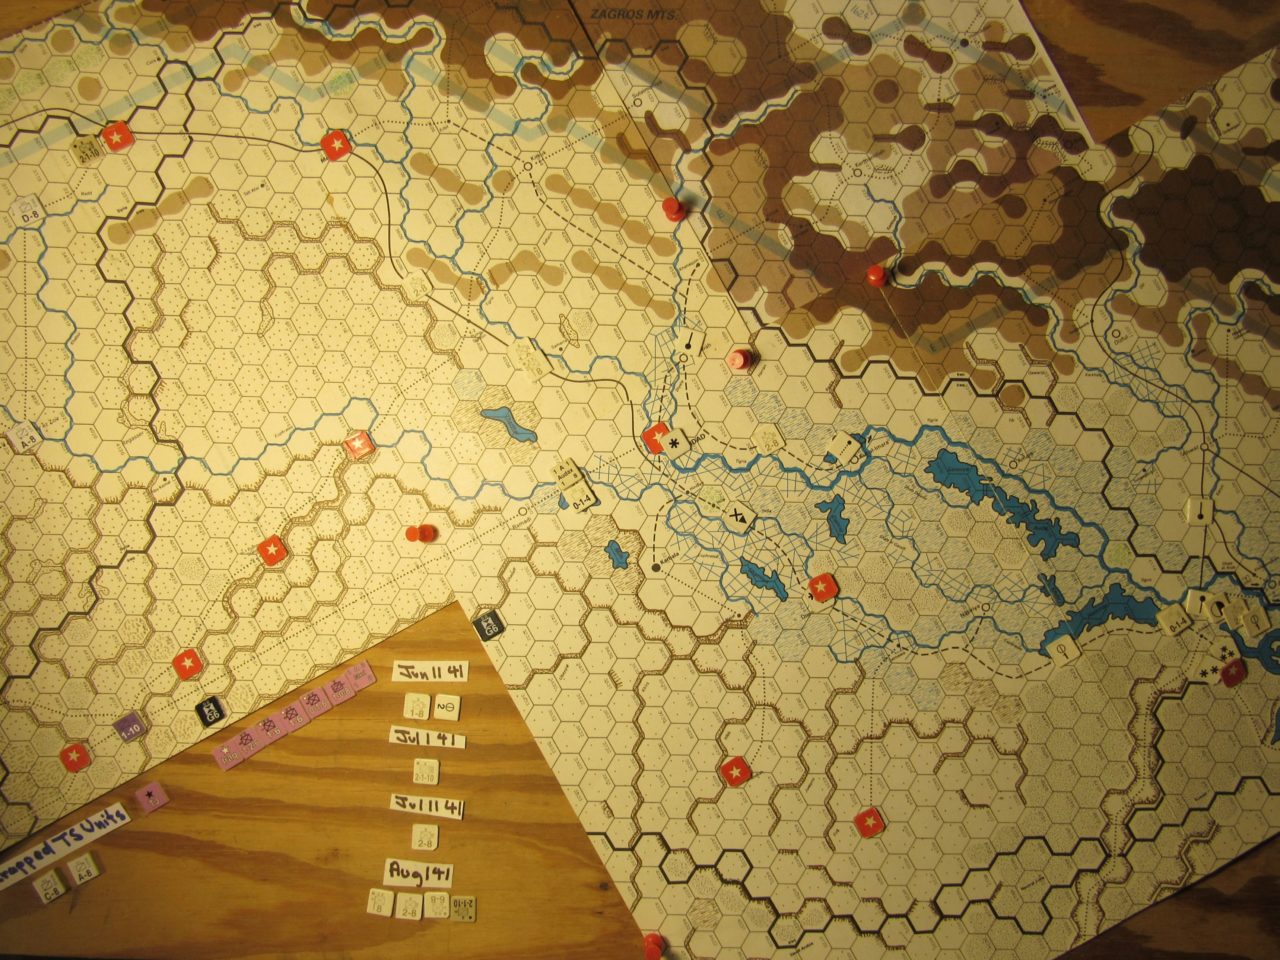
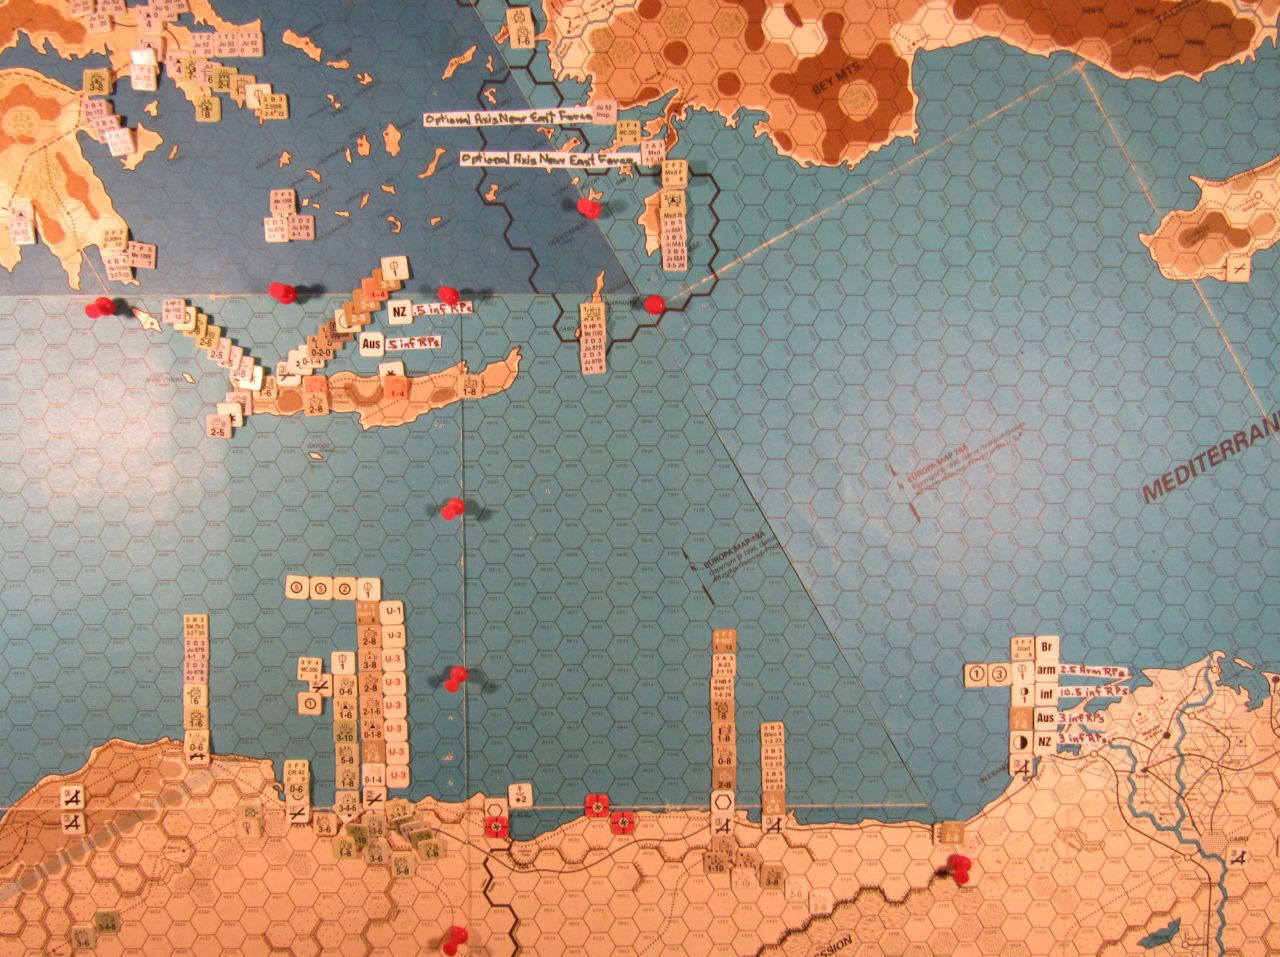
Jun I 41 Allied end Initial Phase dispositions: Libya, Sicily, Malta, Crete and the southwestern part of the Aegean Sea region
At step 14 of the Initial Phase the Allied units at the isolated Tobruch hex that began the turn technically at Red U-2 now become technically Red U-3. But all are in special general supply due to the available gsp’s in the hex. All the Axis units on Crete become Red U-1. There is a somewhat superfluous single gsp at the Khania hex, but the Axis player designates it as supplying the Me 110C air unit based in the hex. Also somewhat superfluous for our particular I. Phase situation is the stipulation at WW Rule 24B2-[Airborne Landing] Supply Conditions, stating that the air-droppable units are in “special general supply for the following enemy player turn.” At Malta the Allied units there are all definitely Red U-2, with no available gsp’s on the island at step 14 of the I. Phase.
In the Initial Phase, at step 16, the Allied player generates 4 new gsp’s at the Suez and Alexandria Allied Standard Supply sources.
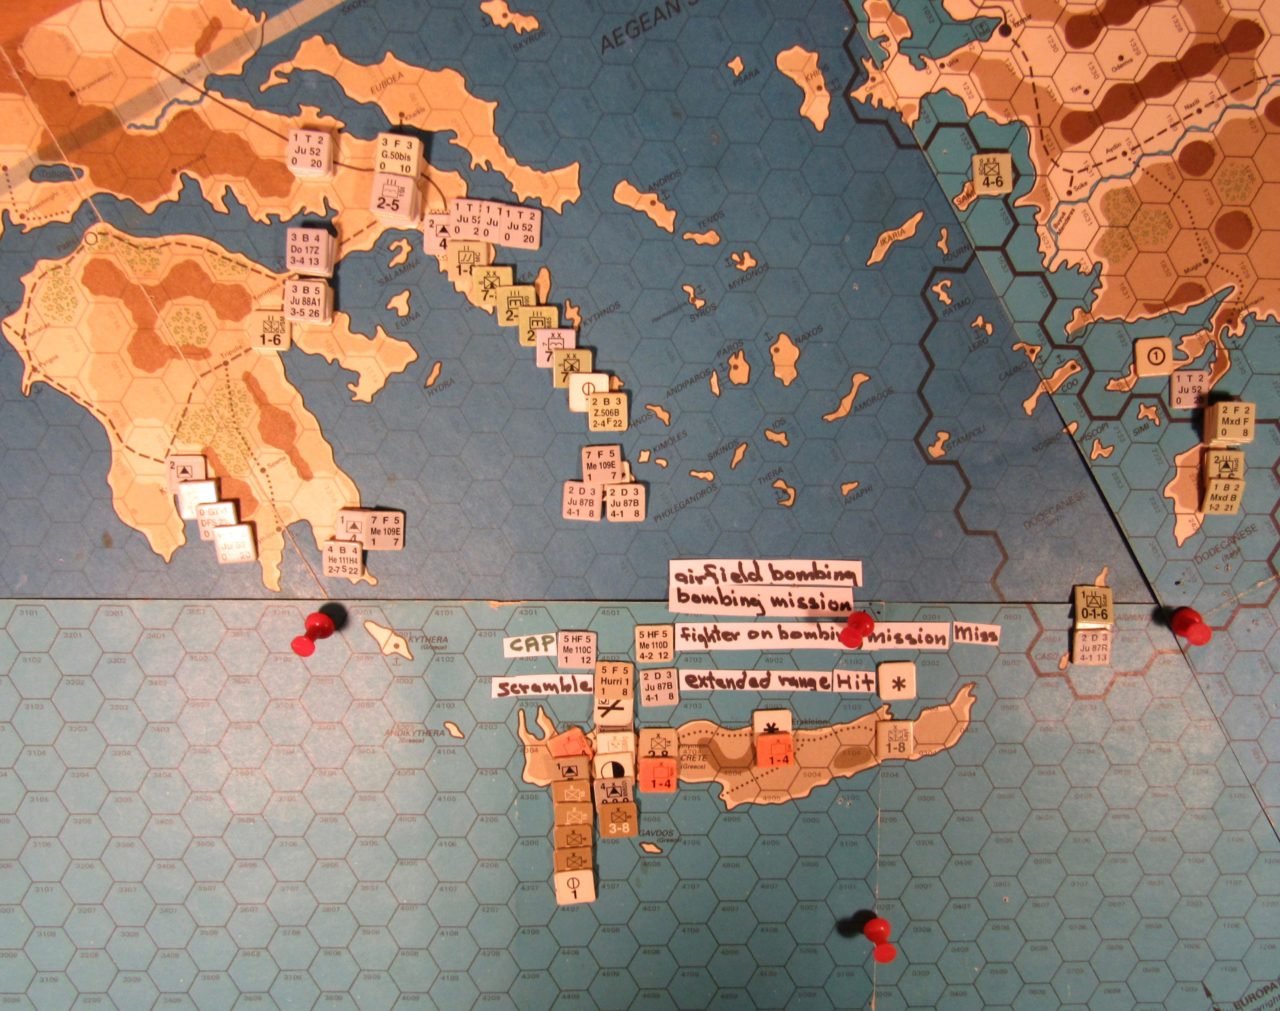
In the Initial Phase, at step 22, the non-phasing Axis player flies the Me 109E F type air unit based at 15B:1415, on the southeastern Peloponnese coastline, on the CAP air mission over the Suda Bay hex, on Crete. The MC 200 F type air unit based at the Rodi airfield flies the CAP air mission over the Scarpanto airfield hex (19A;0701). He also flies a number of Naval Patrol air missions from bases on mainland Greece, the Aegean isle of Melos, Rodi, Scarpanto, and Derna, in Libya. See the texts above or the pictures below for more details.
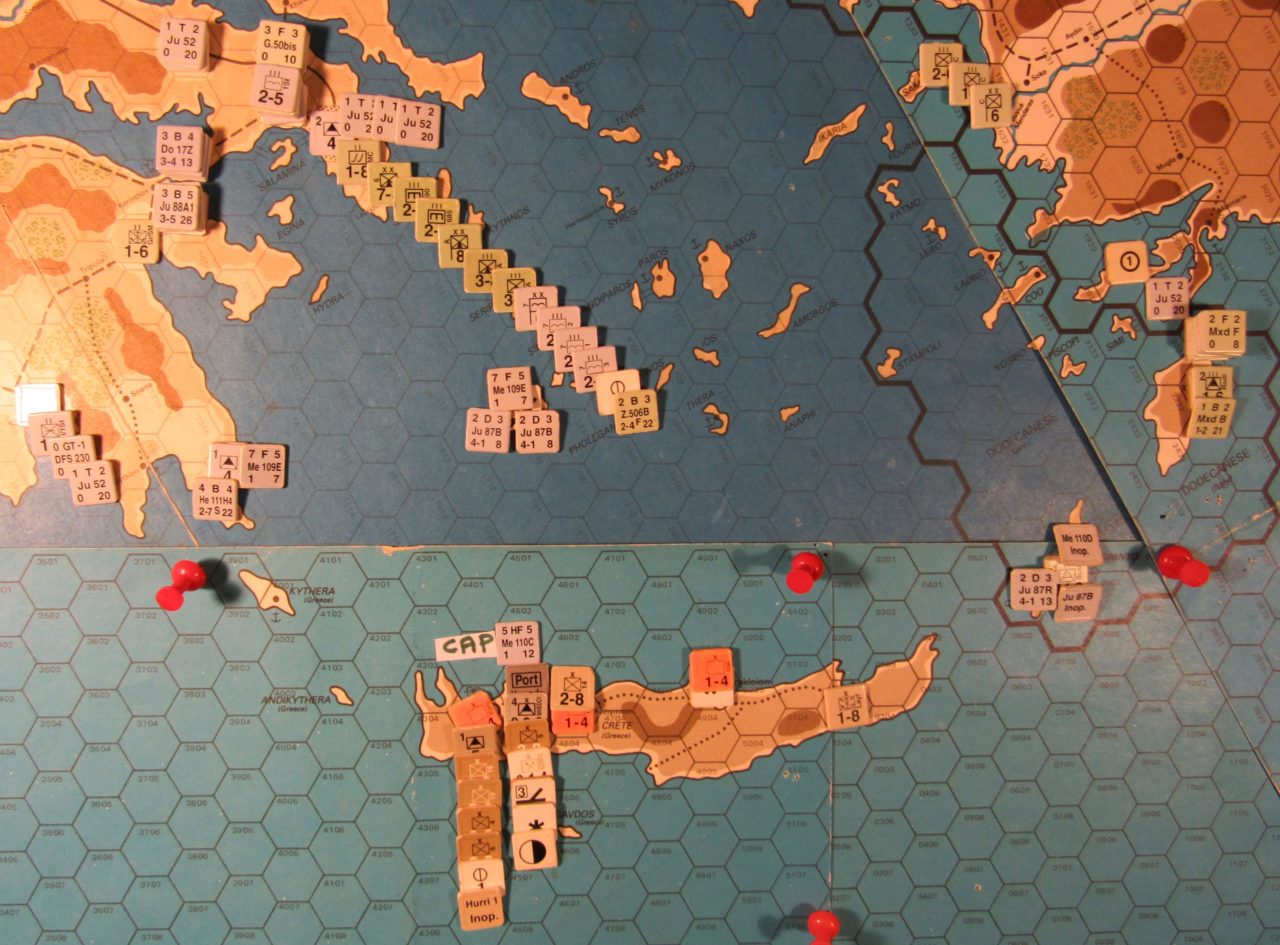
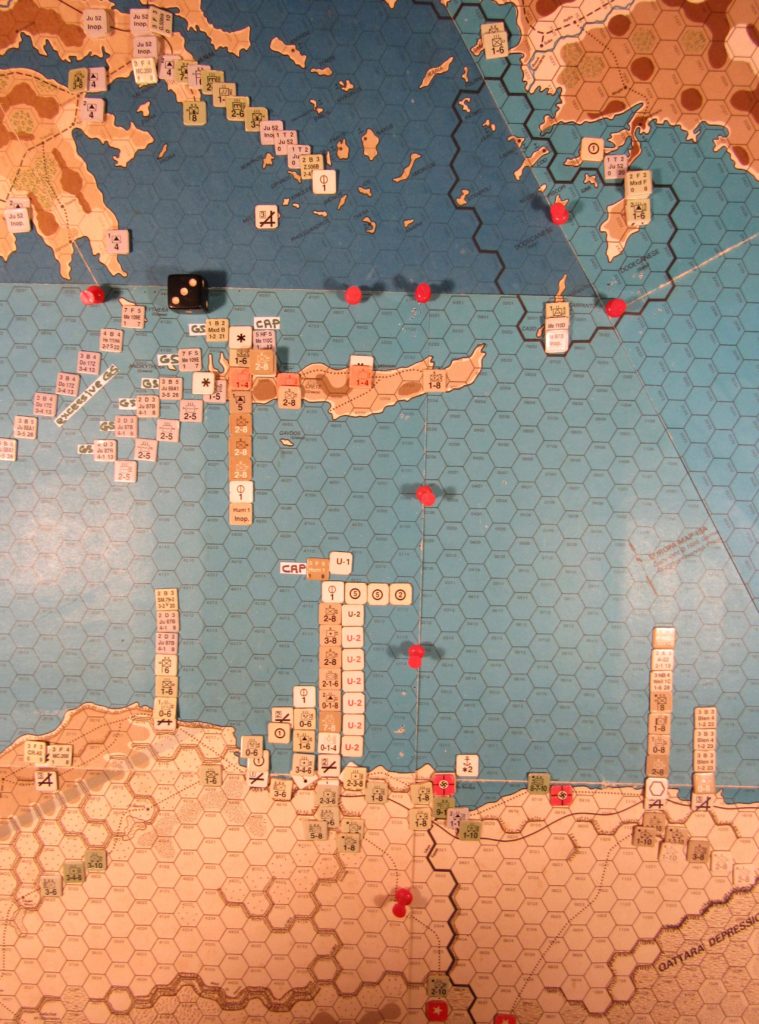
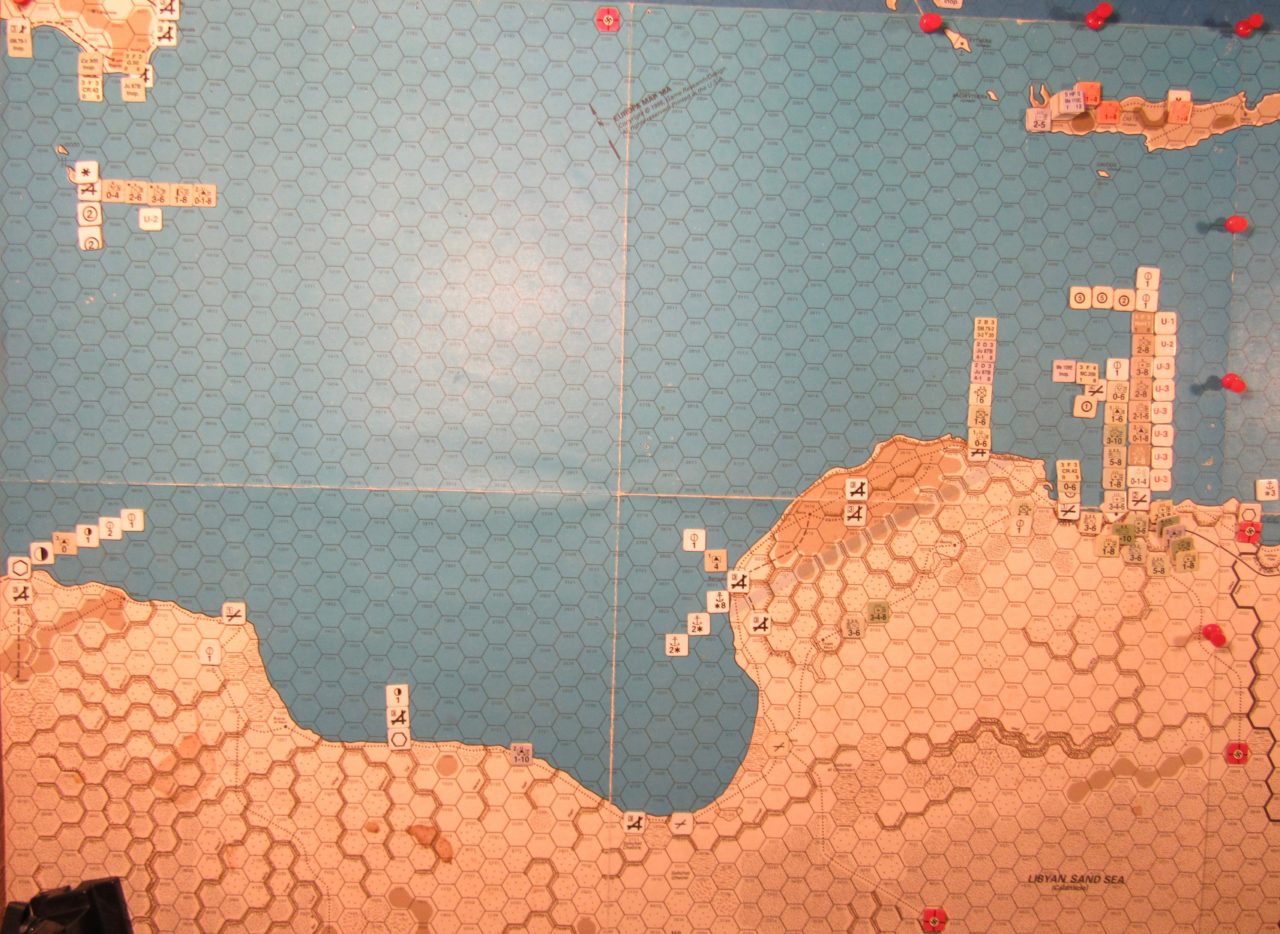
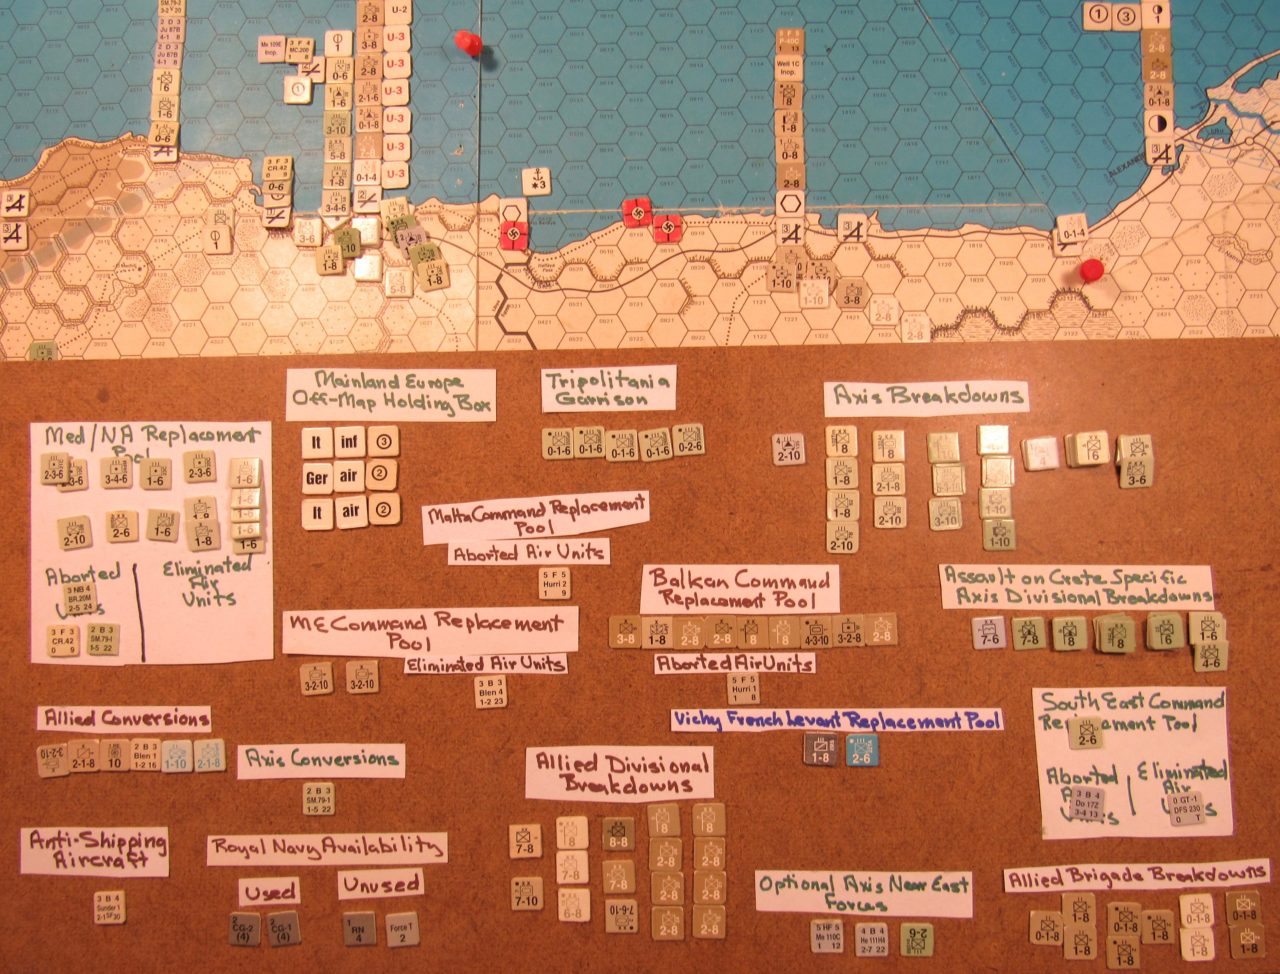
Jun I 41 Allied end of step 21 of the Initial Phase dispositions: the Western Desert region, Greece, and the Aegean
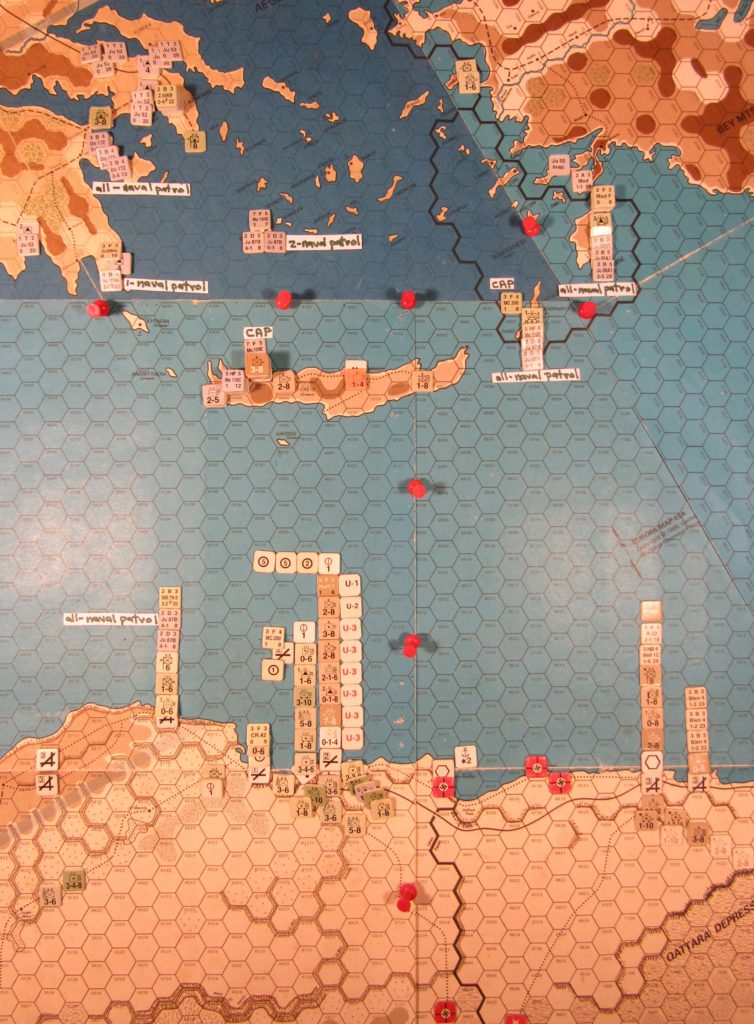
Jun I 41 Allied end of Initial Phase dispositions: eastern Libya, western Egypt, Greece, and the Aegean
In the Initial Phase, at step 24, the four old gsp’s at Alexandria and Suez respectively, that were generated on the May II 41 Allied Initial Phase are removed from the map.
Sea transport in the Allied turn naval movement step, prior to any Axis Naval Patrol Contact attempts, in the order done:
- One West Med NTP is used to successfully sea transport 4 gsp’s generated in the Jun I 41 Initial Phase from Gibraltar to Valletta, on Malta.
- Using the turn reinforcement sea transport ability, the Allied player sea transports one of his reinforcement steps of attack supply into Tobruch. Sea movement at night is used in the 9 hex naval transport stretch from all-sea hex 19A:0617 (NW of Sidi Barrani) to the coast hex of Benghazi (18A:4817). The Axis player declines to attempt a Naval Patrol contact using the available Axis air units in range at Derna, saving them for the anticipated Allied evacuation from Crete and not wishing to tangle with the SAAF P-40C F type air unit based at Matruh. The second turn reinforcement step of attack supply is sea transported to Alexandria, where it disembarks. In the M. Phase it is railed to Haifa, where it is expended in the three attacks done in the Combat Phase against the Vichy French Levant forces being attacked by the Allied invaders.
- Using the turn reinforcement sea transport ability, the Allied player sea transports the the Br 0-1-8 Hv AA II 68 unit (AA=2) reinforcement to Alexandria, where it disembarks and remains. The Aus 1-8 Art II 1 turn reinforcement uses the reinforcement sea transport ability to sail to Haifa, where it disembarks and then moves towards the Palestine-Vichy Levant border, in preparation for an attack.
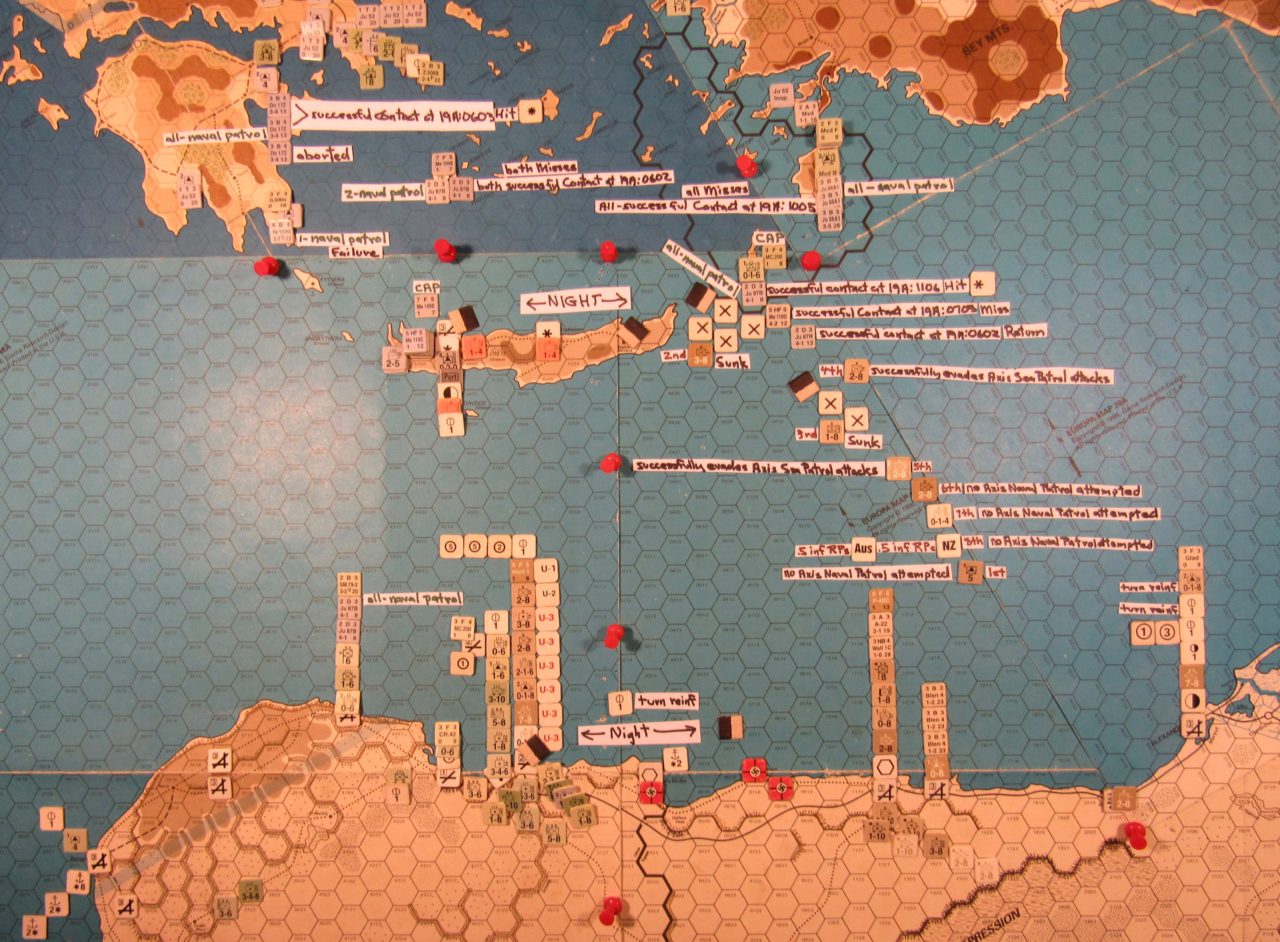
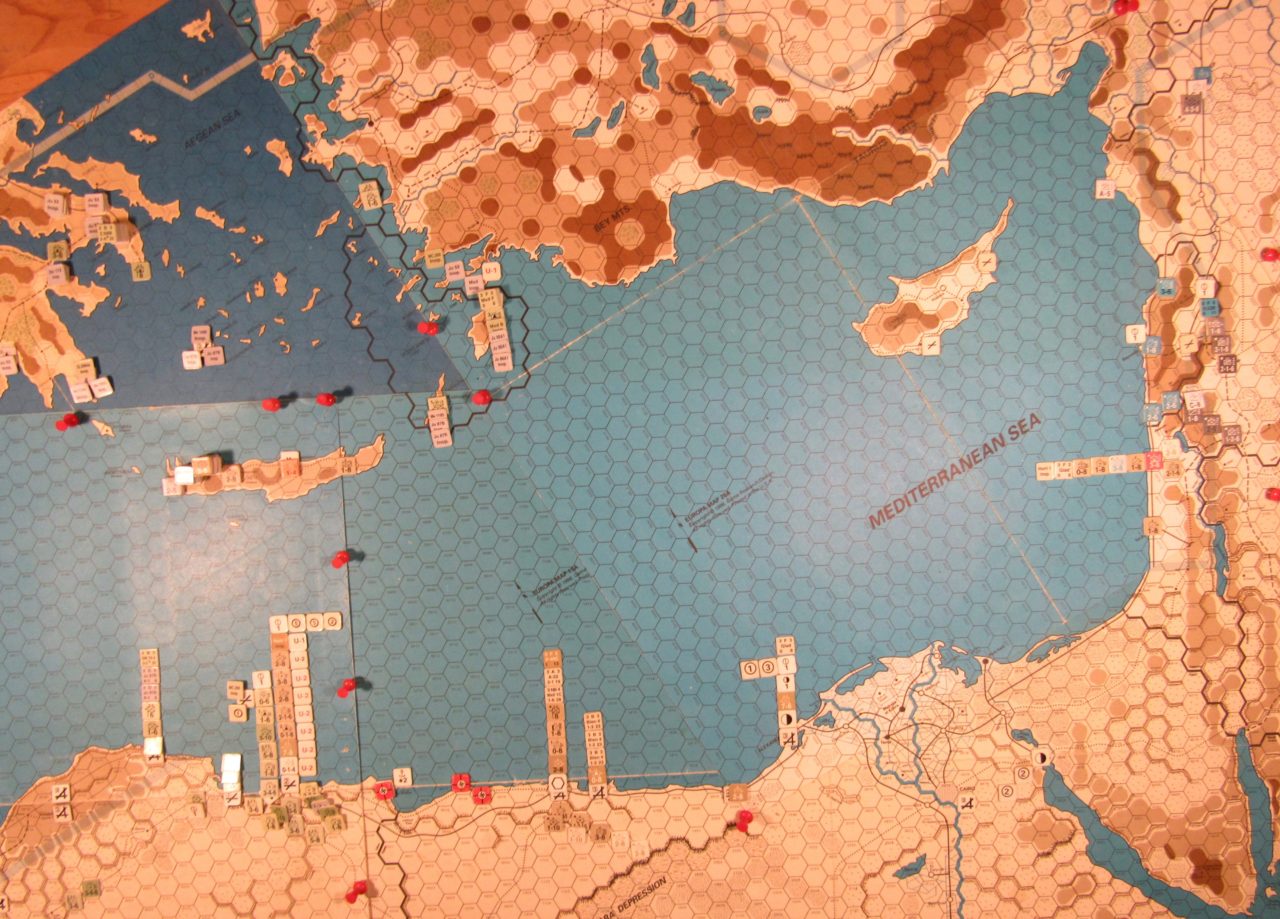
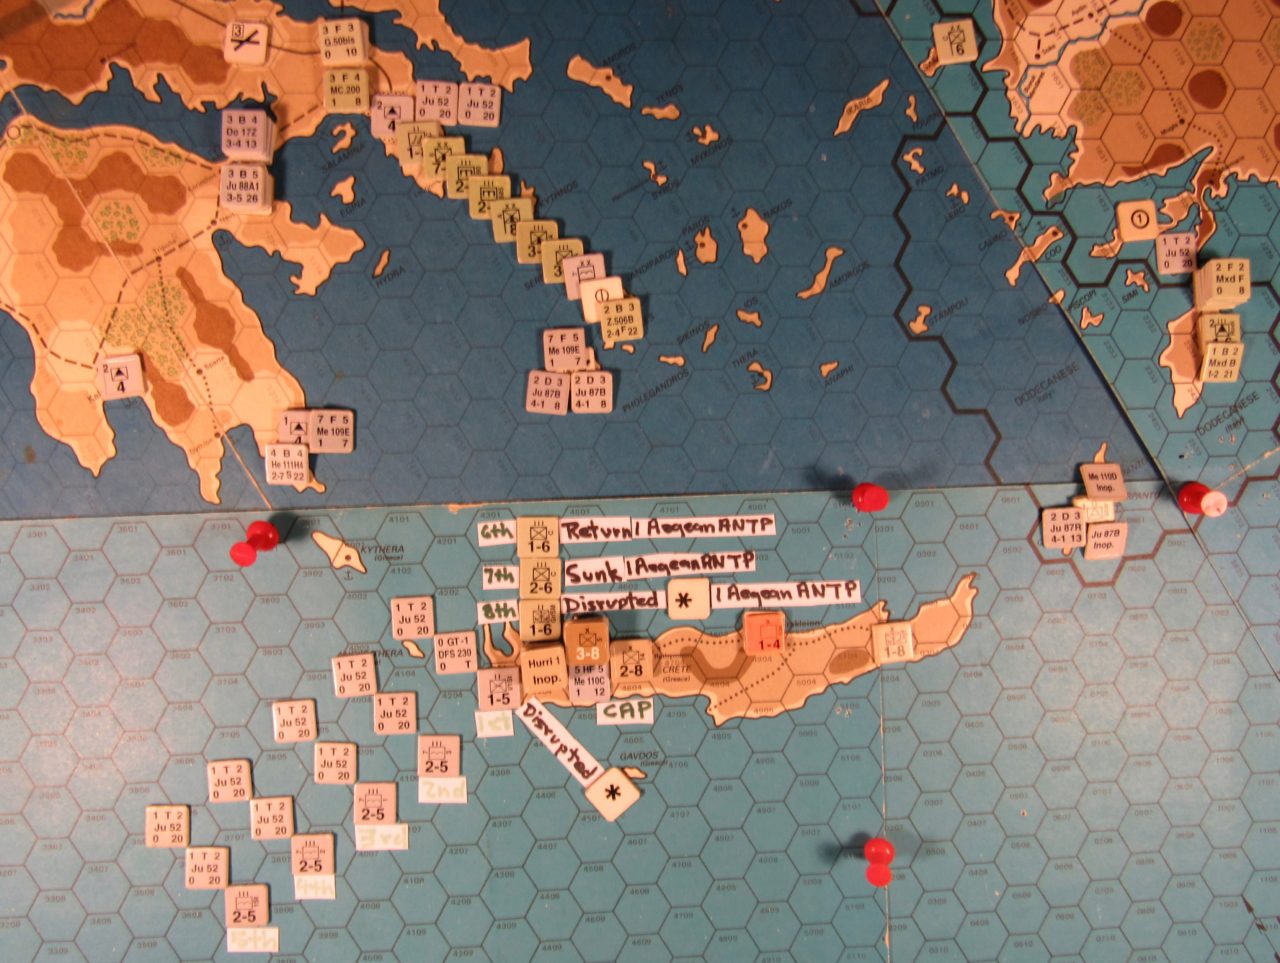
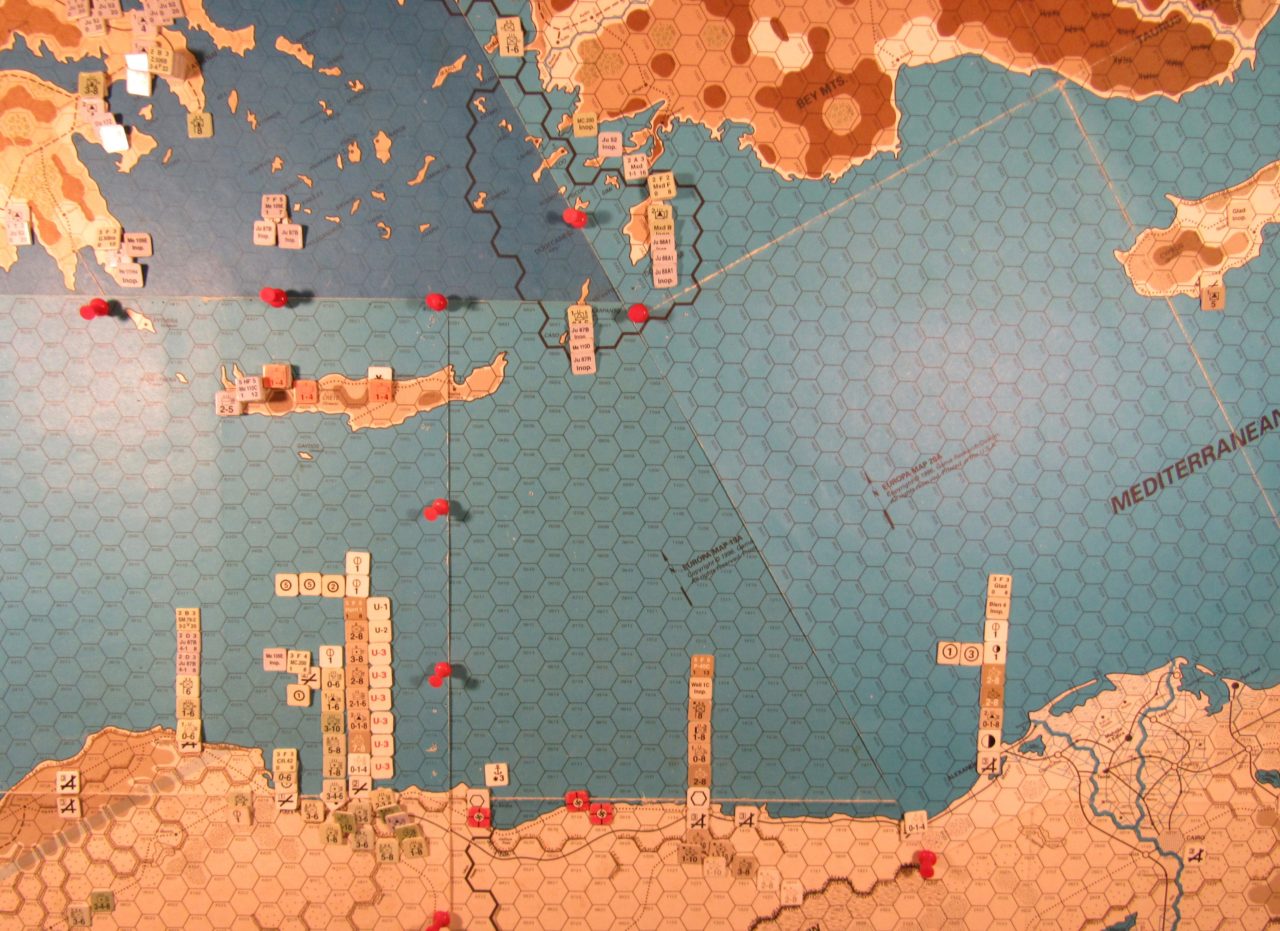
Jun I 41 Allied M. Phase naval movement step activity in the seas surrounding Crete
List of the Allied sea transport evacuation of certain Allied forces from Crete using East Med NTPs, in the order of the Allied sea movement, juxtaposed with the Axis Naval Patrol air mission attacks done in the Allied Movement Phase naval movement step:
- The Br 5 pos flk unit (AA=1), beginning the turn at Suda Bay (18A:4503), sails eastwards 10 hexes in the Aegean Sea at night to all-sea hex 19A:0502. But at the next all-sea hex at 19A:0503 (the first daylight hex of sea transport), the Axis player declines to make any Naval Patrol Contact attempt, waiting for bigger fish to fry. And so the East Med NTP transporting the Br pos flk unit proceeds to Limassol (20A:3615), on Cyprus, where its cargo is disembarked.
- The 3-6 Inf X 5 (NZ), beginning the turn at Suda Bay, sails eastwards 10 hexes in the Aegean Sea at night to all-sea hex 19A:0502. At the very next all-sea hex at 19A:0503 (the first daylight hex of sea transport), the Ger LW He 111H4 4B4 2-7/S/22 air unit based at 15B:1415 (on the southeastern Peloponnese coastline) rolls for Contact on the Success Table. The modifiers are +3 for calm seas and -3 for the 16 hex range, for a 0 modifier. The Success Table die roll is a 2: Failure. The air unit returns to its base, landing inoperative. But at the very next all-sea hex at 19A:0603, the three Ger LW Do 17Z 3B4 3-4/13 air units based at 15B:0914 (on the eastern Peloponnese coastline) roll for Contact on the Success Table. The modifiers are +3 for calm seas, -3 for the 18 hex range, for a 0 modifier. The Success Table die roll is a 5: Success. Then the Allied player has 3 two factor Antiaircraft Fire Table dice rolls (no modifiers) for the Allied East Med NTP flack shot (see WW Rule 27A1), resulting in an Abort done to a Do 17Z air unit. The other two Do 17Z air units make it through the Allied flack. Next are only 2 Axis player bombing die rolls (due to the Do 17Z air units flying at extended range to reach the Target hex), looking for 6’s only: and a 6 shows up for a Hit! And so the Allied East Med NTP and the 3-8 Inf X 5 (NZ) are sunk, and the ground unit is placed in the Balkan Command Replacement Pool, fetching no special NZ inf RPs. The two surviving Ger LW Do 17Z air units return to their original base inoperative.
- The Br 1-8 Marine Cmdo X Layf, beginning the turn at Hagios Nikolaos (19A:0203), sails first eastwards and then southeastwards 9 hexes at night to all-sea hex 19A:0905. At the next all-sea hex 19A:1005 (the first daylight hex) the three Ger LW Ju 88A1 3B5 3-5/26 air units based at 20A:2331 (on the Dodecanese island of Rodi) roll for Contact on the Success Table. The modifiers are +3 for calm seas and -1 for the 8 hex range, for a +2 modifier. The Success Table die roll is a 6: for a Success even without the +2 modifier. Then the Allied player has 3 two factor Antiaircraft Fire Table dice rolls (no modifiers) for the Allied NTP flack factor and comes up with three Misses. Then the Axis player does 9 bombing die rolls, looking for 6’s only: and lo and behold there are no 6’s, all Misses. But at the very next all-sea hex at 19A:1106, the Ger LW Ju 87B 2D3 4-1/8 air unit based at Scarpanto (19A:0701) rolls for Contact on the Success Table. The modifiers are +3 for calm seas and -1 for the 7 hex range, for a +2 modifier. The Success Table die roll is a 3, modified to a 5: Success. The Allied player’s 2 factor Antiaircraft Fire Table dice roll fails to deter the LW dive bomber air unit. Using the Bombing Table, the Axis player rolls 4 dice, looking for 5’s or 6’s, due to the D type’s +1 modifier. The result is a Hit, and the East Med NTP is sunk transporting the primo Br 1-8 Marine Cmdo X Layf, which is placed in the Balkan Command Replacement Pool.
- The Br 2-8 Inf X 14, beginning the turn at Rethymnon (18A:4603), sails eastwards and then southeastwards at night to all-sea hex 19A:0503. At the next all-sea hex at 19A:0602 (the first daylight hex of sea transport), the two Ger LW Ju 87B 2D3 4-1/8 air units based at the Aegean isle of Melos (15B:1610) roll for Contact on the Success Table. The modifiers are +3 for calm seas and -2 for the 11 hex range, for a +1 modifier. The Success Table die roll is a 5, modified to a 6: Success. The Allied 2 flack factor flack shot fails to deter the Ju 87B air units’ dive bombing attack. But the Axis player’s two bombing die rolls, depleted due the extended range air attack, are snake eyes: two Misses. And so the Stukas return to their airfield at Melos. But doggedly, at the next all-sea hex at 19A:0703 the Ger LW Me 110D 5HF5 4-2/12 air unit at Scarpanto rolls for Contact on the Success Table, coming after the British. The modifiers are +3 for calm seas and -0 for the two hex range, and the Axis player easily rolls a Success on the table. The Allied player rolls high on his 2 flack factor NTP flack shot, for a miss. Then the Axis player rolls 4 dice on the Bombing Table, looking for 6’s only, and comes up with 4 Misses; and so the Me 110D air units returns to Scarpanto, basing there inoperative. After this, the Axis player decides to let the Allied East Med NTP carrying the Br 2-8 Inf X 14 go its way, and so it proceeds to Haifa, in Palestine, where it disembarks the ground unit, with 5 MPs remaining.
- The 2-8 Inf X 19 (Aus), beginning the turn at Suda Bay, sails eastwards at night to all-sea hex 19A:0502. At the next all-sea hex at 19A:0602 (the first daylight hex of the sea transport), the Ger LW Ju 87R 2D3 4-1/13 air unit based at Scarpanto rolls for Contact on the Success Table, with a +3 modifier. The Success Table die roll is a Success; but the Allied player successfully rolls a 4 on the 2 column of the Antiaircraft Fire Table, and Returns the Ju 87R D type air unit back to the Scarpanto airfield. Afterwards the Axis player allows the East Med NTP transporting the 2-8 Inf X 19 (Aus) to proceed to Alexandria, where it disembarks its cargo.
- The 2-8 Inf X 6 (NZ), beginning the turn at Suda Bay, sails eastwards at night to all-sea hex 19A:0502. It then proceeds to 19A;0602, the first daylight hex of its sea transport aboard an East Med NTP. By now the Axis player has had his fill of chasing the evacuating Allied forces at Crete. He could certainly roll for Naval Patrol Contact using the It SM 79-2 2B3 3-2/V/20 air unit based at Derna (18A:4116), but it would have to fly the air mission at extended range and suffers a -1 modifier on the Antiaircraft Fire Table, and is loath to losing this unit at this time; and so opts to end the Axis barrel shoot of the fleeing Allied forces at Crete. Accordingly, the NTP carrying the NZ inf X continues to Alexandria, where it disembarks its cargo.
- Next the 0-1-4 Cons X 43 RPC (Col) beginning the turn at Suda Bay, embarks on an East Med NTP and voyages to Alexandria, where it disembarks and is railed to El Alamein (19A:2119), where it ends the turn.
- Finally, the Aus and NZ special RPs (.5 each), stored at the Suda Bay hex, are embarked on an East Med NTP and sail to Alexandria, where they are disembarked and stored at that hex.
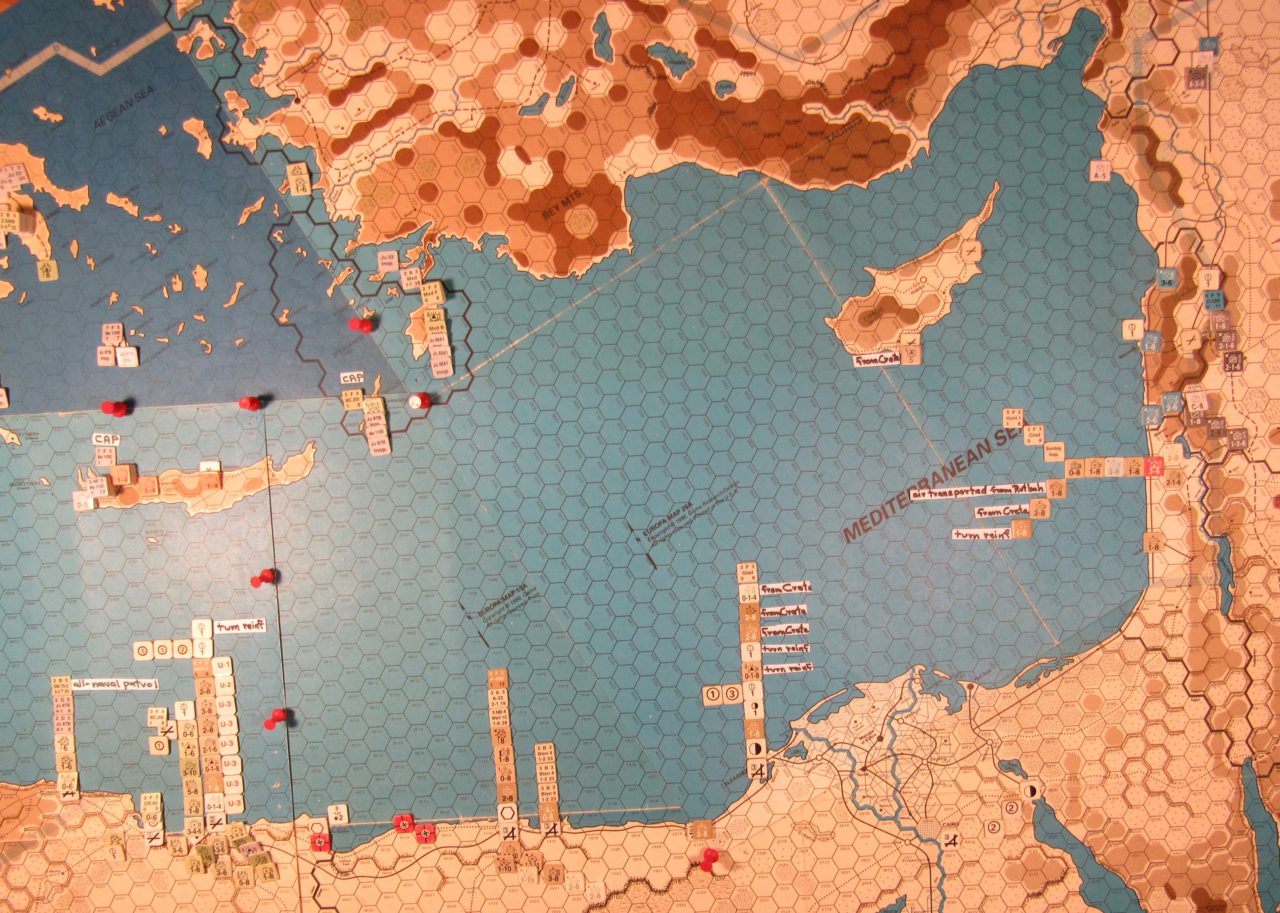
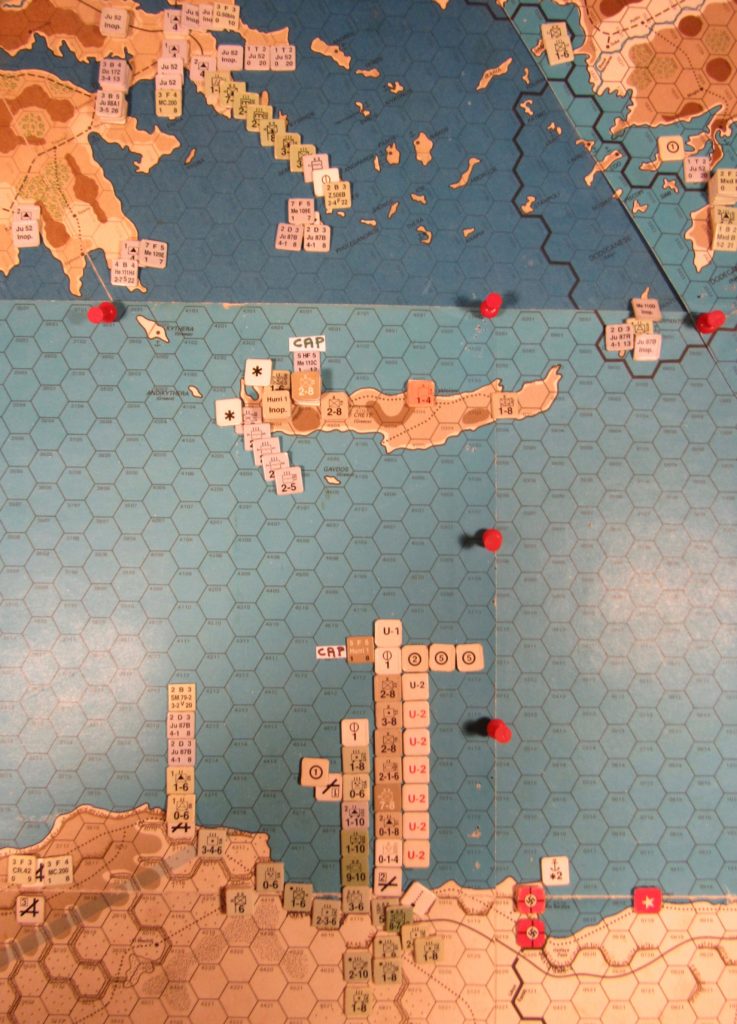
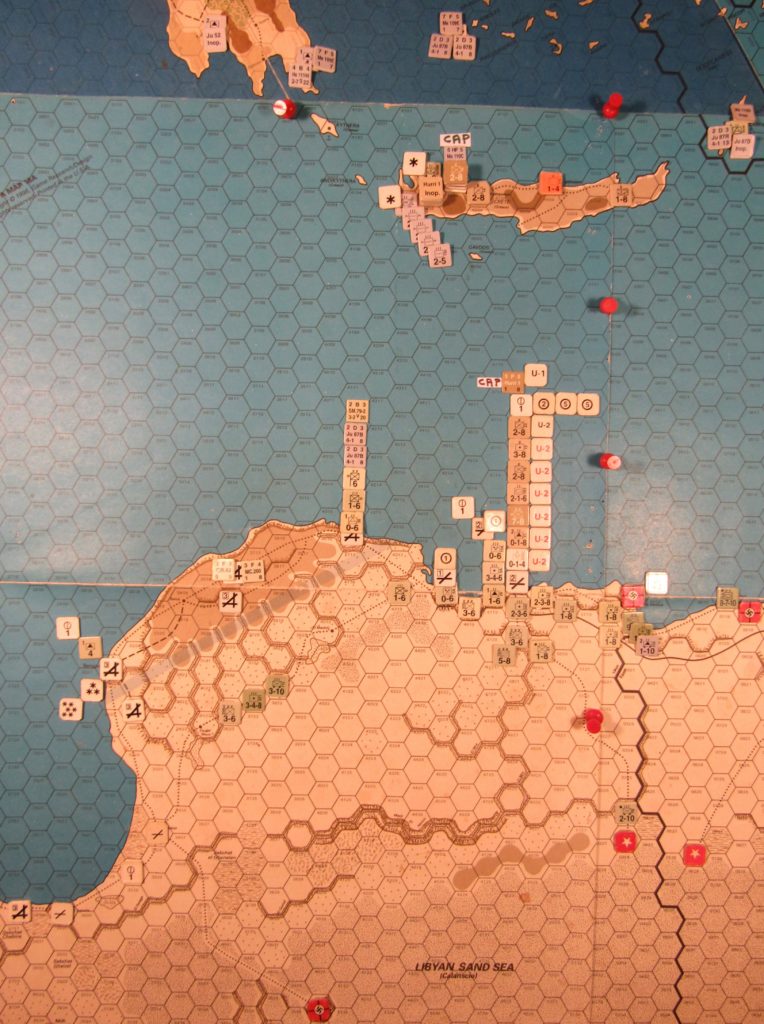
Jun I 41 Allied end of the naval movement step of the Movement Phase dispositions
In the Movement Phase the Allied Player invades the Vichy French Levant. Per WW Rule 41B1b-Special Conditions, under Levant Status, the Vichy French Levant “becomes part of the Allied Middle East Command.” This stipulation is evidently used in WW Middle East (ME) Campaigns, per WW Rule 41B4b.
In the Combat Phase the Allied player attacks Vichy French Levant ground units at three Levant hexes just north of the Palestinian borderline. A total of 10.5 Allied REs of ground units participate in the attacks. At the end of the Combat Phase the step of attack supply at Haifa is expended, which was railed from Alexandria to there earlier in the Movement Phase.
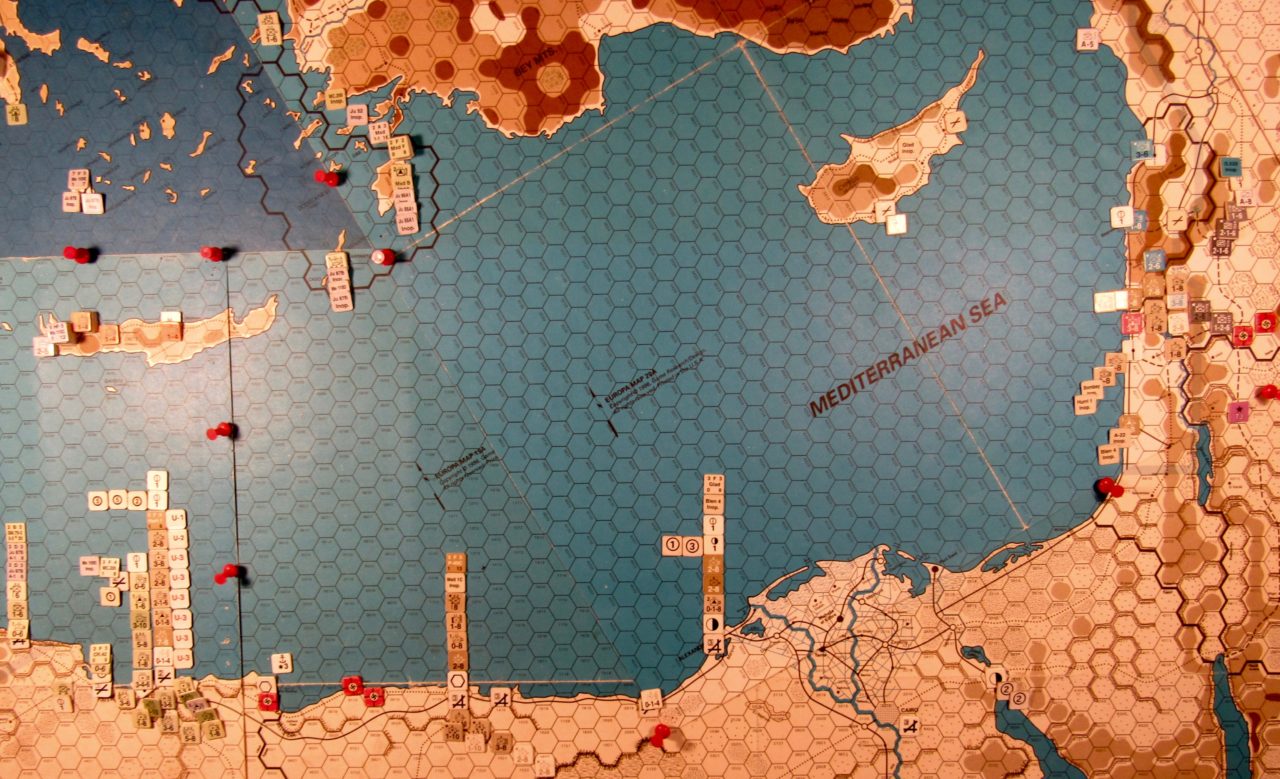
Jun I 41 Allied end of the Combat Phase dispositions: eastern Egypt, Palestine, Cyprus
The first Allied attack is at 20A:4607, containing the Vichy French 1-8 Cav III 2 MS (Afr) and the C-8 Cav III Ligne (TS). This Vichy stack is attacked by the 3-8* Inf X 1 FL (FF) and the 2-8* Inf X 7 (Ind) from hex 20A:4708, just inside Syria, and also the 1-8 AT II 65, stacked with the 7-8 Inf XX 6 (Aus), not participating in this particular attack, from the adjacent Safad hex (20A:4609), still in Palestine. Although the anti-tank II is supported by the Aus inf XX, it is the single Allied ground unit designated not in attack supply, and so attacks with a modified strength of .5. The Allied player sends the Br Blen 4 air unit on the GS air mission to the hex, which began at 19A:1418, in Egypt, but staged to the Cairo partial city hex, in the Delta zone. The Blen 4 air unit is escorted by the Br Hurri 1 F type air unit, based at Haifa, but the Vichy French D 520 F type air unit based at Damas intercepts at the target hex and successfully bypasses the Hurri 1 air unit, which rolls a (-). The French D 520 air unit subsequently Kills the Blen 4 B type air unit in air combat. Before the combat die roll the TS cav III Ligne is dispersed per the cohesion die roll and placed in the Sud-Syrie territory box. The Allies attack with 5.5 combat factors against the Vichy French .5 defense factor, and the combat die roll is a 3, modified to a 2 for the rough terrain: good for a DE at the 9 to 1, -1 Combat odds. After combat the 3-8* Inf X 1 FL (FF) and the Br 1-8 AT II 65 both advance into hex 20A:4607.
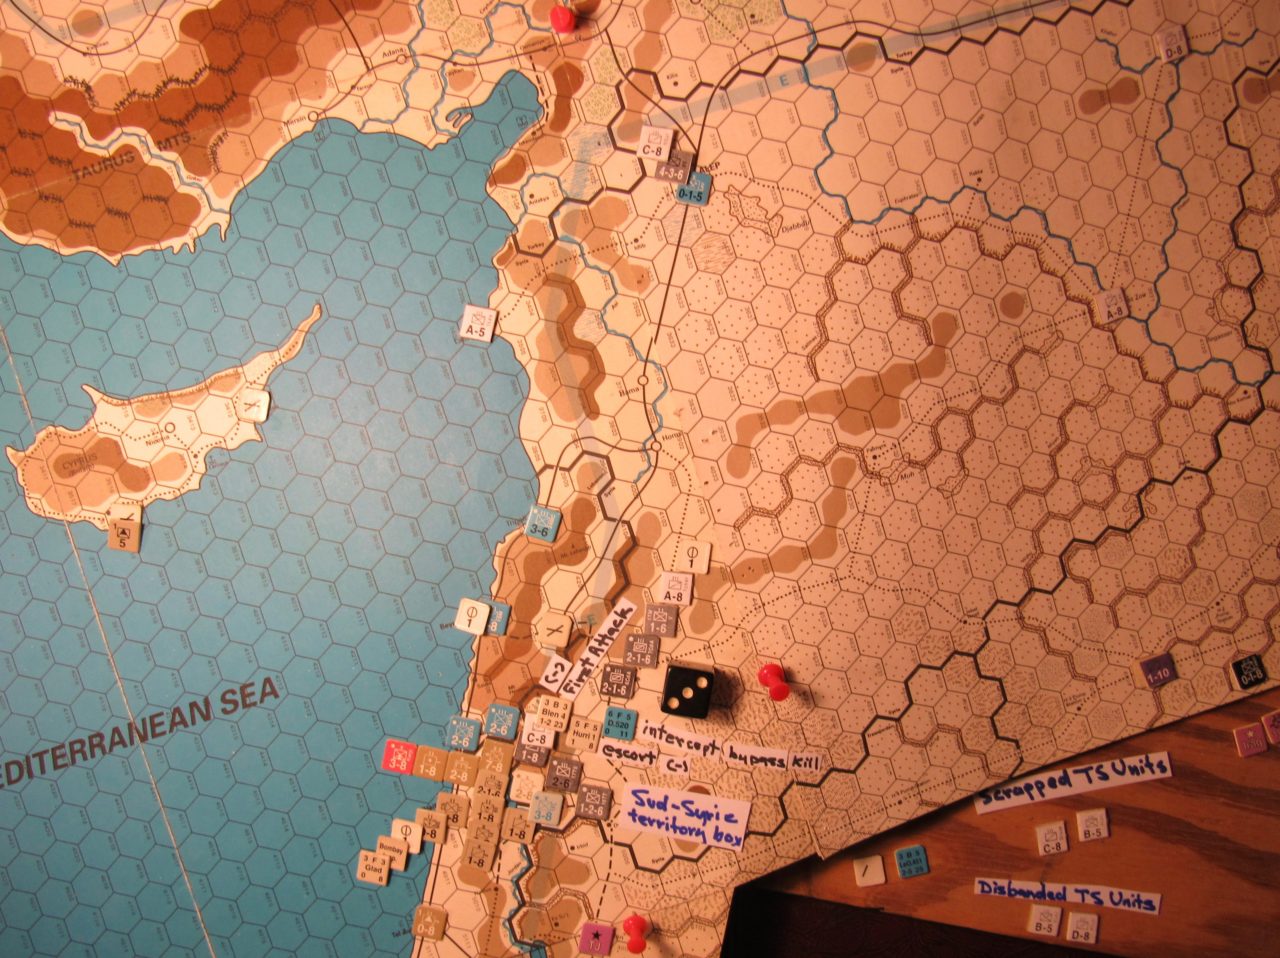
Jun I 41 Allied Combat Phase action: First Attack in the French Levant
The second Allied attack is at 20A:4508, containing the Vichy French 2-6* Inf III 29 TA (Afr). This Vichy unit is attacked by the Allied stack at Safad (20A:4608), across the border still inside Palestine. Attacking are the 7-8 Inf XX 7 (Aus), the 2-1-6 Tnk II 4 RT, the 2-8 Inf X 14, and the 1-8 Cav 5. The Allies attack with a total of 12 combat factors to the Vichy French 2 defense factors, at a 6 to 1, -1 for the rough terrain; unfortunately for the Allies they are just over the 1/10 ratio needed for the +1 AECA modifier. The Allied player rolls a 2, which modifies to a 1: DR. And so the Vichy 2-6* Inf III 29 TA (Afr) retreats northwards to 20A:4407, and the Allied player advances after Combat into hex 20A:4508 the 7-8 Inf XX 7 (Aus) and the 2-1-6 Tnk II 4 RT.
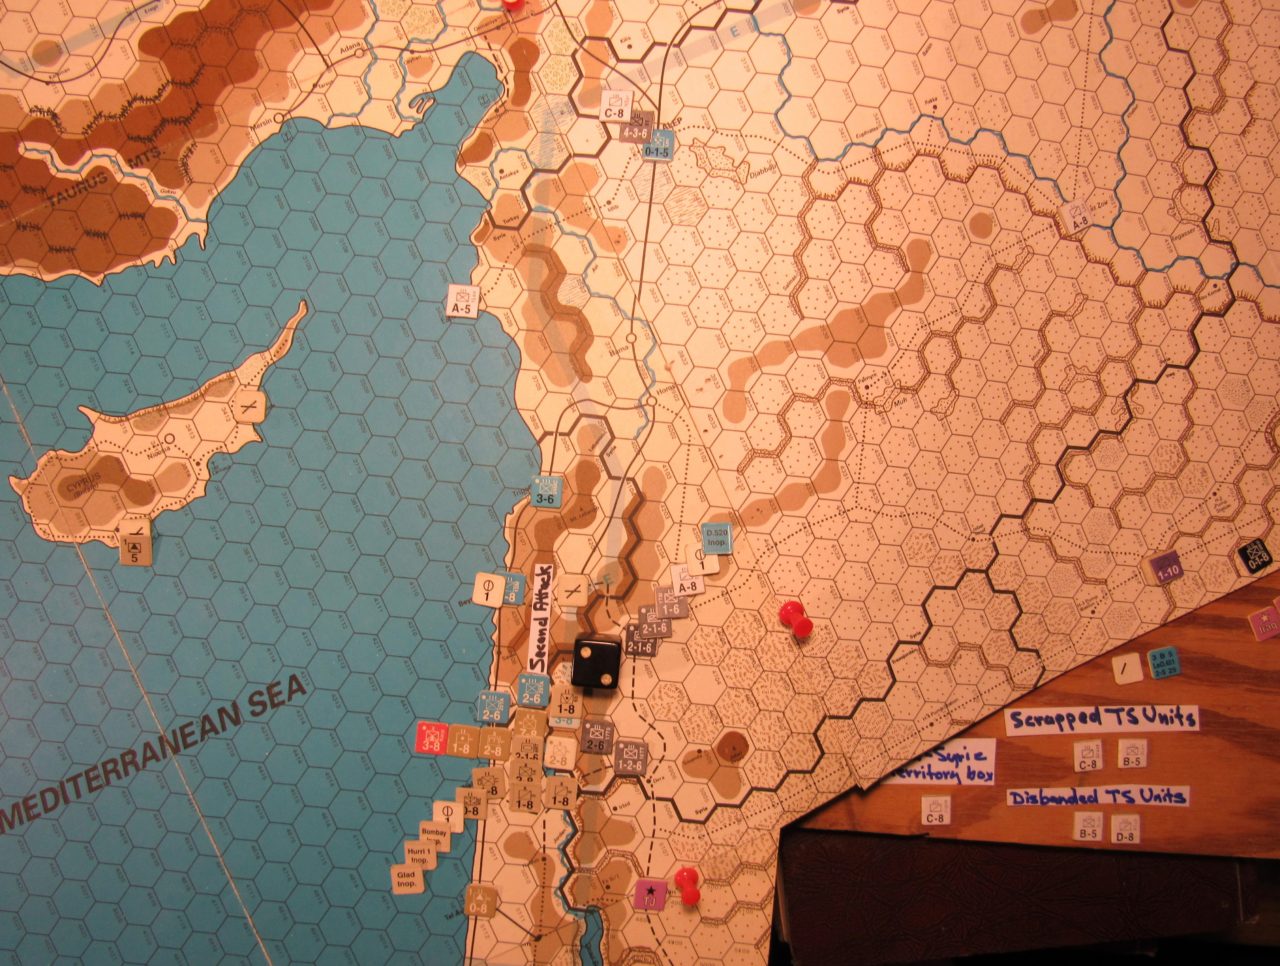
Jun I 41 Allied Combat Phase action: the Second Attack in the Vichy French Levant
The third Allied attack is at Sour, at Lebanese clear terrain coast hex 20A:4509, containing the Vichy French 2-8* Inf III 22 TA. This French unit is attacked from southwards hex 20A:4609, just inside Palestine, containing the 2-8 Eng X 1 (Aus), the 1-8 Art II 1 (Aus), and the 3-8* Mtn X Carp (Pol). Two Br Blen 4 B types and the Br A-22 A type air units fly the GS air mission to the target hex. The two Blen 4 air units began the turn at 19A:1418, in Egypt, and staged to the Cairo partial city hex. The A-22 air unit began the turn at Matruh and staged to Mansura, in the Delta zone. The Allies attack with a total of 10 attack factors to the Vichy French 2 defense factors for a straight up 5 to 1 and roll another 3: DR, which in this case is good enough for a DE, due to the Aus inf XX’s encroaching ZOC. And so the Vichy French ground unit is eliminated. At the end of the C. Phase one of the Blen 4 air units rebases at Tel Aviv, along with the A-22 air unit; the other Blen 4 air unit rebases at Alexandria.
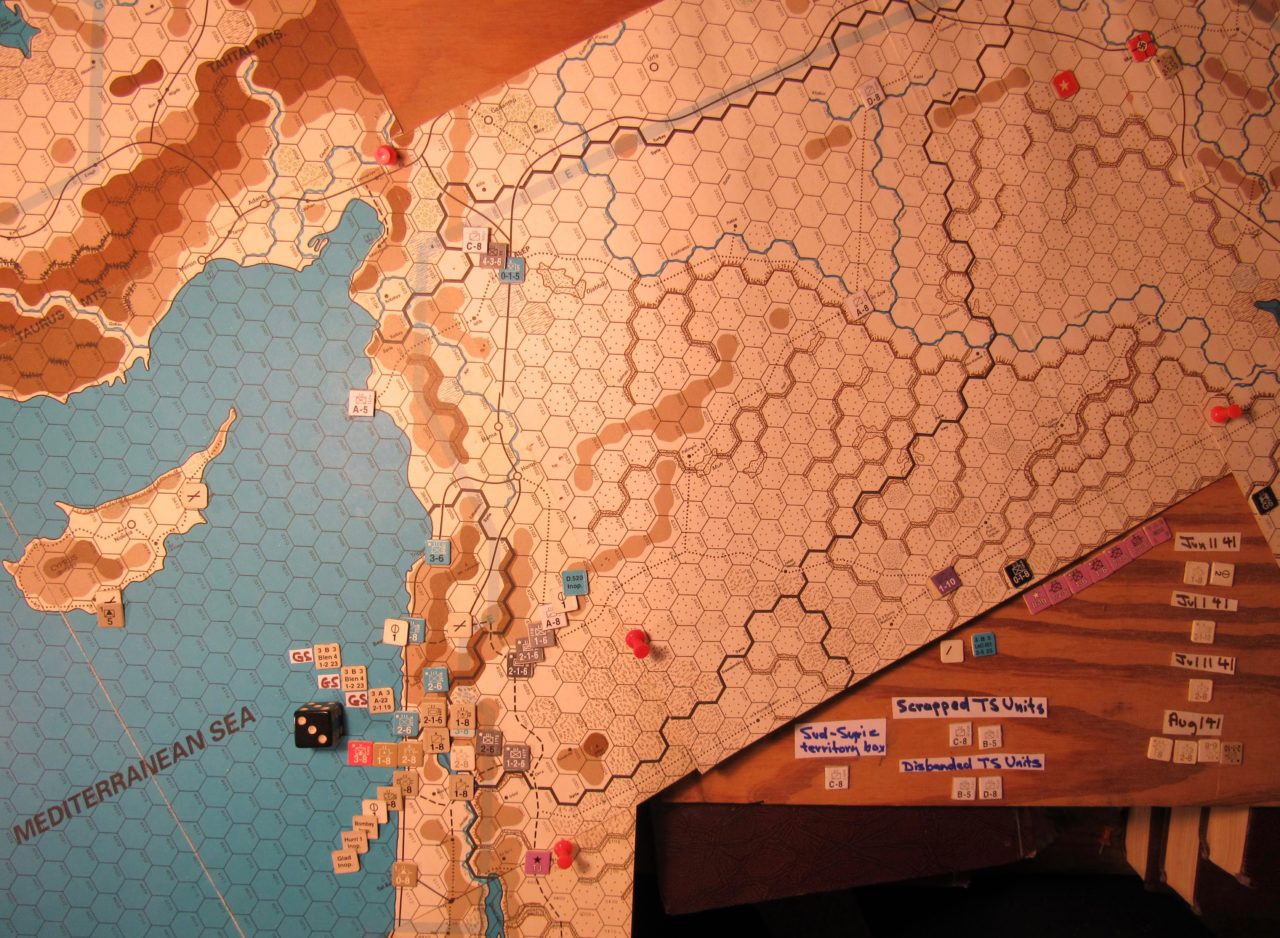
Jun I 41 Allied Combat Phase action: the Third Attack in the Vichy French Levant
Late in the E. Phase the Br Well 1C NB type air unit based at Matruh flies a strat port bombing air mission to the Axis-owned Porto Bardiya hex, just inside Libya, and scores a hit, jacking the Port Damage hit marker there to a 3. Afterwards it returns to base at Matruh.
Near the end of the E. Phase the Allied player destroys the step of attack supply at the Suda Bay hex, on Crete.
Near the end of the E. Phase the Ger LW Me 109E 7F5 type air unit based in Sicily air transfers to the Axis temporary airfield at 18A:4718, SW of Allied-held Tobruch. The operative SAAF Hurri 5F5 type air unit based at adjacent Tobruch declines to patrol or intercept, opting to fight another day. Then the Br Glad air unit based at Haifa flies the air transfer mission to the reference city airbase at Nicosia, on Cyprus. At the end of the E. Phase the two SE Command Axis air units on CAP missions over Crete and Scarpanto hexes return to their respective bases.
At the end of the turn Allies have the following accumulated replacements: 10.5 Br inf, 2.5 Br arm, 0 Br ARPs, 3.5 Aus, and 3.5 NZ RPs. All items are stored at the Alexandria hex.
Commentary
In the May II 41 Allied Turn EA game report, at the Special Assault on Crete Segment May II 41 Allied turn Set-up, under the Crete heading, some of the initial 1941 ME/ER-II/Crete Scenario draft rules provisions were laid out regarding playing the Crete segment. In conformance with the Assault on Crete Scenario Allied OB stipulations found in the WW OB booklet, on p. 7, the three at-start Greek static Xs are placed “one unit in each standard port [hex] on the island of Crete.” Here is the revised updated text of the Scenario’s draft rules for the three at-start Greek static Xs and the Br 0-2-0 Hv AA X NMBDO (RM) unit, all at Crete: “These three Greek static Xs must remain in their Crete standard port hexes until either a particular Greek static X moves out of its standard port hex due to an Enemy Reaction movement (WW Rule 33B) or if the particular Greek static X is pushed/moved out of its standard port hex due to movement in a C. Phase. Thereafter it may move as it pleases.” Furthermore, “the 0-2-0 Hv AA X NMBDO (RM) must remain in the Suda Bay hex 18A:4503/15B:2113, as it cannot move or be sea transported out. It is eliminated if required to move out of the hex due to combat. It may be disbanded in an Allied Initial Phase, but this gains the Axis VPs, per the WW Common Victory Chart.” And finally, “if there are no British forces (per WW Rule 3B2) on Crete in an Axis Initial Phase, then any remaining Greek static Xs surrender at the very beginning of step 4, thereby enabling the Axis to then cease operations in the Balkans, per WW Rule 3E5b.” What do you think?
The above rules text appears to be the only practicable way to enable the Axis player to execute a historical cessation of operations in the Balkans in either the WW Assault on Crete Scenario or the 1941 ME/ER-II/Crete Scenario, on the “historical” Jun I 41 Axis turn, per WW Rule 3E5a. This Europa war gamer was so sure of this that he made an alternate text disbanding the Br 0-2-0 hv AA X at Crete on this Jun I 41 Allied turn, along with the pictures, but later it was decided to make things a little tough for both sides by delaying the fall of Crete a turn by keeping the Br 0-2-0 Hv AA X NMBDO (RM) at the Suda Bay hex, along with the three Greek static Xs also on the island. I say “tough for both sides” because the Allied player wants the provisions of WW Rule 3E5b kicked in as soon as possible, too, so he can sooner rebuild the Allied ground units currently in the Balkan Command Replacement Pool. In Scenario game terms the Axis player wants the same WW Rule provisions kicked in so he can sooner do the Ger LW air unit conversions and transfers back to the Western Desert.
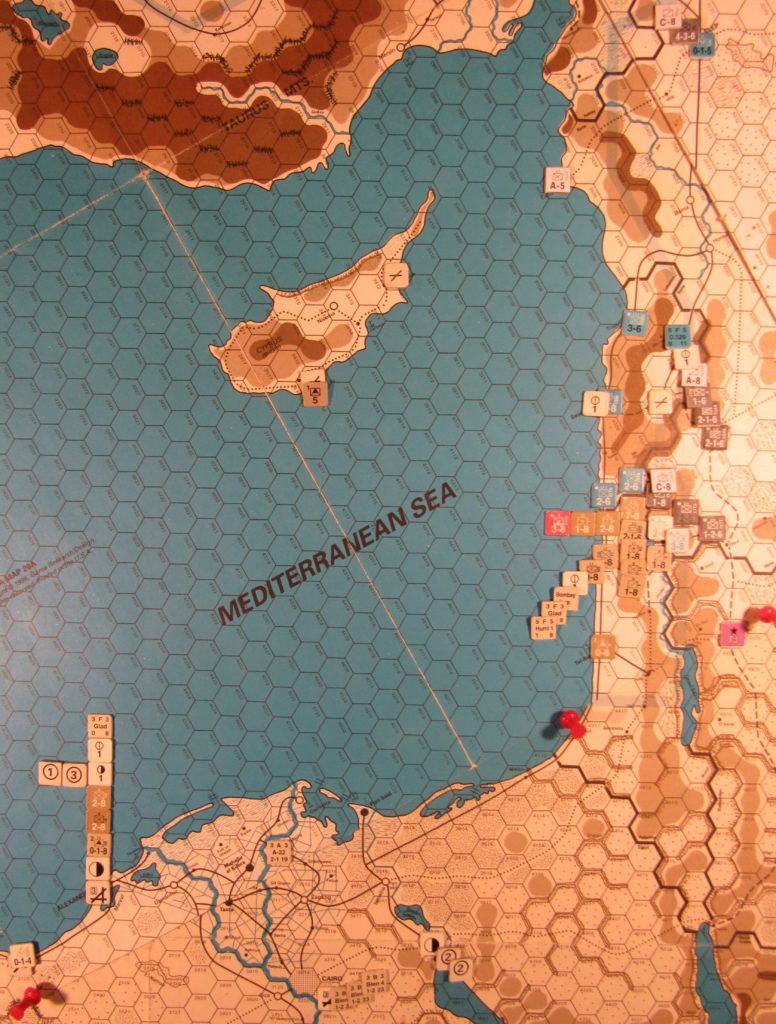
A careful look given at this turn’s Allied invasion of the Vichy French Levant certainly reveals both the far greater than historical amount of Allied forces being used this turn in their initial assault on the Vichy French colony and the corresponding patent weakness of the Western Desert Force, now just a thin weak line beginning at Matruh, going one hex south to Siwa road hex 19A:1219, and then abruptly dog-legging SE to the Qattara Depression, ending at 19A:1621. This given is no accident, and we need to understand that the enabler of this convenient Allied strategic trick is WW Advanced Rule 14Ag-Road Construction, aka the Tobruch Bypass proviso, also found in Watson’s ER-II Europa battle scenario. Currently the road element of the Axis supply line back to Tripoli, Libya (18A:0121) ends at coast road hex 18A:4718, SW of Allied-controlled Tobruch (18A:4817). Overland it can go eastwards 7 hexes to Halfaya Pass (19A:0419)-19A:0420-19A:0421, and this pretty much stops the Axis eastwards advance dead in its tracks at Tobruch, for the time being. So far I believe this to be a fitting historical Axis chain-hobble at this particular Jun I 41 game turn date. What do you think?
Another “given” in the several Europa Middle East Scenario games is the Variable Iraqi Coup Collapse Table’s +5 modifier “if this is the first turn (only) that a supported Allied unit is adjacent to an Iraqi-owned Baghdad” (see the Wavell’s War Errata-28 October 2005 addendum). So far I believe this to be a wise rule, but it’s tempting to fiddle with it. What do you think?
Finally, in the 1941 ME/ER-II/Crete Scenario there could be some tweaking done to the operational areas of the Axis SE Command forces included in its special Assault on Crete segment, which currently operate exclusively on Map 15B, Crete, the Dodecanese, and the Aegean/Adriatic Sea hexes. Thus for now at least it appears we virtually comply with WW Rules 3E4, 3E2, and 3E1, except that we do also include the Mediterranean Sea hexes on maps 18A & 19A in range of the SE Command Axis Naval Patrol and maybe a few possible directly related air missions, ie., escort of the SE Command Naval Patrol air missions. In the Scenario the SE Command operational area should probably also include Cyprus, and the current Allied turn is somewhat set up for this potential threat. Also, Axis air units might ought to be allowed to do certain bombing air missions at target hexes in Libya, Egypt, Palestine, and the Vichy French Levant, if the Axis air units return to base in the SE Command. But the WW Balkan Victory Chart Axis Victory Point Schedule is too generous to the Axis player in waiting until the Jul II 41 Axis Initial Phase before he begins to lose -5 VPs per Axis turn if he “has not ceased operations in the Balkans,” at least in the context of the 1941 ME/ER-II/Crete Scenario. Setting aside for now the careful explanations, this VP penalty may be suitable/applicable for WW Desert and the Balkan or Balkan Campaign Scenarios using essentially the WW rules as written. But I think in the new Scenario, with the provisions mentioned above in the commentary, the demands of Barbarossa can come again into the fore of Axis June 1941 grand strategy, just as apparently historical, and in the new Scenario a telling VP penalty could be implemented beginning even on the Jun I (historical) turn, or the Jun II 41 turn at the latest, compelling the Axis player to send forthwith practically everything in his command to the Soviet border, because evidently Victory in the world war will be decided on the steppes of Russia.